
Pattern Description:
The Ela Peplum Top (MDF420) is a close-fitted women’s garment available in sizes 00-32. It features a structured bodice with front and back panels, a flared peplum hem, and optional flaps for styling.
Designed with lining pieces included, it offers a polished finish, suitable for both casual and formal wear.
Materials Needed & Measurements:
- Fabric Recommendation: Suiting, twill, or plaid (medium-weight woven fabrics).
- Lining Fabric: Required for all bodice and peplum sections.
- Body Measurements: Bust 31-59.5″, Waist 23-51.5″, Hips 34-65.5″ (sizes 00-32).
- Finished Garment Bust: 30.5-59″.
- Seam Allowance: ½” included unless otherwise noted.
Preparing the Patterns
- Print and Assemble: Print the pattern at actual size. Check the test square to ensure accuracy. Assemble the sheets using either the trimless overlap or trimmed matching method.
- Cutting Fabric: Cut all fabric and lining pieces according to the instructions. For mirrored pieces, ensure fabric is folded or cut in pairs.
- Ela Top pieces include: upper bodice front and back sections, lower peplum panels, side panels, and optional flaps.
- Ava Skirt pieces include: skirt front, skirt back, waistband, and facings.
- Marking: Transfer all notches, darts, and grainlines onto the fabric. This ensures correct alignment during sewing.
Sewing the Ela Peplum Top
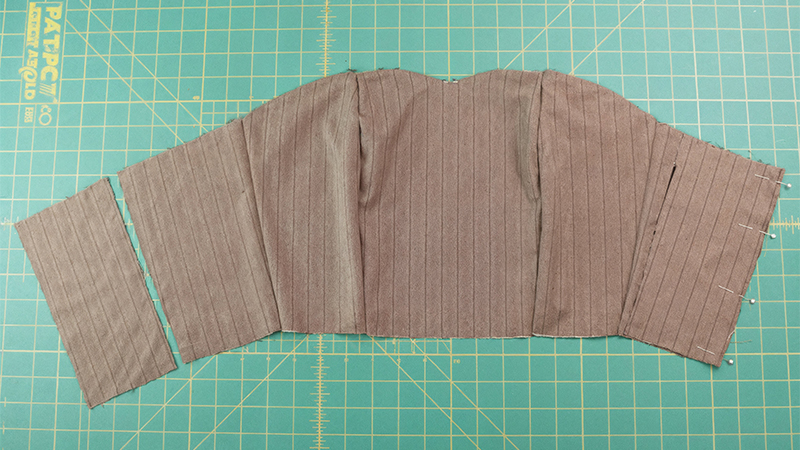
Step 1: Constructing the Bodice
- Join the upper front center to the side front panels, matching notches.
- Attach the upper back center pieces to the side back panels.
- Sew shoulder seams, then side seams, pressing them open for a clean finish.
Step 2: Adding the Lining
- Repeat the same construction steps with lining pieces.
- Place lining and bodice right sides together, sewing along the neckline and armholes.
- Clip curves and understitch for a crisp edge, then turn right side out.
Step 3: Assembling the Peplum
- Sew the lower front center to lower side panels, then attach to the back pieces.
- Repeat with lining if using.
- Attach the peplum to the bodice, ensuring even distribution of seams.
Step 4: Optional Flaps
- Sew flap pieces right sides together, turn, and press.
- Insert flaps between bodice and peplum seams for a decorative touch.
Step 5: Finishing
- Insert zipper at the back.
- Press thoroughly, ensuring seams lay flat.
- Hem the peplum lining and fabric for a neat finish.
Sewing the Ava Mini Skirt
Step 1: Shaping the Skirt
- Sew darts on the front and back panels. Press darts toward the center for structure.
- Join side seams and press open.
Step 2: Adding the Waistband
- Interface the waistband for stability.
- Sew waistband to the skirt top edge, right sides together.
- Fold waistband inside, press, and topstitch for a polished finish.
Step 3: Installing the Zipper
- Insert an invisible zipper into the back seam.
- Sew the remaining back seam below the zipper, ensuring smooth alignment.
Step 4: Hemming
- Fold hem allowance, press, and stitch. Choose a narrow hem for a modern finish.
Final Touches
- Fit Check: Try on both garments to check comfort and fit. Make adjustments to darts or seams as necessary.
- Pressing: Press all seams for a professional look.
- Styling: Pair the fitted Ava Mini Skirt with the structured yet flared Ela Top for a chic outfit. The combination balances sleek lines with volume, offering a flattering silhouette.
Download Free PDF:


