Quilt Description:
This is a very easy, beginner-friendly, lap-sized quilt measuring 50″ × 60″. It can be assembled quickly using just one jelly roll (2.5″ strips) and 1.5 yards of a coordinating solid fabric.
The quilt is built from 10″ × 10″ blocks, which are created by sewing simple strip sets of patterned and solid strips.
The block method makes the project more manageable and allows for flexible layout options.
Estimated Time and Skill Level:
- Skill Level: Beginner.
- Time to Complete: A few hours to a weekend, depending on experience.
Materials Needed & Measurements:
- Precut Fabric: 1 Jelly Roll / Rolie Polie (e.g., Kiss Me, Kate Jelly Roll)
- Solid Fabric: 1.5 yards coordinating solid cotton (off-white recommended)
- Rotary Tools: Rotary cutter, mat, ruler
- Backing & Batting: As needed for 50″ × 60″ quilt
- Binding: Extra jelly roll strips (cut to ~22″ each)
Instructions for Making the Free Jelly Roll Strip Quilt:
Cutting Requirements:
- Patterned Strips: 75 strips, cut from jelly roll pieces, each measuring 2.5″ x 10.5″.
- Solid Strips: 75 strips, cut from solid fabric, each measuring 2.5″ x 10.5″.
- Binding: Jelly roll strips cut approximately 22″ long each and pieced together.
- Finished Block Size: 10″ x 10″.
- Total Blocks: 30 (15 of each block type).
- Final Quilt Size: 50″ by 60″.
Preparation:
- Sorting the Jelly Roll: Begin by unrolling your jelly roll and examining the fabrics. Set aside any strips that are too light in value (especially if they blend too much with your chosen solid fabric). Aim for a strong contrast between patterned and solid strips for maximum visual impact.
- Cutting the Strips:
- Cut 75 patterned strips from the jelly roll to a length of 10.5″.
- Cut 75 solid strips (from the 1.5 yards of fabric) also to 2.5″ x 10.5″. Use a rotary cutter and ruler for accuracy, precise cutting ensures easier block assembly later.
Block Construction:
The quilt consists of two block variations, each made up of five strips sewn together in a strip set.
- Block 1 (Solid-Start Block): Arrangement = solid / patterned / solid / patterned / solid. This block begins and ends with solid strips, framing the patterned fabric.
- Block 2 (Patterned-Start Block): Arrangement = pattern / solid / pattern / solid / pattern. This block begins and ends with patterned strips, creating the opposite effect.
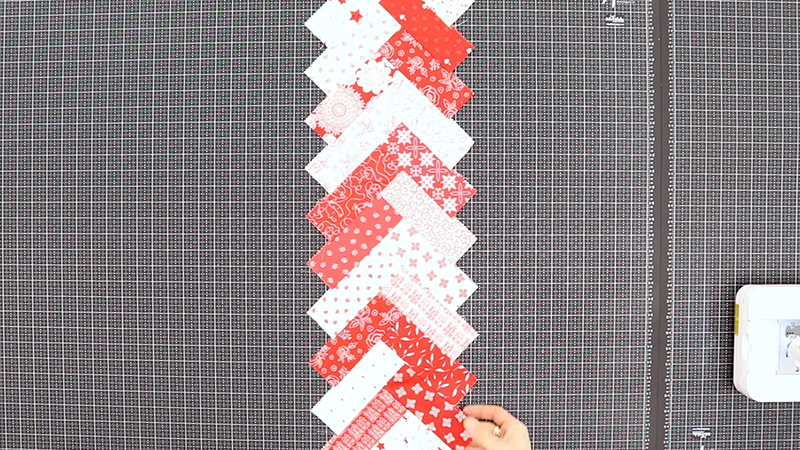
Sewing the Blocks
- Lay out five strips in the correct sequence for either Block 1 or Block 2.
- Sew the strips together along the long edges, using a ¼″ seam allowance.
- Press seams to one side, alternating directions with each block to reduce bulk.
- Square up the block to 10″ x 10″.
- Repeat this process until you have 15 blocks of each type (30 blocks total).
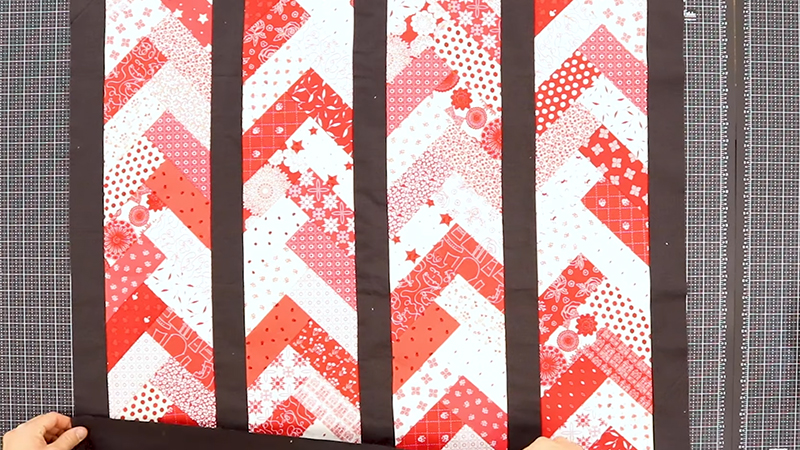
Quilt Assembly and Layout
Once the blocks are completed, it’s time to assemble the quilt top.
- Arrange Blocks in Rows: The quilt top is five blocks wide and six blocks tall. Each row contains five blocks, alternating between Block 1 and Block 2. For example:
- Row 1: Block 1, Block 2, Block 1, Block 2, Block 1.
- Row 2: Block 2, Block 1, Block 2, Block 1, Block 2.
- This alternating arrangement creates the checkerboard effect.
- Join the Rows: Sew the five blocks in each row together. Press the seams between blocks in one direction for odd rows and the opposite direction for even rows. This will allow the seams to “nest” neatly when rows are sewn together.
- Sew Rows Together: Align and pin each row carefully, then stitch rows together to form the full quilt top.
Quilting and Binding
- Preparing the Quilt Sandwich:
- Lay your backing fabric right side down.
- Place the batting on top.
- Lay the quilt top right side up.
- Smooth each layer and secure with safety pins or basting spray.
Quilting Suggestions
Because the strip design is bold and linear, almost any quilting style works well. Options include:
- Straight-line quilting along the seams for a minimalist look.
- Wavy or squiggly quilting to add movement.
- Free-motion designs such as loops or swirls.
If you have access to a longarm machine, this quilt is a great candidate for edge-to-edge designs.
Binding
- Use leftover jelly roll strips for a scrappy binding.
- Cut strips into 22″ lengths and sew them together end-to-end at a 45-degree angle to create one continuous strip.
- Fold the strip in half lengthwise, press, and attach it around the quilt edges using your preferred binding method.
Final Quilt Size
When finished, the quilt measures 50″ x 60″. Its lap size makes it versatile, perfect for snuggling, travel, or as a thoughtful handmade gift.
Why This Quilt Works
The beauty of this pattern lies in its simplicity and efficiency:
- Using precut jelly rolls eliminates much of the cutting work.
- Sewing in block units keeps the process approachable.
- The alternating strip blocks create visual rhythm with minimal effort.
- The design is flexible, change the solid fabric color or jelly roll theme to make seasonal quilts, baby quilts, or holiday gifts.
Even beginners can feel confident tackling this project, while more experienced quilters can enjoy the speed and playfulness of working with precuts.