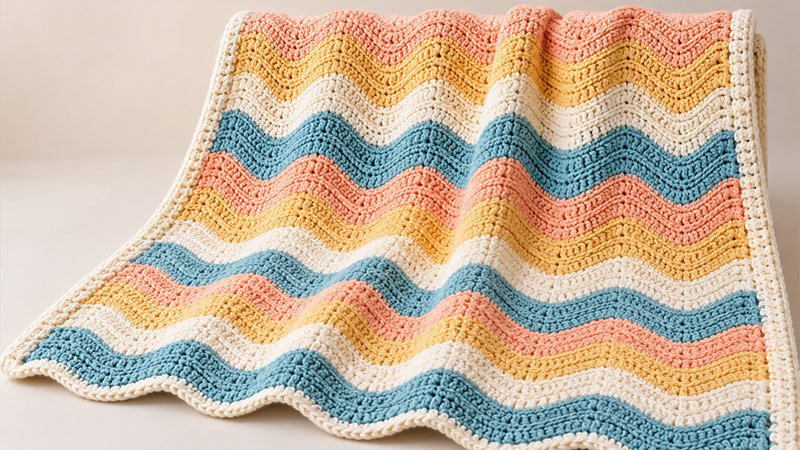
Make a soft throw with smooth waves and wide bands of color. The Sunrise Shore Ripple Throw uses peach, soft gold, cream, and sea blue.
Simple single crochet stitches make the main fabric. Easy increases and decreases form each wave. Work back and forth in rows to make the throw.
When the main part is done, add a neat finish to both side edges. The pattern gives clear row steps, stitch counts, color changes, and tips to help you change the size.
Materials
- Yarn: Use worsted-weight yarn, category #4. Pick four shades from the same yarn range.
- Estimated yarn amount: About 1,800–2,200 yards in all. This includes yarn for the side edges.
- Color A: Soft peach, about 450–550 yards.
- Color B: Pale gold, about 450–550 yards.
- Color C: Cream, about 450–550 yards.
- Color D: Sea blue, about 450–550 yards.
- Crochet hook: Use 5.0 mm (US H/8). Or use the size that meets gauge.
- Stitch markers: Ten can help mark the wave peaks.
- Yarn needle: Use this to weave in ends.
- Scissors.
- Measuring tape.
These yarn amounts are rough guides. Make a swatch to check your gauge and yarn use. Do this before you buy the full amount.
Gauge
Target gauge: 15 sts and 16 rows = approximately 4 × 4 inches in the ripple pattern once washed and dried.
Check the width across a few full waves. Let the cloth rest flat. Do not stretch the waves straight. Count each sc2tog as one full st.
To make a swatch:
- With Color A, ch 46.
- Work Row 1 below. Repeat the part in brackets 3 times, not 10.
- Keep working Row 2 until you have 24 rows.
- Wash and dry as shown on the yarn label.
- Check the gauge away from the edges.
The swatch has 45 sts per row.
If you have too many sts across the width, try a larger hook. If you have too few, try a smaller hook.
Finished Measurements:
Planned size: About 40 inches wide × 48 inches long. This does not include the narrow side edging.
The top and bottom edges keep their waves. To check the length, start at a point on the first edge. Measure to the same point on the last edge.
This is a new design. It has not been tested. Make a full sample to check the final size and how much yarn it needs.
Notes
- This pattern uses US crochet terms.
- Work back and forth in rows.
- Turn at the end of each row.
- The turning ch does not count as a st.
- Work through both top loops unless told otherwise.
- Each row has 150 sts.
- Each row has 10 wave repeats.
- Each repeat uses 15 sts from the last row. It makes 15 new sts.
- Work 3 sc in one st at each peak.
- Work sc2tog at the start and end of each repeat.
- Where two repeats meet, two sc2tog groups sit side by side. They form a valley.
- Do not skip sts between repeats.
- Keep the starting chain loose.
- Add the side edging once the main panel is done.
- Both sides look the same. Use either side as the front.
Abbreviations
- ch: Chain.
- sc: Single crochet.
- sc2tog: Single crochet two stitches together.
- sl st: Slip stitch.
- st / sts: Stitch / stitches.
- yo: Yarn over.
- rep: Repeat.
Single crochet — sc
Put the hook into the stated st. Yo and pull up a loop. Yo and pull through both loops.
Single crochet two together — sc2tog
- Put the hook into the next st.
- Yo and pull up a loop.
- Put the hook into the st after that.
- Yo and pull up a loop. You now have 3 loops on the hook.
- Yo and pull through all 3 loops.
This uses 2 sts and makes 1 st.
Peak increase — 3 sc in one st
Work 3 sc into the same st. Make each sc on its own. This uses 1 st and makes 3 sts.
Pattern Instructions
Step 1: Make the Starting Chain
With Color A, ch 151.
Keep the chains loose and even. If your chains tend to be tight, use a hook one size larger. Use it to make the chain. Switch back to your main hook before Row 1.
Step 2: Work the First Ripple Row
Row 1:
Start in the second ch from the hook.
[Sc2tog over the next 2 ch. Sc in the next 5 ch. Work 3 sc in the next ch. Sc in the next 5 ch. Sc2tog over the next 2 ch.]
Work this set 10 times.
Turn.
Count: 150 sts.
The first skipped ch does not count as a st.
Each set makes:
- 1 st from the first sc2tog.
- 5 sc.
- 3 sc at the peak.
- 5 sc.
- 1 st from the last sc2tog.
Total: 15 sts per repeat.
Mark the middle sc of each 3-sc peak. You should have 10 marked peaks.
Step 3: Work the Main Repeat Row
Row 2:
Ch 1.
[Sc2tog over the next 2 sts, sc in the next 5 sts, 3 sc in the next st, sc in the next 5 sts, sc2tog over the next 2 sts] 10 times.
Turn.
Count: 150 sts.
Work the 3 sc into the middle sc of the peak from the last row.
Move each marker to the middle sc of the new peak.
At each valley, work the last sc2tog of one repeat. Then work the first sc2tog of the next repeat.
Do not add a ch or skip a st between them.
Step 4: Complete the First Color Band
Rows 3–8: Rep Row 2 with Color A.
After Row 8, the peach band has 8 rows.
Check that:
- Each row has 150 sts.
- Each row has 10 peaks.
- The peaks line up.
- The start edge lies flat. It does not pull inward.
Step 5: Change Colors
Change yarn on the last sc2tog of the row.
- Use the old yarn. Pull up a loop in each of the last 2 sts.
- Keep 3 loops on the hook. Yo with the new color.
- Pull the new color through all 3 loops.
- Turn. Ch 1 with the new color.
Cut the old yarn. Leave a tail of about 6 inches to weave in.
Keep the join loose so the side edge does not pull in.
Step 6: Work the Color Sequence
Rep Row 2 throughout. Change colors every 8 rows.
| Rows | Color |
|---|---|
| 1–8 | A — Soft peach |
| 9–16 | B — Pale gold |
| 17–24 | C — Cream |
| 25–32 | D — Sea blue |
These four bands make one 32-row color cycle.
Rows 33–192: Rep the same color cycle 5 more times.
You will have:
- 192 rows in total.
- 24 color bands.
- 6 complete color cycles.
- 150 sts in every row.
The final band, Rows 185–192, uses Color D.
After Row 192, fasten off. Leave a tail of about 6 inches.
Step 7: Check the Main Panel
Lay the throw flat before adding the edging.
Smooth the fabric gently with your hands. Let the waves keep their shape.
Check the side edges for tight joins. If a yarn tail pulls on the edge, loosen that join before weaving it in.
At the target gauge, the panel should be approximately 40 × 48 inches.
Step 8: Add the First Side Edging
Use Color C for a simple cream finish.
With your chosen front facing you, join Color C at the lower end of one long side.
Side edging:
- Ch 1.
- Work 1 sc into the end of each row along the side.
- After the last row end, fasten off.
Starting count: 192 sc.
Spread the stitches evenly along the edge. Work into the row-end fabric, rather than around loose yarn tails.
Lay the edge flat as you work:
- If it pulls inward, add an extra sc at evenly spaced points.
- If it forms ruffles, work fewer sc at evenly spaced points.
The row-end count is a starting guide. A flat edge matters more than a fixed edging count.
Step 9: Finish the Second Side
Keep the same front facing you. Join Color C at the top of the other long side.
Ch 1. Work sc down this side. Use the same stitch placement as the first edge.
Fasten off.
Leave the top and bottom edges bare. This keeps their wave shape clear.
Step 10: Weave In the Ends
Thread each tail onto a yarn needle.
Weave it through several stitches on the back. Change direction and pass through a few more stitches before trimming.
Do not pull the tails tight. The fabric should stay soft and lie flat.
Step 11: Wash and Shape
Wash the throw as directed on the yarn label.
Lay it flat to dry. Gently smooth the side edges and arrange the waves into an even shape.
Avoid stretching the fabric. Let it dry fully before folding or using it.
How to Change the Width?
Add or cut starting chains in groups of 15.
Use this rule:
Starting chain = (15 × number of wave repeats) + 1.
For example:
- 8 repeats: Ch 121. Work 120 sts per row.
- 10 repeats: Ch 151. Work 150 sts per row.
- 12 repeats: Ch 181. Work 180 sts per row.
At the target gauge, each wave adds about 4 inches in width.
Match the bracketed repeats to your starting chain. Use this same count in each row.
How to Change the Length?
Repeat Row 2 to add or remove rows.
For full color bands, add or remove 8 rows at a time. Each band adds about 2 inches at the target gauge.
For full four-color cycles, add or remove 32 rows at a time. Each cycle adds about 8 inches.
Change the amount of yarn to suit the new width or length.