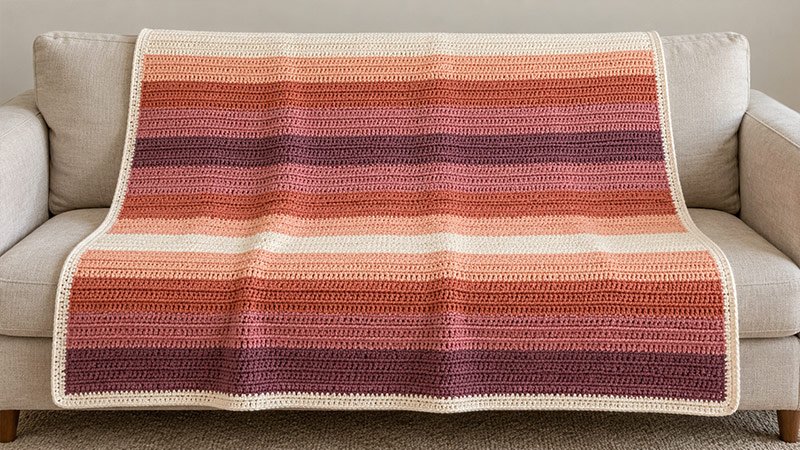
The Sunset Stripes Crochet Blanket has wide bands of color. The shades are cream, peach, clay, dusty rose, and muted plum. Use half double crochet to make the throw. Rows worked in the back loop add soft ridges. A cream border frames the throw.
Work in one piece from the bottom up. Each stripe has 12 rows. Learn the first two rows. Then repeat the same row. Change colors as shown.
Skill Level
Easy.
You should know how to chain, work half double crochet and single crochet, change colors, and weave in ends.
Size
- Main blanket: About 41 × 52 inches.
- With border: About 43 × 54 inches, or 109 × 137 cm.
- Stitches per main row: 144 hdc.
- Main rows: 156.
- Stripes: 13, with 12 rows in each stripe.
The border adds about 1 inch to each edge. Its width may vary with your tension.
Materials
- Yarn: Worsted weight, Category 4.
- Color A — Cream: About 500 yards. This includes the border.
- Color B — Peach: About 400 yards.
- Color C — Clay: About 400 yards.
- Color D — Dusty rose: About 400 yards.
- Color E — Muted plum: About 300 yards.
- Total yarn: About 2,000 yards.
- Hook: US I/9, 5.5 mm. Use the size you need to meet gauge.
- Yarn needle.
- Scissors.
- Measuring tape.
- Stitch markers.
Use yarns of the same weight. Choose yarns with much the same fiber content. All five colors should need the same care.
Abbreviations
Use US crochet terms.
| Abbreviation | Meaning |
|---|---|
| ch | Chain |
| st / sts | Stitch / stitches |
| hdc | Half double crochet |
| sc | Single crochet |
| sl st | Slip stitch |
| BLO | Back loop only |
| rep | Repeat |
| rnd | Round |
| RS | Right side |
| WS | Wrong side |
Half Double Crochet — Hdc
- Yarn over.
- Insert the hook into the stated ch or st.
- Yarn over and pull up a loop. You have three loops.
- Yarn over and pull through all three loops.
Single Crochet — Sc
- Insert the hook into the stated st.
- Yarn over and pull up a loop.
- Yarn over and pull through both loops.
Back Loop Only — BLO
Find the two loops that form a V at the top of the stitch. Work into the loop farthest from you as you hold the current row.
Gauge
14 hdc × 12 rows = 4 × 4 inches, measured in the back-loop stitch pattern after washing and drying.
Make a Gauge Swatch
- Ch 26.
- Hdc in the third ch from the hook and in each ch across. Turn. 24 hdc.
- Ch 2. Hdc in BLO of each st across. Turn. 24 hdc.
- Rep Step 3 until you have at least 20 rows.
- Wash and dry the swatch as directed on the yarn label.
- Lay it flat without stretching.
- Count sts and rows within a central 4-inch square.
If you have more than 14 sts in 4 inches, try a larger hook. If you have fewer than 14 sts, try a smaller hook. Check the row gauge too.
Adjust the Size
Change the Width
You can use any whole stitch count.
- Choose the width of the main piece. Leave out the border.
- At the stated gauge, multiply the width in inches by 3.5.
- Round to a whole number. This is your hdc count.
- Add two chains to get your starting chain count.
Example: For a main width of about 48 inches, use 168 hdc. Start with ch 170. Add a 1-inch border on each side. The full width will be about 50 inches.
If your gauge is not the same, use your own stitch count per inch.
Change the Length
At the stated gauge, each 12-row stripe is about 4 inches tall.
- Add one full stripe for about 4 more inches.
- Leave out one full stripe for about 4 fewer inches.
- Allow about 2 more inches for the top and bottom border.
To change the stripe depth, choose its depth in inches. Multiply this by your row count per inch. Use an even row count. This keeps all color changes on the same side.
Buy more yarn if you make a larger blanket.
Pattern Notes
- Work the main blanket flat in rows.
- Turn at the end of each row.
- Ch 2 does not count as a st.
- Work Row 1 in the foundation chains.
- Work all main rows after Row 1 in BLO. This includes the first and last sts.
- Each main row has 144 hdc.
- Each stripe has 12 rows.
- The main blanket has 156 rows.
- Change colors on the last pull-through of the last hdc.
- Leave an 8-inch tail when you join or cut yarn.
- Work border sts through both loops where st tops are present.
- Border ch 1 does not count as a st.
- Join each border rnd with a sl st.
- Do not turn between border rnds.
- Choose the face you like best. Mark it as the RS before you add the border.
Blanket Pattern Instructions
Step 1: Foundation Chain
With A, ch 146.
Keep the chain relaxed. If it feels tight, use a hook one size larger for the chain. Switch back to the main hook for Row 1.
Step 2: Row 1
- Hdc in the third ch from the hook.
- Hdc in each remaining ch across.
- Turn.
Count: 144 hdc.
The two skipped chains do not count as a st.
Step 3: Row 2
- Ch 2.
- Hdc in BLO of the first st.
- Hdc in BLO of each remaining st across.
- Turn.
Count: 144 hdc.
Do not work into the turning ch.
Step 4: Finish the First Stripe
Rows 3–12: Rep Row 2 with A.
Change to B on the last pull-through of the final hdc in Row 12.
You now have one cream stripe with 12 rows.
Step 5: Change Colors
At the last hdc of a stripe:
- Yarn over with the old color.
- Place the hook in BLO of the last st.
- Yarn over with the old color. Pull up a loop.
- Keep three loops on the hook.
- Drop the old yarn on the WS.
- Yarn over with the new color.
- Pull it through all three loops.
- Cut the old yarn. Leave an 8-inch tail.
- Leave an 8-inch tail of the new yarn. Weave this in later.
- Turn. Use the new color for the next row.
The last st is part of the old stripe. Use the new color for ch 2 at the start of the next row.
Step 6: Work the Remaining Stripes
Rep Row 2 for every row. Follow this color order.
| Stripe | Rows | Color |
|---|---|---|
| 1 | 1–12 | A — Cream |
| 2 | 13–24 | B — Peach |
| 3 | 25–36 | C — Clay |
| 4 | 37–48 | D — Dusty rose |
| 5 | 49–60 | E — Muted plum |
| 6 | 61–72 | D — Dusty rose |
| 7 | 73–84 | C — Clay |
| 8 | 85–96 | B — Peach |
| 9 | 97–108 | A — Cream |
| 10 | 109–120 | B — Peach |
| 11 | 121–132 | C — Clay |
| 12 | 133–144 | D — Dusty rose |
| 13 | 145–156 | E — Muted plum |
Change colors at the end of each stripe.
After Row 156, fasten off. Leave an 8-inch tail.
Final main count: 144 hdc per row × 156 rows.
Step 7: Prepare for the Border
- Weave in the color-change tails on the WS.
- Check that the tails do not pull the edges inward.
- Lay the blanket flat.
- Mark all four corners.
- Place the RS facing up.
If the fabric needs blocking, follow the yarn label’s care directions. Let it dry before adding the border.
Step 8: Border Rnd 1
Lay the blanket with the RS up. Join A in the first st. Start at the right-hand end of the top edge.
- Ch 1. Work 3 sc in the same corner st.
- Sc in each of the next 142 sts across the top.
- Work 3 sc in the last top corner st.
- Work down the first side. Work 1 sc in each row end. This gives 156 side sc. Do not work in the corner stitch tops again.
- At the bottom corner, work 3 sc into the underside of the first foundation st.
- Sc into the underside of each of the next 142 foundation sts.
- Work 3 sc into the underside of the last foundation st.
- Work up the last side. Work 1 sc in each row end. This gives 156 side sc.
- Join with a sl st to the first sc.
Planned count: 608 sc.
Mark the middle sc in each 3-sc corner group.
Lay the blanket flat. Check the border. If a side pulls in, add a few sc. Space them out evenly. If a side waves, work a few less side sc. These changes will change the border stitch count.
Step 9: Border Rnds 2–4
Rnd 2:
- Ch 1.
- Sc in each st around.
- Work 3 sc in each marked corner st.
- Move each marker to the middle sc of the new corner group.
- Join with a sl st to the first sc.
Rnds 3–4: Rep Rnd 2.
Each rnd adds 8 sts, if no other changes are made.
| Border round | Planned stitch count |
|---|---|
| Rnd 1 | 608 sc |
| Rnd 2 | 616 sc |
| Rnd 3 | 624 sc |
| Rnd 4 | 632 sc |
After Rnd 4, fasten off. Leave an 8-inch tail.
Step 10: Finish
- Weave in all loose ends on the WS.
- Take out the stitch markers.
- Wash and dry as the yarn label says.
- If the yarn allows, shape the damp blanket. Use a clean, flat space.
- Smooth the edges and corners. Do not stretch them.
- Let it dry fully before use.
At the stated gauge, the blanket should be about 43 × 54 inches.