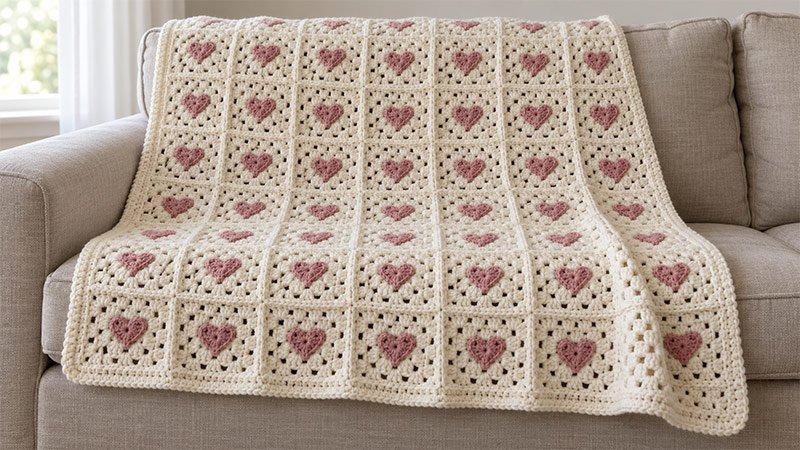
The Heart Granny Square Blanket pairs small crochet hearts with classic granny squares. Each square has open stitches. Sew a heart to the center of each square. Use one shade for all the hearts. Or use a few shades throughout the blanket.
Make each square on its own. Then join the squares in rows. Add a plain border to finish the blanket. Make each heart as a separate piece. This lets you check its shape with ease. You can then place it where you want.
These steps use US crochet terms. Yarn amounts and sizes are estimates. First, make one full square with its heart. Do this before you start the blanket.
Why You Like This Pattern
- Small squares are easy to carry and work on.
- The square uses a short repeat.
- Each heart needs just one round.
- You can use small amounts of yarn for the hearts.
- You can change the size by adding or removing squares.
- The sewn hearts let you choose how much raised detail to add.
Pattern Details
Skill Level
Confident beginner
You should know how to work chains, slip stitches, single crochet, double crochet, and treble crochet. You will also sew the hearts in place and join the squares.
Size
Each blocked square measures about 7 × 7 inches.
Make 48 squares. Arrange them in 6 columns and 8 rows.
- Before the border: about 42 × 56 inches
- With a border about 1 inch wide: about 44 × 58 inches
The joining seam, yarn, and your stitch tension may affect the size.
Materials
- Worsted-weight yarn, category #4: approximately 1,800–2,200 yards total
- A: About 1,550–1,850 yards for squares, joins, and border
- B: About 250–350 yards for hearts
- 5 mm crochet hook, or the size needed for a 7-inch square
- Yarn needle
- Scissors
- Stitch markers
- Tape measure
- Blocking mat and pins, if suited to your yarn
Use a washable yarn with good stitch definition. For example, use cream for A and rose for B.
Abbreviations
- ch: Chain
- sl st: Slip stitch
- sc: Single crochet
- dc: Double crochet
- tr: Treble crochet
- st / sts: Stitch / stitches
- sp / sps: Space / spaces
- rnd: Round
- rep: Repeat
- RS: Right side
- WS: Wrong side
- GC: Granny cluster: 3 dc in the same sp
Gauge
One five-round square = about 7 × 7 inches after blocking.
Make one square and measure it before making the rest.
- If it is too small, try a larger hook.
- If it is too large, try a smaller hook.
- Check that the fabric feels soft and the square lies flat.
Pattern Notes
- Work each square in joined rnds.
- Do not turn between rnds.
- The first ch 3 counts as 1 dc.
- Each GC has 3 dc.
- Work (3 dc, ch 2, 3 dc) in each corner.
- Use ch 1 between clusters on each side.
- Join each square rnd to the top of its first ch 3.
- Make each heart on its own. Then sew it to a square.
- Lay out the squares for the blanket. Keep all hearts facing the same way.
Stitch Explanations
Granny Cluster — GC
Work 3 dc in the same sp.
Corner
Work (3 dc, ch 2, 3 dc) in the same corner ch-2 sp.
The ch-2 sp forms the new corner.
Double Crochet — dc
- Yarn over.
- Insert the hook into the stated st or sp.
- Yarn over and pull up a loop.
- Yarn over and pull through 2 loops.
- Yarn over and pull through the last 2 loops.
Treble Crochet — tr
- Yarn over twice.
- Insert the hook into the stated st or sp.
- Yarn over and pull up a loop.
- Yarn over and pull through 2 loops.
- Yarn over and pull through 2 loops.
- Yarn over and pull through the last 2 loops.
Magic Ring
Make an adjustable yarn loop. Work the stated stitches into the loop, then pull the yarn tail to close it.
If you prefer, ch 4 and sl st in the first ch to form a ring. This may leave a small hole at the center.
Square Pattern Instructions
Make 48 Granny Squares
Use A.
Rnd 1: Make the Center
- Make a magic ring.
- Ch 3.
- Work 2 dc into the ring. This forms the first GC.
- Ch 2.
- Work (3 dc, ch 2) into the ring 3 times.
- Pull the ring closed.
- Sl st in the top of the starting ch 3.
Count: 4 GC, 12 dc, and 4 corner ch-2 sps.
Rnd 2: Form the Square
- Sl st in each of the next 2 dc.
- Sl st into the next corner ch-2 sp.
- Ch 3.
- Work (2 dc, ch 2, 3 dc) in the same corner sp.
- Ch 1.
- Work (3 dc, ch 2, 3 dc) in the next corner sp.
- Ch 1.
- Rep Steps 6–7 for the next 2 corners.
- Sl st in the top of the starting ch 3.
Count: 8 GC, 24 dc, 4 corner ch-2 sps, and 4 side ch-1 sps.
Rnd 3: Add One Side Cluster
- Sl st in each of the next 2 dc.
- Sl st into the next corner ch-2 sp.
- Ch 3.
- Work (2 dc, ch 2, 3 dc) in the same corner sp.
- Ch 1.
- Work 1 GC in the next side ch-1 sp.
- Ch 1.
- Work a corner in the next corner ch-2 sp.
- Ch 1.
- Work 1 GC in the next side ch-1 sp.
- Ch 1.
- Rep Steps 8–11 for the next 2 sides.
- Sl st in the top of the starting ch 3.
Count: 12 GC, 36 dc, 4 corner ch-2 sps, and 8 side ch-1 sps.
Rnd 4: Add Two Side Clusters
- Sl st in each of the next 2 dc.
- Sl st into the next corner ch-2 sp.
- Ch 3.
- Work (2 dc, ch 2, 3 dc) in the same corner sp.
- Work (ch 1, GC in the next side ch-1 sp) twice.
- Ch 1.
- Work a corner in the next corner ch-2 sp.
- Work (ch 1, GC in the next side ch-1 sp) twice.
- Ch 1.
- Rep Steps 7–9 for the next 2 sides.
- Sl st in the top of the starting ch 3.
Count: 16 GC, 48 dc, 4 corner ch-2 sps, and 12 side ch-1 sps.
Rnd 5: Finish the Square
- Sl st in each of the next 2 dc.
- Sl st into the next corner ch-2 sp.
- Ch 3.
- Work (2 dc, ch 2, 3 dc) in the same corner sp.
- Work (ch 1, GC in the next side ch-1 sp) 3 times.
- Ch 1.
- Work a corner in the next corner ch-2 sp.
- Work (ch 1, GC in the next side ch-1 sp) 3 times.
- Ch 1.
- Rep Steps 7–9 for the next 2 sides.
- Sl st in the top of the starting ch 3.
- Fasten off and weave in the ends.
Count: 20 GC, 60 dc, 4 corner ch-2 sps, and 16 side ch-1 sps.
Each finished side has 15 dc and 4 ch-1 sps, between the corner ch-2 sps.
Heart Pattern Instructions
Make 48 Hearts
Use B. Keep the stitches loose enough to form a smooth curve.
Heart Rnd
- Make a magic ring.
- Ch 3.
- Work 3 tr into the ring.
- Work 3 dc into the ring.
- Ch 1.
- Work 1 tr into the ring. This forms the lower point.
- Ch 1.
- Work 3 dc into the ring.
- Work 3 tr into the ring.
- Ch 3.
- Sl st into the ring.
- Pull the ring closed.
- Fasten off. Leave an 18-inch tail for sewing.
Count: 7 tr and 6 dc, plus the chains and closing sl st.
Shape the two top curves with your fingers. Ease the center tr downward to define the point. The heart should fit within the square with some granny stitches visible around it.
Sew a Heart to Each Square
- Block the square to about 7 × 7 inches. Follow the yarn label’s steps.
- Let it dry all the way.
- Lay the square with its RS up.
- Place one heart at the center.
- Aim the heart’s tip at the lower edge’s midpoint.
- Pin the heart in place. Do not stretch it.
- Thread the long heart tail through a yarn needle.
- Sew round the heart with small stitches. Catch the underside of its edge. Catch the square’s nearby stitches, too.
- Where the heart spans an open sp, sew to the nearest firm stitch.
- Add a few small stitches through the heart’s center. This helps keep it flat.
- Fasten the yarn on the WS. Weave in the tail.
Keep the stitches snug to hold the heart in place. Do not pull the square out of shape.
Join the Squares
Arrange the Blanket
- Lay out 6 squares across and 8 squares down.
- Check that each heart points toward the lower edge of the blanket.
- Move any colors around until you like the layout.
- Keep the squares in this order as you join them.
Sew the Squares Together
Use A and a yarn needle.
- Set 2 squares side by side. Keep the RS facing up.
- Cut yarn about 3 times the seam length.
- Fix the yarn at the first pair of corner sps.
- Match the dc sts. Whipstitch through their outer edge loops.
- At each pair of ch-1 sps, pass through both sps once.
- Keep the seam loose so the squares lie flat.
- Fix the yarn at the last pair of corner sps.
- Join all 6 squares to make one row.
- Make 8 rows this way.
- Sew the rows to each other. Match the square corners at each seam.
Weave in the join ends on the WS.
Blanket Border
Use A. Keep the RS facing you. Do not turn between border rnds.
Border Rnd 1
- Join A in an outer corner ch-2 sp.
- Ch 1. This does not count as a st.
- Work 3 sc in the same corner sp.
- Sc in each dc and work 1 sc in each ch-1 sp along the edge.
- At a square join, work 1 sc in each of the two meeting corner sps. Do not add extra sc into the seam.
- Work 3 sc in each outer blanket corner.
- Continue around the blanket.
- Sl st in the first sc.
Mark the middle sc of each 3-sc corner group.
Lay the blanket flat. If an edge pulls inward, add a few evenly spaced sc. If it forms waves, reduce a few sc.
Border Rnds 2–4
- Ch 1.
- Sc in each st around.
- Work 3 sc in each marked corner st.
- Move each marker to the middle sc of the new corner group.
- Sl st in the first sc.
After Rnd 4, check the border width. Add another rnd if you want a wider edge, or stop sooner if the border is already about 1 inch wide.
Fasten off and weave in the ends.
Adjust the Blanket Size
Keep each square at 7 inches and change the number of squares.
| Layout | Squares Needed | Size Before Border |
|---|---|---|
| 4 columns × 5 rows | 20 | About 28 × 35 inches |
| 5 columns × 6 rows | 30 | About 35 × 42 inches |
| 6 columns × 8 rows | 48 | About 42 × 56 inches |
| 8 columns × 10 rows | 80 | About 56 × 70 inches |
A 1-inch border adds about 2 inches to the total width and length. Larger blankets need more yarn.
Finishing
- Weave in all loose ends on the WS.
- Remove the stitch markers.
- Check each heart and secure any loose edges.
- Wash and dry as directed on the yarn label.
- If the yarn permits, lay the damp blanket flat and shape it.
- Smooth the seams and corners without stretching.
- Let the blanket dry fully before use.