Pattern Description:
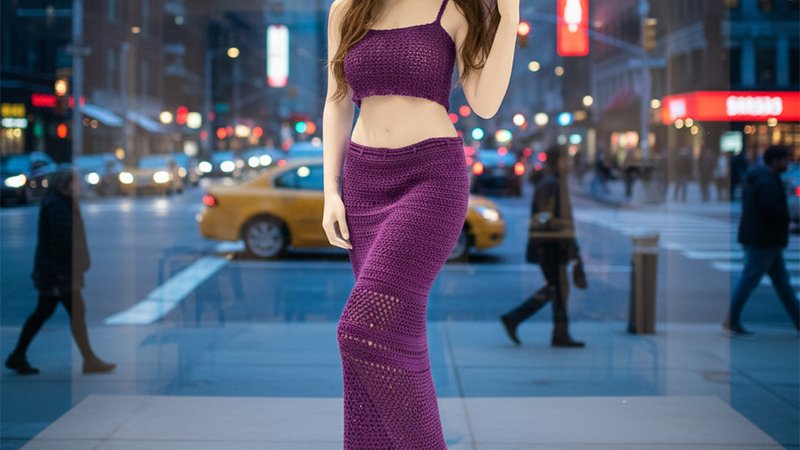
The Crochet Skirt and Crop Top is a free pattern that is very simple to make, requiring knowledge of only three or four basic stitches. Both the skirt and top are constructed as large rectangles with no shaping.
The skirt features a drawstring waistband for adjustability, while the crop top utilizes a lace-up closure in the back to create tension and a proper fit.
Materials Needed & Measurements:
Materials
- Yarn: 8 (10/12/14/16/18) balls of Gazzal Baby Cotton (Sport Weight, cotton, 150 yds/ball).
- Hook: G/4.00 mm crochet hook.
- Tools: Measuring tape.
- Optional: Decorative charms for drawstring ends.
Sizing Notes
Because both pieces are rectangles, your personal measurements guide the design.
- Skirt: Foundation chain must fit around your hips- the widest lower-body point. A drawstring at the waist adjusts fit.
- Top: Width is based on bust measurement; the foundation chain length equals your preferred top length.
- Length: Entirely customizable.
- Gauge (important for fit):
- SC: 4 sts × 4 rows = 1″
- GS: 5 sts × 5 rows = 1″
- DC: 4 sts × 2 rows = 1″
- Mesh: 2–3 ch-spaces × 3 rows = 1″
Instructions for Making the Crochet Skirt and Crop Top Pattern:
Part One: Coverage Sections
Begin with a foundation chain that is a multiple of 6 + 1, sized to your hip circumference. The skirt is worked from the top downward.
Foundation and First Griddle Stitch Panel
- Row 1: SC across the foundation chain. CH 3, turn (counts as DC).
- Begin the Griddle Stitch (GS) pattern:
- SC in second st, DC in next st, SC in next st; repeat to the end (last st = SC).
- CH 3 and turn after each row.
- Continue GS rows until the section meets your preferred length. End with CH 1.
2″ Middle Transition Section
- Work 3 SC rows.
- CH 3, turn; work 1 DC row.
- CH 1; work 2 SC rows.
- CH 3; work 1 DC row.
- CH 1; work 3 SC rows.
Second Griddle Stitch Panel
Repeat the GS pattern for another customizable-length section. End with CH 1.
3″ Transition Section
- Work 3 SC rows.
- CH 3; DC row.
- CH 1; 2 SC rows.
- Repeat sequence until 3 DC rows are completed and 7 SC rows total are worked around them.
Part Two: Mesh and Finishing
First Mesh Section (Fixed 3″)
- Row 1: CH 3, skip 1, SS in next. Repeat CH 3/SS to the end.
- Rows 2–9: SS into each CH 3 space, CH 3, SS into next space. Work 10 mesh rows total.
- Finish with CH 1.
4″ Transition Section
- Work 2 SC in each CH-space across.
- CH 1; work 2 SC rows.
- CH 3; work 2 DC rows.
- CH 4; start a DC/CH 1 mesh-style row, skipping every other stitch.
- CH 3; DC across the row, placing 1 DC into each DC and CH space.
- Work 1 more DC row, then 2 SC rows.
Second Mesh Section (Custom Length)
Repeat the earlier CH 3/SS mesh pattern until your skirt is 6″ short of the desired total length.
Bottom 6″ Section
- SC twice into every CH-space.
- Work 3 SC rows, then 1 DC row.
- Work a mesh-style DC/CH 1 row, followed by:
- 1 row DC,
- 4 rows SC,
- Repeat mesh + SC sequence once more.
- Finish with 1 SC row.
Waistband & Drawstring
Return to the top edge:
- Work 4 SC rows, then 1 DC row.
- Next row: Work FPDCs at intervals to create drawstring loops.
- Finish with 2 SC rows. Create a long foundation chain for the drawstring and add charms if desired.
Side Slit & Assembly
On each skirt side:
- Work 1 SC row evenly, then another SC row.
- Work mesh-style DC/CH 1 rows as needed for slit shaping.
- Seam sides together, keeping waistband loops on the inside.
Crop Top
The top is worked side-to-side; foundation chain = desired length from bust top downward.
Side 1: Foundation & Lace-Up Holes
- Row 1: SC across.
- Row 2: Form lace holes by skipping sts and replacing each skipped st with CH 1.
- Rows 3–7: SC rows. End with CH 3.
Center Panels
Work alternating long GS sections and SC transition blocks. A sample XS sequence includes:
- GS for ~53 rows
- SC 4 rows
- GS 5 rows
- SC 4 rows
- Two bust-shaping rows using DC and skipped stitches
- Repeat SC and GS blocks symmetrically
- Finish with another long GS block (~53 rows)
Side 2 Lace-Up
Work 5 SC rows, then form lace holes mirroring Side 1. End with 1 SC row and tie off.
Finishing the Top
Create a long chain to lace the back. Add optional straps between GS panels or leave strapless.