Pattern Description:
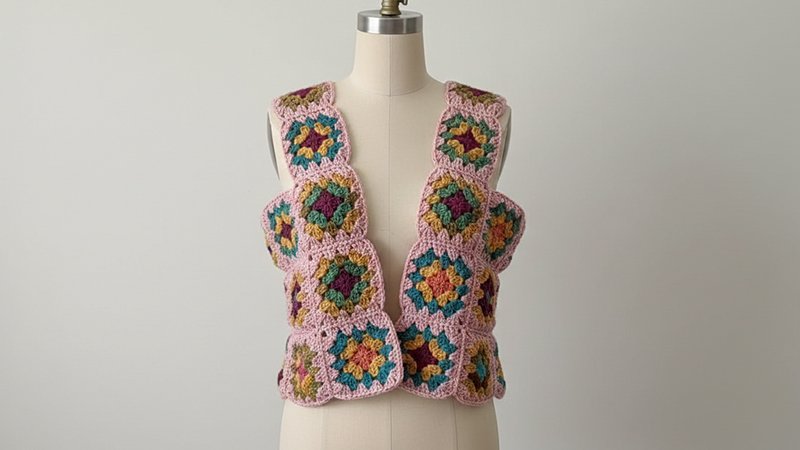
The Agnes Sweater Vest is a fun and easy crochet project made from granny squares, designed to utilize leftover worsted weight yarn.
The vest features oversized armholes and a slightly cropped length, intended for easy layering.
The finishing details include ribbing at the collar, armholes, and hem, typically created by picking up and knitting in the round, although a crocheted finishing method can be substituted.
Materials Needed & Measurements:
Yarn Details:
- Wool of the Andes skeins are 50g/110yd (100m).
- Simply Wool Worsted (used for the main color) skeins are 100g/193yd (176m).
- The project used less than one skein of each accent color.
- Almost the whole skein of the Simply Wool Worsted main color was used.
- The finished vest weighed about 8.5 oz (around 241g).
Specific Colors Used (Examples):
- Version 1 (White Main Color): Wendy (Simply Wool Worsted); Brass Heather, Mink Heather, Pampas Heather (Wool of the Andes); Winnie Twist, Winkle, Wallace (Simply Wool Worsted).
- Version 2 (Brown Main Color): Brass Heather (Wool of the Andes); Mink Heather, Winkle, Pampas Heather, Grass, Forest Heather (Wool of the Andes); Wallace (Simply Wool Worsted); Olive Palm (Wool of the Andes Tweed); Green Tea Heather (Wool of the Andes).
Tools
- 4.5mm (US 7) crochet hook.
- 4.5mm (US 7) circular knitting needles (16″ and 29″-36″ lengths).
- Note: Circular or double-pointed needles are necessary for the armholes and neckline ribbing, although straight knitting needles can be used for the hem.
Gauge & Squares
- Gauge: Granny squares measure 4″ (10.2 cm) before joining.
- The squares for the reference vest were 4-rounds.
- Total Squares: 25 granny squares were made and laid out for the creator’s version.
Finished Vest Dimensions (Reference based on 5’4″ height, 34″ bust)
The final dimensions of the creator’s version were included to provide an idea of measurements to aim for:
- Bust: approximately 13.5″.
- Total length: 17.5″.
- Width at the hem: 18.25″.
- Shoulder width: about 5″.
- Armholes: 10″ deep.
Abbreviations Used:
- GS – Granny Square
- Rnd(s) – Round(s)
- sc – Single crochet
- st(s) – Stitch(es)
- wyif – With yarn in front
- wyib – With yarn in back
- K – Knit
- P – Purl
- K1, P1 – Knit 1, Purl 1 (ribbing pattern)
- BO – Bind off
- CR – Collar ribbing
- AR – Armhole ribbing
- SH – Split hem
- WS – Wrong side
- RS – Right side
Instructions for Making the Granny Square Vest Pattern:
Step 1: Crochet the Granny Squares (GS)
The GS pattern is a basic, 4-Rnd pattern.
- Make a total of 25 GS for the layout used in the reference vest.
- The back section of the vest uses one more row of squares than the front.
- You may use different colors for the first 3 Rnds, but using the same color for the final Rnd helps hide seams.
- To adjust the fit or size, you may add an extra Rnd to your GS (note this will also widen the shoulder width). Alternatively, you could try making 3-Rnd squares for smaller sizes.
- Tip for Fit: Use safety pins to temporarily secure the squares together throughout the process to check the fit.
Step 2: Join GS Together
- Connect the GS using your preferred method; whip-stitching was used in the example.
- It may be easiest to connect the squares into rows first, and then seam the rows to each other.
- Weave in loose ends now or save them for the end.
Step 3: Collar Ribbing (CR)
The CR is knit in the round.
- Pick up sts for the CR. Pick up 76 sts (total) in each ch st around.
- Add 4 sc sts at the corners to help round out the neckline and make it easier to pick up sts.
- Work ribbing: K1, P1 for 4 Rnds.
- Prepare for tubular bind-off (BO) by knitting 2 set-up Rnds (optional):
- Rnd 1: [K1, Slip 1 wyif] repeat until end of Rnd (K the K sts, slip the P sts wyif).
- Rnd 2: [Slip 1 wyib, P1] repeat until end of Rnd (Slip the K st wyib, P the P sts).
- BO: Bind off using the sewn tubular BO method or your preferred stretchy BO method.
Step 4: Armhole Ribbing (AR)
- Pick up 124 sts in each ch st around.
- Pick up about 3 sts at each seam where squares meet.
- Add 3 sc sts in the corners, similar to the neckline.
- Work ribbing: K1, P1 for 4 Rnds.
- Knit the 2 set-up Rnds for the tubular BO (refer to Step 3 instructions).
- BO: Bind off using the sewn tubular BO method.
Step 5: Split Hem (SH)
The SH is knit flat (back and forth).
- Start at the FRONT right, finding the middle at the sides.
- Pick up 71 sts (ensure an ODD number of sts) in each ch st.
- Turn work so the WS is facing you.
- Rnd 1 (WS): Slip first st purlwise wyif, [P1, K1] until end.
- Rnd 2 (RS): Slip first st purlwise wyif, [K1, P1] until end, K the last st.
- Repeat Rnds 1 and 2 for 11 rows or 2″ (or desired length).
- Prepare for tubular BO (knitting flat):
- For both rows: [K1, Slip 1 wyif] repeat until end of Rnd (K the K sts and slip the P sts wyif).
- BO: Bind off using the sewn tubular BO.
- Repeat these steps for the BACK hem, starting in the same st at the sides that was picked up at the front to prevent a gap.
Step 6: Finishing
- Weave in all remaining yarn ends (if not done previously).
- Block the finished vest and gently shape it to the desired measurements.