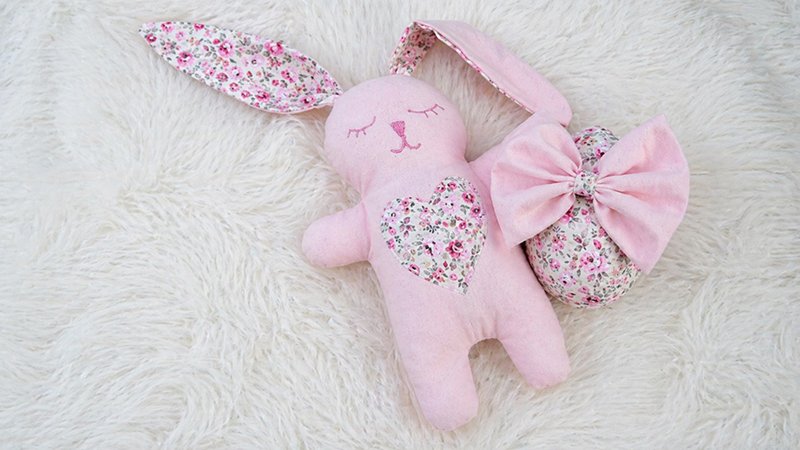
Easter is the perfect time to create something soft, handmade, and meaningful. This Snuggle Bunny is more than just a toy—it’s a cozy companion with its own matching blanket, making it ideal for babies, children, or as a heartfelt gift.
This guide walks you through every step in detail, even if you’re a beginner.
Materials & Tools (Prepare Everything First)
Materials
Main Bunny Body:
- Cream fleece: 22” x 8” (55.5 cm x 20.5 cm)
Ears:
- Pink & cream cotton: 10” x 8”
- Cream fleece: 10” x 8”
Decorative Details:
- Pink wool felt (small scraps) for:
- Heart
- Nose
Blankey:
- 2 cotton triangles (pink/cream + white):
- 25” x 16½” x 16½”
Other:
- Cream embroidery floss
- Cream sewing thread
- Polyester stuffing (soft, high-quality)
Tools
- Sewing machine (straight stitch, length 2.5)
- Stretch needle (size 14/90) – important for fleece
- Pins
- Fabric scissors + paper scissors
- Embroidery needle
- Blue tailor’s chalk or washable marker
- Chopstick (for turning and shaping)
- Printed A4 pattern
Step-by-Step Instructions
Step 1: Print, Cut & Prepare
- Print your pattern on A4 paper.
- Cut out all template pieces using paper scissors.
- Place templates onto fabric and cut: You should have:
- 2 body pieces (cream fleece)
- 2 earpieces (cotton)
- 2 earpieces (fleece)
- 1 heart (felt)
- 1 nose (felt)
Tip: Always use fabric scissors only for fabric to keep them sharp.
Step 2: Sew the Ears
- Take:
- 1 cotton earpiece
- 1 fleece earpiece
Place them right sides together.
- Pin around edges.
- Sew along the edges, but:
- Leave the bottom open (between points A and B)
- Turn the ears right side out:
- Use a chopstick to gently push out the tips
- Smooth and set aside.
Step 3: Create the Face & Chest Details
- Take one body piece (this is the front).
Attach Heart:
- Place felt heart on chest
- Sew using a blanket stitch with 2 strands of embroidery floss
Attach Nose:
- Center nose on face
- Sew using a whip stitch
Draw Face:
- Use chalk to lightly sketch:
- Eyes
- Mouth
Stitch Face:
- Use a chain stitch to embroider over your lines
Tip: Go slowly—this gives your bunny personality!
Step 4: Assemble the Bunny Body
- Lay the front piece right side up
- Position ears:
- Place them at the top of the head
- Cotton side facing down toward fleece
- Raw edges aligned with the fabric edge
- Pin ears securely
- Place the back body piece on top (right side down)
You now have a “fabric sandwich”:
- Bottom: front piece
- Middle: ears
- Top: back piece
- Tuck ears inward so they don’t get sewn into side seams
- Sew around the body:
- Seam allowance: 0.5 cm (¼ inch)
- Leave the bottom open (between A and B)
Step 5: Turn & Stuff the Bunny
Before Turning:
- Clip/snips into:
- Neck curves
- Arm corners
This prevents bulky seams
Turn Right Side Out:
- Pull fabric through the bottom opening
- Use chopsticks to shape:
- Arms
- Head
- Ears
Stuffing:
- Fill with polyester stuffing
- Keep it:
- Firm, but not stiff
- Soft and cuddly
Close Opening:
- Use a whip stitch
- Stitch neatly for a clean finish
Step 6: Make the Matching Blankey
- Place the two fabric triangles:
- Right sides together
- Pin edges
- Sew around all sides:
- Seam allowance: 0.5 cm
- Leave a 2-inch (5 cm) gap
- Trim corners (important for sharp points)
- Turn the right side out
- Close the gap using:
- Ladder stitch (invisible stitch)
Customization Ideas
Make your bunny unique:
- Folded Ears: Fold the base before sewing for a floppy look
- All Cotton Version: Skip fleece for a lighter feel
- Machine Appliqué: Sew the heart with the machine instead of hand stitching
- Add Accessories:
- Bow
- Tiny scarf
- Easter egg toy
Final Tips
- Take your time with turning and shaping—it makes a big difference
- Don’t overstuff—softness is key
- Hand stitching details = more personality
Your Snuggle Bunny is now complete—soft, adorable, and ready for cuddles or gifting 💝
Happy sewing!