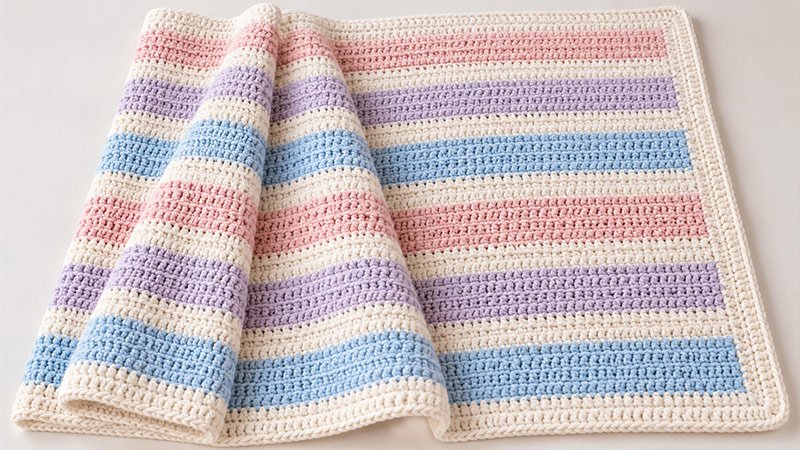
The Fairy Floss Striped Throw is a soft crochet blanket. It has cream, blush pink, pale lilac, and light blue stripes. Work half double crochet stitches in the back loop. This gives the cloth a soft, ribbed feel. A cream border makes the edge look neat.
Work the throw flat, one row at a time. Each stripe has nine rows. This makes it easy to track each color change. The project suits those new to crochet. You need to know how to chain and work half double crochet. You should know how to change colors, too.
This new design was made for this request. It does not copy a published pattern with the same name. The design has not been made and tested yet. The size and yarn amounts are estimates. Make a gauge swatch before you start.
Materials
- Worsted-weight yarn, category #4: About 1,800–2,200 yards in all.
- Color A — Cream: About 850–1,000 yards. This includes the border.
- Color B — Blush pink: About 350–450 yards.
- Color C — Pale lilac: About 350–450 yards.
- Color D — Light blue: About 250–300 yards.
- Crochet hook: US I/9, 5.5 mm. Or use a size that meets gauge.
- Yarn needle.
- Scissors.
- Measuring tape.
- Four stitch markers.
Use yarns of the same weight. Their fiber content should be much the same. Choose soft yarn that you can wash. This works well for a blanket you use often.
Gauge
12 hdc and 9 rows = 4 inches. Work in BLO. Wash and dry the swatch as the yarn label says. Then check the gauge.
Make a swatch:
- Ch 26.
- Hdc in the third ch from the hook. Hdc in each ch across. 24 hdc.
- Ch 2 and turn.
- Hdc in BLO of each st across. 24 hdc.
- Repeat Steps 3–4 for at least 18 rows.
- Wash and dry the swatch. Measure a 4-inch section near the center.
If you have more than 12 sts in 4 inches, try a larger hook. If you have fewer than 12 sts in 4 inches, try a smaller hook.
Finished Measurements:
The throw is about 42 inches wide × 54 inches long. This size includes the border.
Before you add the border, it should be about 40 inches wide × 52 inches long.
Your yarn, gauge, and how you finish the throw may change its final size.
Pattern Notes
- Work in rows. Turn at the end of each row.
- The turning ch 2 does not count as a st.
- Each blanket row has 120 hdc.
- For Row 1, work into the foundation chains.
- For all later blanket rows, work in BLO.
- Work the border through both loops.
- Each stripe has 9 rows.
- Change colors on the last pull-through of the last hdc.
- Cut the yarn at each color change. Leave a 6-inch tail to weave in.
- Mark the first and last hdc in each row if needed.
- Count the sts often to keep the edges straight.
Abbreviations
| Abbreviation | Meaning |
|---|---|
| ch | Chain |
| st / sts | Stitch / stitches |
| hdc | Half double crochet |
| sc | Single crochet |
| sl st | Slip stitch |
| BLO | Back loop only |
| RS | Right side |
| WS | Wrong side |
| rep | Repeat |
Half double crochet: Yarn over, insert the hook into the stitch, yarn over, and pull up a loop. Yarn over and pull through all three loops.
Back loop only: Work into the loop farthest from you at the top of the stitch.
Pattern Instructions
Step 1: Make the Foundation Chain
With Color A, ch 122 loosely.
If your chains feel tight, use a hook one size larger for the foundation chain. Switch back to your main hook for Row 1.
Step 2: Work Row 1
Hdc in the third ch from the hook.
Hdc in each ch across.
Count: 120 hdc.
The two skipped chains do not count as a st.
Step 3: Work Row 2
Ch 2 and turn.
Hdc in BLO of the first st and each st across.
Count: 120 hdc.
Do not work into the turning ch from the row below.
Step 4: Finish the First Stripe
Rows 3–9: Rep Row 2 with Color A.
You now have nine rows of cream.
On the last hdc of Row 9, change to Color B as described in Step 5.
Step 5: Change Colors
- Work the last hdc until three loops remain on the hook.
- Drop the old color.
- Yarn over with the new color.
- Pull the new color through all three loops.
- Cut the old color, leaving a 6-inch tail.
- Ch 2 with the new color and turn.
- Begin the next row.
Keep the yarn tails loose enough that they do not pull the edge inward.
Step 6: Follow the Stripe Plan
Continue to rep Row 2. Work 120 hdc in BLO on every row.
| Rows | Color | Number of Rows |
|---|---|---|
| 1–9 | A — Cream | 9 |
| 10–18 | B — Blush pink | 9 |
| 19–27 | A — Cream | 9 |
| 28–36 | C — Pale lilac | 9 |
| 37–45 | A — Cream | 9 |
| 46–54 | D — Light blue | 9 |
| 55–63 | A — Cream | 9 |
| 64–72 | B — Blush pink | 9 |
| 73–81 | A — Cream | 9 |
| 82–90 | C — Pale lilac | 9 |
| 91–99 | A — Cream | 9 |
| 100–108 | D — Light blue | 9 |
| 109–117 | A — Cream | 9 |
After Row 117, fasten off.
Lay the blanket flat. Check that both sides are straight and that each row has 120 sts.
Step 7: Work Border Round 1
Choose one face as the RS. Keep the RS facing you. Join Color A at a corner.
Ch 1. This does not count as a st.
Work 3 sc in the corner. Mark the middle sc.
Work all the way around the blanket:
- Along each side: Start with 4 sc per 3 row ends. Work 1 sc in the first row end. Work 1 sc in the next. Work 2 sc in the third.
- Across the foundation edge: Work 1 sc under each foundation ch that holds an hdc.
- Across the top edge: Work 1 sc in each hdc.
- At each corner: Work 3 sc. Mark the middle sc.
At each top and foundation corner, use 3 sc in place of the single sc for that edge st. Do not work the same corner twice.
Sl st to the first sc to join. Do not turn.
Lay the blanket flat. If a side pulls in, add a few sc. Space them out evenly. If a side waves, take out a few sc.
Step 8: Work Border Rounds 2–4
Ch 1.
Sc in each st around, working 3 sc in each marked corner st.
Move each marker to the middle sc of the new corner group.
Sl st to the first sc to join. Do not turn.
Rep for four border rounds in total. The border should be about 1 inch wide. Add or omit a round if needed for your gauge.
Fasten off and leave a 6-inch tail.
Step 9: Weave In the Ends
- Thread each tail onto the yarn needle.
- Weave it through several stitches on the WS. Change direction once, then weave through a few more stitches.
- Trim the end close to the fabric. Take care not to cut a stitch.
Step 10: Wash and Shape
- Wash the blanket as directed on the yarn label.
- Lay it flat to dry. Smooth the sides and shape the corners with your hands.
- Let it dry fully before folding or using it.
Adjusting the Size
To change the width: Add or remove foundation chains. The stitch count is two less than the chain count. At the stated gauge, three more chains add about 1 inch of width.
To change the length: Add or remove rows. Nine rows add about 4 inches. Keep nine-row stripes to keep each color band the same depth.
A larger blanket needs more yarn.