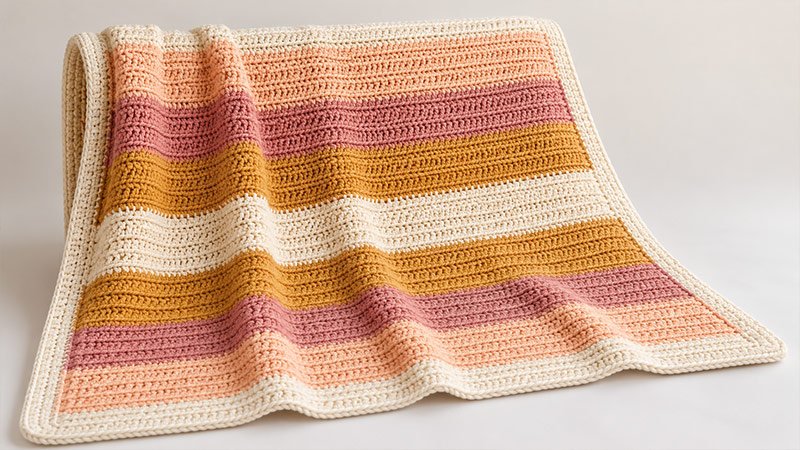
The Strata Sunrise Throw has the soft hues of dawn. Wide stripes of cream, peach, rose, and warm gold go from light to deep, then back again.
The stitches are easy to learn. They give the throw a soft feel. Work one row at a time. Then add a neat trim to the edge.
Drape it on a couch, chair, or bed. Make one as a gift for someone who loves soft shades and calm starts to the day.
Work one row of single crochet. Then work one row of half double crochet. Repeat these two rows. Eight bands of color give the throw an even look.
- Skill level: Beginner
- Terminology: US crochet terms
- Construction: Worked flat in rows, with a border added in rounds.
Materials (use bullet)
- Approximately 2,000–2,200 yards of worsted-weight yarn, category #4, divided as follows:
- Color A — Cream: 650–750 yards, including the border.
- Color B — Pale peach: 300–325 yards.
- Color C — Dusty rose: 375–400 yards.
- Color D — Warm gold: 675–725 yards.
- 5.5 mm crochet hook, or the size needed to meet gauge.
- Yarn needle.
- Scissors.
- Measuring tape.
- Stitch markers.
- A clean, flat surface for blocking.
Choose yarns of the same weight and similar fiber content. A smooth yarn helps the two stitch types show clearly. Check the yarn labels so all four colors can be washed in the same way.
Gauge
14 sts and 12 rows = 4 inches, measured over alternating rows of sc and hdc after washing and drying the sample.
The row gauge includes both stitch types: six sc rows and six hdc rows.
Make a gauge sample:
- Ch 25.
- Sc in the second ch from the hook. Sc in each ch to the end. 24 sts.
- Ch 1. Turn. Hdc in each st to the end.
- Ch 1. Turn. Sc in each st to the end.
- Rep Steps 3–4 until you have at least 20 rows.
- Wash and dry as shown on the yarn label. Measure the center. Do not stretch it.
If you have too many sts in 4 inches, use a larger hook. If you have too few, use a smaller hook.
Finished Measurements:
The throw is about 48 × 61 inches. This size includes a border about 1 inch wide on each side.
The main part is about 46 × 58⅔ inches at the given gauge.
The size and yarn used may change. This depends on your yarn, how tight you stitch, and how wide you make the border.
Abbreviations
- ch: Chain.
- sc: Single crochet.
- hdc: Half double crochet.
- sl st: Slip stitch.
- st / sts: Stitch / stitches.
- rep: Repeat.
- RS: Right side.
- WS: Wrong side.
Single crochet — sc: Insert the hook into the indicated st. Yarn over and pull up a loop. Yarn over and pull through both loops.
Half double crochet — hdc: Yarn over and insert the hook into the indicated st. Yarn over and pull up a loop. Yarn over and pull through all three loops.
Slip stitch — sl st: Insert the hook into the indicated st. Yarn over and draw through the st and the loop on the hook.
Step by step Pattern instructions
1. Read the Pattern Notes
- Each row in the main panel has 161 sts.
- Ch 1 to start each row. It does not count as a st.
- Work the first st in the first st of the last row.
- Work the last st in the last st of the last row.
- Turn at the end of each row.
- Use sc for odd rows.
- Use hdc for even rows.
- Change yarn shades at the end of the row, just before the next stripe starts.
If the edge sts are hard to see, mark the first and last st in each row. Move each marker to the new row as you work.
2. Follow the Color Layout
Work the stripes in this order:
| Band | Color | Rows | Number of rows |
|---|---|---|---|
| 1 | A — Cream | 1–16 | 16 |
| 2 | B — Pale peach | 17–36 | 20 |
| 3 | C — Dusty rose | 37–60 | 24 |
| 4 | D — Warm gold | 61–88 | 28 |
| 5 | A — Cream | 89–116 | 28 |
| 6 | D — Warm gold | 117–140 | 24 |
| 7 | C — Dusty rose | 141–160 | 20 |
| 8 | B — Pale peach | 161–176 | 16 |
The panel has 176 rows in total. Each stripe starts with a sc row and ends with a hdc row.
3. Make the Foundation
With Color A, ch 162.
Keep each ch loose and even. Tight chains can pull the base edge in.
Row 1 — RS: Sc in the second ch from the hook. Sc in each ch to the end. Turn. 161 sc.
Count your sts before you go on. Do not count the skipped ch as a st.
If your chains are tight, use a hook one size up to make the chain. Use your main hook for Row 1.
4. Establish the Stitch Repeat
Row 2 — WS: Ch 1. Hdc in each st across. Turn. 161 hdc.
Row 3 — RS: Ch 1. Sc in each st across. Turn. 161 sc.
Row 4 — WS: Ch 1. Hdc in each st across. Turn. 161 hdc.
Rep Rows 3–4 through Row 16.
Work through both top loops of each st. Skip the turning ch at the edge.
The sc rows make thin lines. The hdc rows are a bit taller. Keep your sts loose and even. This helps the throw drape well.
5. Change to Color B
Change to Color B in the last hdc of Row 16:
- With Color A, yarn over. Put the hook in the last st.
- Yarn over and pull up a loop. You now have three loops on the hook.
- Drop Color A.
- Yarn over with Color B. Pull through all three loops.
- Leave a 6–8 inch tail of each color.
- Ch 1 with Color B. Turn.
Row 17: Sc in each st across. Turn. 161 sc.
Row 18: Ch 1. Hdc in each st across. Turn. 161 hdc.
Repeat these two rows through Row 36. Ch 1 at the start of each row.
Cut the old yarn each time you change colors. Weave in the tails at the end. Do not carry the yarn up the long edges.
6. Work the Remaining Stripes
Keep the same two-row repeat. Use the shades in the color chart.
- On the last pull-through of Row 36, switch to Color C. Work Rows 37–60.
- On the last pull-through of Row 60, switch to Color D. Work Rows 61–88.
- On the last pull-through of Row 88, switch to Color A. Work Rows 89–116.
- On the last pull-through of Row 116, switch to Color D. Work Rows 117–140.
- On the last pull-through of Row 140, switch to Color C. Work Rows 141–160.
- On the last pull-through of Row 160, switch to Color B. Work Rows 161–176.
Keep 161 sts in each row.
Count the sts each time you switch shades. Lay the piece flat now and then. Check that both edges stay straight.
Fasten off at the end of Row 176.
7. Weave In the Panel Ends
Thread each yarn tail through the eye of a yarn needle.
On the WS, weave the tail through a few sts of the same color. Turn and weave through a few more sts to hold it in place.
Do not pull the tails tight. Keep the stripe edges soft and flat.
8. Add the First Border Round
Lay the blanket flat with the RS up. Join Color A at any corner.
Round 1:
- Ch 1. Work 3 sc in the corner. Mark the middle sc.
- Work sc along the first edge. Space the sts evenly.
- Work 3 sc in the next corner. Mark the middle sc.
- Work sc along each edge. Place 3 sc in each corner.
- Join with a sl st to the first sc.
On the top and bottom edges, work one sc in each st or base ch. Use the corner st or ch for the 3-sc group. Do not add a separate sc there.
On each long side, aim for about 205 sc between the corner groups. Spread the sts across the row ends. Add or skip a few sts as needed to keep the edge flat.
If the edge forms waves, use fewer sts. If it pulls in, add a few sts.
9. Complete the Border
Round 2: Ch 1. Sc in each st around. Work 3 sc in each marked corner st. Move each marker to the middle sc of the new group. Join with a sl st to the first sc.
Rounds 3–4: Rep Round 2.
Check that the blanket lies flat after each round. Work each new corner group into the marked st.
Four sc rounds should make a border about 1 inch wide. The width may change based on how tight or loose you work. Add one more round if needed.
Fasten off. Weave in all loose ends.
10. Finish the Blanket
Wash the throw as shown on the yarn label.
Lay it flat. Shape it with care so each side is straight. Smooth the corners and edges. Do not stretch it. Let it dry all the way.
To change the width, add or cut chains at the start. You do not need a set chain count.
To change the length, add or cut two rows at a time. Each stripe should start with sc and end with hdc. Use more or less yarn to suit the new size.