Pattern Description:
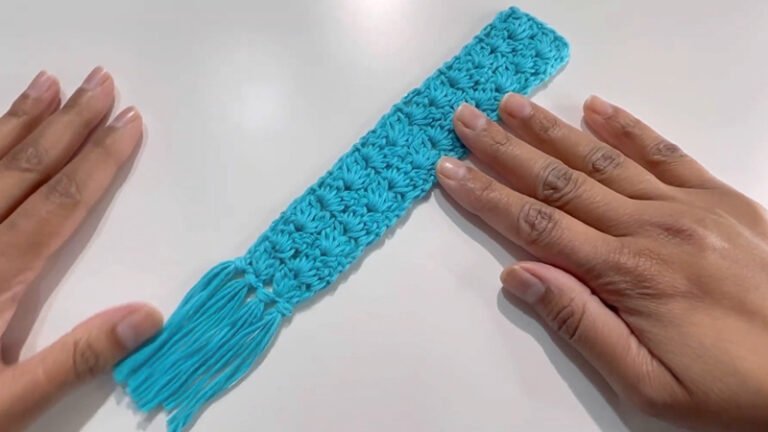
The Blissful Crochet Bookmark is a beautiful and functional pattern, ideal for marking your place in a book or gifting to a friend.
It utilizes Size 10 yarn (or smaller), often resulting in an elegant, vintage-inspired hue. Construction involves crocheting on the underside of a starting chain to form a long oval shape.
The design uses various chain spaces, single crochet, and double crochet stitches. Blocking is recommended to prevent curling.
Materials Needed & Measurements:
- Size 10 yarn or smaller
- Red Heart Classic Natural Cotton Yarn, 1000 yds, 1 skein, or
- Antique Artiste Cotton Crochet Thread, 350 yds, 1 skein
- 1.65 mm crochet hook
- Scissors
- Tapestry needle
Abbreviations Used:
- St(s) – stitch(es)
- Sl st – slip stitch
- Ch – chain
- Sc – single crochet
- Dc – double crochet
Instructions for Making the Blissful Bookmark Pattern:
Special Instructions
Please note these important instructions before beginning the pattern:
- The starting chain 1s do not count as a stitch.
- The numbers provided in parentheses at the end of each row indicate the final count of stitches or types of stitches you should have.
- Parentheses are used around certain stitches that are repeated to enhance visual readability.
- The recommended yarn size for this project is Size 10 or smaller. Using a larger size may result in a bookmark that is too large or too small.
Foundation: Chain 54
The pattern begins by forming the foundation chain.
Row 1: Establishing the Oval Shape
Row 1 establishes the fundamental oval shape by working down both sides of the starting chain.
- Make 2 single crochets in the 2nd chain from the hook.
- Work 1 single crochet into each chain across.
- Work 3 single crochets in the last chain.
- Turn the work down the underside of the chain.
- Work 1 single crochet into each chain across.
- Work 1 single crochet in the last chain.
- Slip stitch into the first stitch to join (108 stitches total).
Row 2: Introducing Chain Spaces
This row introduces chain 3 spaces, which will form the basis for the lace design in subsequent rows.
- Chain 1.
- Single crochet in the same stitch as the joining stitch.
- Work 2 single crochets in the next stitch.
- Work 1 single crochet in the next 5 stitches.
- Begin the repeating sequence: chain 3, skip a stitch, single crochet in the next stitch.
- Repeat this sequence 3 times total.
- Work 1 single crochet in the next 3 stitches.
- Repeat the entire sequence 5 times.
- Work (1 single crochet in next stitch, 2 single crochets in next stitch) two times total.
- Work 1 single crochet in the next 5 stitches.
- Repeat the sequence 5 times once more.
- Work 1 single crochet in the next stitch.
- Work 2 single crochets in the next stitch.
- Slip stitch into the first single crochet to join (82 single crochets, 30 chain-3 spaces).
Row 3: Expanding the Lace and Defining the Ends
Row 3 introduces longer chain spaces (chain 5 and chain 9) to shape the ends and sides of the bookmark.
- Slip stitch into the next 3 stitches.
- Chain 1.
- Single crochet in the same stitch.
- Begin the main side pattern: chain 5, skip the next 4 stitches, single crochet in the first chain-3 space, (chain 3, single crochet in the next chain-3 space) two times.
- Repeat the sequence until the last chain-3 space has been worked into.
- Begin the turning section (end): chain 5, skip 4 stitches, single crochet into the next stitch, chain 9, skip 5 stitches, single crochet into the next stitch.
- Repeat the sequence once more.
- Repeat the entire sequence again.
- Slip stitch into the first single crochet to join (34 single crochets, 2 chain-9 spaces, 12 chain-5 spaces, 24 chain-3 spaces).
Row 4: Finishing with Double Crochet Shells
This final row fills the larger chain spaces with double crochet stitches to create the shell edging.
- Chain 1.
- Single crochet in the same stitch as the joining stitch.
- Begin the main side pattern: 9 double crochets in the next chain-5 space, single crochet in the next chain-3 space, chain 3, single crochet in the next chain-3 space.
- Repeat the sequence until the last chain-3 space has been worked into.
- Begin the turning section (end): 9 double crochets in the next chain-5 space, single crochet in the next single crochet, 12 double crochets in the chain-9 space, single crochet in the next single crochet.
- Repeat the sequence once more, until the last chain-3 space has been worked into.
- Repeat the previous sequence again.
- Slip stitch to the first single crochet to join (24 single crochets, 10 chain-3 spaces, 114 double crochets).
Finishing and Blocking
Once Row 4 is complete, the crocheting is finished.
- Cut the yarn.
- Weave in the ends securely using a tapestry needle.
Blocking:
- Soak the crochet piece in water.
- Pat it dry.
- Pin it to a mat (a pizza box works well).
- Optionally, apply starch if a stiff finish is desired.