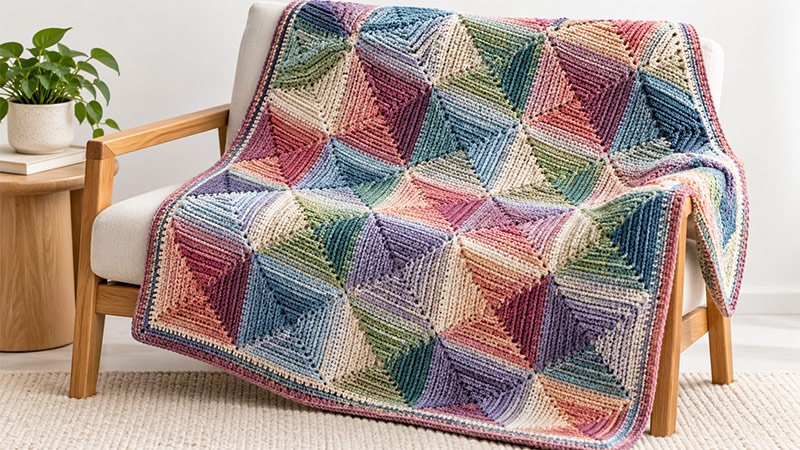
Make a cozy throw with no need to sew many pieces together. The beauty of the continuous mitered square method is that you work the blanket as one piece.
This method gives the throw a soft, patchwork look. It works very well with self-striping yarn. The yarn adds smooth color changes as you crochet.
Work each stitch through the back loop only. This creates raised ridges across the fabric. A diagonal decrease forms the center of each square and adds more texture.
This project is a great fit for intermediate crocheters. The steady stitch pattern is calm and simple. Best of all, there is little finishing work when the blanket is done.
Materials & Specifications
- Yarn: About 1,770 yards of light Category 3 yarn, such as self-striping acrylic cakes.
- Hook: H-8 (5.0 mm) crochet hook, or the size needed to meet the gauge.
- Tools: Tapestry needle and scissors.
- Finished Size: About 52 × 40 inches. This makes 8 squares across and 11 rows down. You can change the size by adding or removing squares.
- Square Size: Each square is about 4.75 inches wide.
Pattern Key & Technique Notes
- Stitches: Chain (ch), single crochet (sc), sc3tog, and slip stitch (sl st).
- Back Loop Only (BLO): Work all sc and sc3tog stitches through the back loop only.
- Center Decrease: Work an sc3tog over the middle three stitches of each row. This cuts two stitches from each row and makes each mitered square.
Foundation Block (Row 1, Square 1)
Chain 34.
- Row 1: Sc in the 2nd ch from the hook and in the next 14 chs. Work an sc3tog over the next 3 chs. Sc in the last 15 chs. Turn. (31 sts)
- Row 2: Ch 1; this does not count as a st. Sc in the first 14 sts, work an sc3tog, then sc in the last 14 sts. Turn. (29 sts)
- Rows 3–15: Keep the same decrease pattern. On each row, ch 1, sc in one fewer st before the center sc3tog, work the sc3tog, then sc in the same number of sts on the other side. Turn. Row 15 ends with 3 sts.
- Row 16: Ch 1, then work an sc3tog over the last 3 sts. Do not turn. (1 st remains)
Completing the First Strip (Row 1, Squares 2–8)
- Setup: Chain 1. Pick up 17 sc along the left edge of the square. Put the last stitch in the bottom corner. Chain 17, then turn.
- Square: Sc in the 2nd chain from the hook and in the next 14 chains. Make an sc3tog over the last 2 chains and the first picked-up stitch. Sc in the next 15 edge stitches. Turn. (31 stitches)
- Rows 2–16: Repeat the same decrease rows used for Square 1 until 1 stitch is left.
- Repeat: Repeat these steps until the base row has 8 squares. Turn.
Building Subsequent Rows (Row 2 through Row 11)
First Square of a New Row:
- Setup: Chain 17. Single crochet in the 2nd chain from the hook and in the next 15 chains. Single crochet in the top corner of the square below. Then work 16 single crochets across the top edge of that square, ending at the far corner. Turn.
- Rows 1–16: Work the decrease rows. Start with 31 stitches and reduce to 1 stitch. Use the center sc3tog decrease in each row.
Remaining Squares across the Row:
- Setup: Ch 1. Pick up 16 sc along the left edge of the next square. Work 1 sc in the corner where the squares meet. Pick up 16 sc along the top edge of the square below. Turn. (33 loops)
- Rows 1–16: Sc to the center. Work the center sc3tog. Sc to the end. Keep working the decrease until 1 st remains.
- Progress: Repeat for all 8 squares in the row. Add more full rows until you have 11 rows, or the length you want. Do not fasten off.
Perimeter Edging
- Round 1: Chain 1. Slip stitch around the edge of the blanket. Place about 16 even stitches along each square side. Join with a slip stitch.
- Round 2: Chain 1. Single crochet in each stitch around. Work 3 single crochets in each of the 4 corner stitches. Join with a slip stitch.
- Rounds 3–4: Repeat Round 2 two more times to make the border wider.
Fasten off the yarn. Use a yarn needle to weave in the loose ends. Block the project if you like.