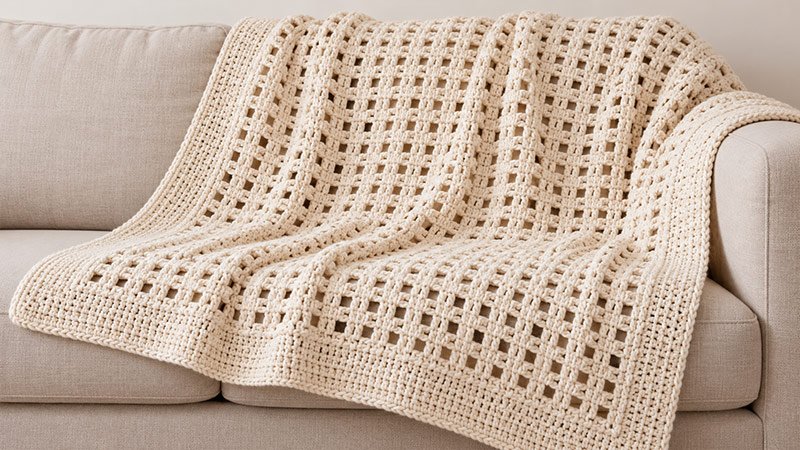
Give your home a soft, snug feel with this crochet throw. Small gaps form a neat grid. A plain border frames the edge. Use double crochet and chain stitches to make a light throw with a soft drape. Lay it on a chair or couch for a warm touch.
Pick cream for a calm look. Or choose a shade that fits your room. The rows are easy to learn and repeat. Work on it as you rest at night. It makes a sweet gift, too.
Materials
- About 1,650–1,850 yards of worsted-weight yarn, category #4, for the throw and its edge.
- A 5.5 mm crochet hook, or a size that gives the right gauge.
- A yarn needle to weave in loose ends.
- Scissors.
- Stitch markers.
- A tape to check the size.
- A mat or a clean, flat space to block the throw.
- Pins that will not rust, if you need them.
Use smooth yarn so the open gaps show well. Make the whole throw in one shade. Or use a new shade for the edge. If you do, set aside 250–300 yards for it.
Gauge:
About 3½ repeats and 8 rows = 4 inches in the main stitch pattern. Check this size once you block the piece with a light touch. Each repeat has one chain-2 space and two double crochet stitches.
Make a test piece first. Chain 27. Then work the base row and mesh rows shown below. This gives you six repeats between the edge stitches. Work at least twelve rows. Then check the size at the center.
If the piece is too small, use a larger hook. If it is too large, use a smaller hook.
Finished Measurements
The throw is about 44 × 53 inches, with the border, if you match the gauge.
The main part is about 41 × 50 inches. The size and amount of yarn you need may change. This will depend on your yarn, how tight you stitch, and how you block the throw.
Stitches and Abbreviations
This pattern uses US crochet terms.
- ch: Chain.
- sc: Single crochet.
- dc: Double crochet.
- sl st: Slip stitch.
- st / sts: Stitch / stitches.
- sp: Space.
- rep: Repeat.
- RS: Right side.
- WS: Wrong side.
Double crochet: Wrap the yarn over the hook. Put the hook in the stitch shown. Wrap the yarn over the hook once more. Pull up a loop. Wrap the yarn over the hook. Pull through two loops. Wrap the yarn over the hook once more. Pull through the last two loops.
Single crochet: Put the hook in the stitch or space shown. Wrap the yarn over the hook. Pull up a loop. Wrap the yarn over the hook once more. Pull through both loops.
Pattern Notes
Work the blanket back and forth in rows. Start with a solid row to hold the open mesh. End with a solid row so both ends look the same.
The chain at the start of each row counts as the first double crochet in the main panel. Do not add a stitch to the stitch at its base.
Each mesh row has:
- One double crochet at each end.
- Thirty-five groups of two double crochet stitches between the ends.
- Thirty-six chain-2 spaces.
Count each chain as one stitch space. Each row spans 145 stitch positions.
Step-by-Step Pattern Instructions
Step 1: Make the Foundation Chain
Chain 147 loosely.
Try to keep the chains even without pulling them tight. A tight starting chain can cause the lower edge to draw inward.
If necessary, use a hook one size larger for the chain, then return to your main hook for Row 1.
Step 2: Work the Solid Foundation Row
Row 1: Work 1 dc into the fourth chain from the hook. Work 1 dc into each remaining chain across. Turn.
The three skipped chains count as the first dc.
Count: 145 dc, including the beginning chain.
Place a marker in the top of the beginning chain if you find it difficult to identify. This is where the final stitch of the following row will go.
Step 3: Establish the Lattice
Row 2: Ch 3; this counts as the first dc. Skip the stitch directly beneath the turning chain.
Repeat the following 35 times:
Ch 2, skip the next 2 sts, dc in each of the next 2 sts.
Then ch 2, skip the next 2 sts, and dc in the top of the previous row’s turning chain. Turn.
Count: 36 ch-2 spaces and 72 dc, including the turning chain.
The spaces form the open part of the lattice. The pairs of double crochet stitches create the narrow solid strips between them.
Step 4: Repeat the Lattice Row
Row 3: Ch 3. Skip the stitch beneath the turning chain.
Repeat the following 35 times:
Ch 2, skip the next ch-2 space, dc in each of the next 2 dc.
Then ch 2, skip the final ch-2 space, and dc in the top of the turning chain. Turn.
Repeat Row 3 through Row 99.
Keep the chain spaces relaxed and consistent. Do not work into them during these repeating rows; the double crochet stitches sit directly above the double crochet stitches below.
Check the count every few rows. Each row should still contain thirty-six openings. Missing an edge stitch can make the blanket gradually narrower.
Step 5: Close the Upper Edge
Row 100: Ch 3. Skip the stitch beneath the turning chain.
Repeat the following 35 times:
Work 2 dc into the next ch-2 space, then dc in each of the next 2 dc.
Work 2 dc into the final ch-2 space, then dc in the top of the turning chain.
Count: 145 dc.
Fasten off.
This row creates a solid upper edge that balances the foundation row and supports the border.
Step 6: Work the First Border Round
Lay the blanket flat and choose either face as the RS. Join yarn in any corner with the RS facing you.
Round 1: Ch 1; this does not count as a stitch. Work 3 sc in the corner.
Continue around the blanket as follows:
- Work 1 sc into each stitch along the upper edge.
- Work approximately 2 sc around each row end along the long sides.
- Work 1 sc into each available foundation chain along the lower edge.
- Work 3 sc at each remaining corner.
When a corner stitch has already received its three stitches, do not work into it again while continuing along the next edge.
Join with a sl st to the first sc. Mark the middle stitch of each corner group.
The border should lie flat. If a long edge ripples, reduce the number of stitches along that side. If it pulls inward, add a few stitches evenly.
Step 7: Complete the Border
Rounds 2–4: Ch 1. Work 1 sc in each stitch around, placing 3 sc in each marked corner stitch. Join with a sl st to the first sc.
Move each marker to the middle stitch of the new corner group after every round.
Fasten off after Round 4.
For a wider border, add more rounds using the same corner increases. Allow extra yarn and check that the corners remain flat.
Step 8: Finish and Block
Weave each yarn tail through several stitches on the WS, then reverse direction before trimming.
Wash or dampen the blanket according to the yarn label. Lay it flat and gently straighten the sides. Adjust the lattice openings so they look even, without stretching them excessively.
Allow the blanket to dry completely before lifting it.
Adjusting the Size
To change the width, use a multiple of 4 plus 3 for your start chain. Chain 131 for a slim throw. Chain 163 for a wide one.
To change the length, work more or fewer rows of the main stitch. Then add the last solid row. Keep track of how many rows you work. This helps you add the same number of border stitches to each long side.