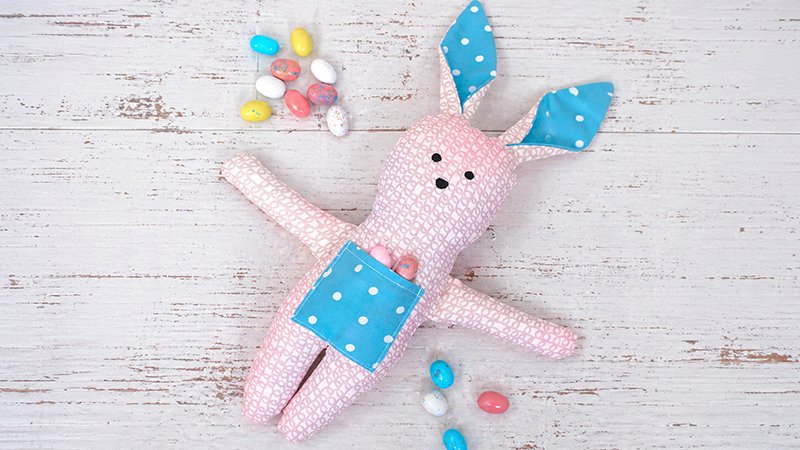
Difficulty Level: Beginner Seam Allowance: 1/4″ (0.6 cm) unless otherwise noted.
Materials & Notions
- Main Fabric: 1/3 yard of cotton or designer fabric (e.g., gray and white modern print).
- Contrast Fabric: Scraps for inner ears and front pocket (e.g., green polka dot).
- Fiberfill: High-quality polyester pillow fill.
- Marking/Face Tools: Fabric paint or fabric paint pen (black or pink).
- General Supplies: Sewing machine, matching thread, fabric scissors, pins or clips, iron, and hand-sewing needle.
Cutting Instructions
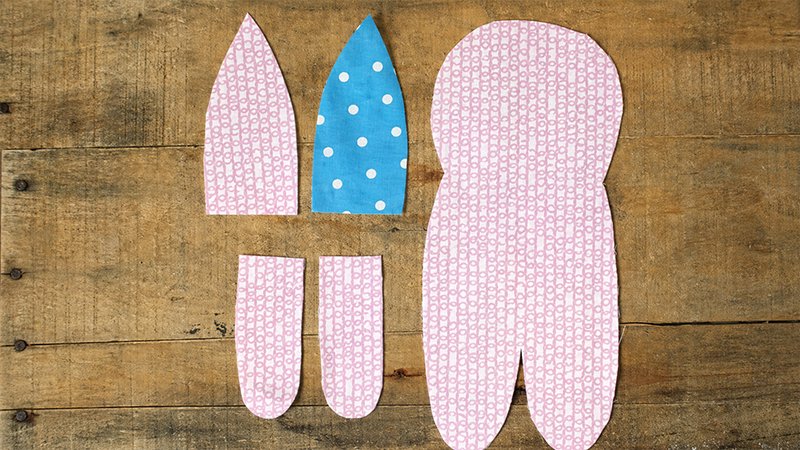
- Body: Cut 2 (1 Front, 1 Back) using the pattern template.
- Arms: Cut 4 from Main Fabric.
- Ears: Cut 4 (2 from Main Fabric, 2 from Contrast Fabric).
- Pocket: Cut 1 from Contrast Fabric.
Construction Steps
1. Prepare the Face and Pocket
- Face: On the Right Side (RS) of the Front Body piece, use a fabric paint pen to draw the eyes and nose. Allow to dry completely before handling.
- Pocket: Turn the top edge of the Pocket piece down 1/4″ to the Wrong Side (WS) and press. Topstitch the hem.
- Placement: Position the Pocket on the RS of the Front Body at the center. Pin in place.
- Attachment: Topstitch around the sides and bottom of the pocket, backstitching at the start and end. Leave the top edge open.
2. Construct the Arms
- Alignment: Place two Arm pieces Right Sides Together (RST).
- Stitching: Sew around the curved perimeter, leaving the straight top edge open.
- Turning: Clip the curves, turn the arm RS out, and press.
- Stuffing: Fill the arm with fiberfill. Leave the top opening raw/open to be integrated into the body later.
- Repeat: Repeat for the second arm.
3. Construct the Ears
- Alignment: Place one Main Fabric ear piece and one Contrast Fabric ear piece RST.
- Stitching: Sew around the perimeter, leaving the straight bottom edge open.
- Finishing: Clip the curves, turn RS out, and press flat. Do not stuff the ears.
4. Assemble the Bunny Body
- Basting Ears: Position the ears on the RS of the Front Body, pointing downward toward the center of the face. Align the raw bottom edges of the ears with the top raw edge of the head. Baste in place.
- Main Seam: Place the Back Body piece on top of the Front Body, RST. Pin the perimeter.
- Stitching: Sew around the entire body using a 1/4″ seam allowance.
- Openings: To allow for stuffing and arm insertion, leave two gaps in the side seams below the neckline:
- Leave a 1-inch opening on one side.
- Leave a 2-inch opening on the opposite side.
- Turning: Clip the curves (especially around the neck and head), then turn the bunny RS out through the 2-inch opening. Press the seams flat.
5. Finishing and Stuffing
- Body Stuffing: Insert fiberfill through the side openings until the bunny reaches the desired firmness.
- Arm Insertion: Insert the open/raw ends of the pre-stuffed arms into the 1-inch and 2-inch side openings.
- Final Closure: Pin the arms securely into the gaps, tucking the raw edges of the body fabric inward.
- Hand Stitching: Use a ladder stitch or whipstitch to hand-sew the openings closed, ensuring the needle catches both the body fabric and the arms to secure them permanently.