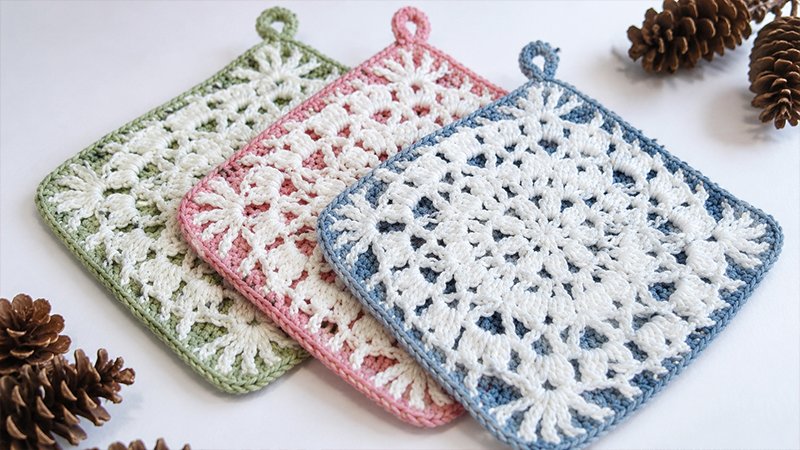
This project creates a beautiful, thick potholder by combining two distinct layers: an elegant, open-work floral lace square (Layer 1) and a dense, solid granny square (Layer 2).
When joined together, the solid background pops through the lace overlay, creating a striking contrast while offering excellent heat protection.
Materials & Specifications
-
Yarn: DK weight (#3 Light) 100% cotton yarn in two contrasting colors:
-
Color A (Lace Overlay): approx. 47 yards (43 m)
-
Color B (Solid Base): approx. 49 yards (45 m)
-
-
Hook Size: 3.5 mm (US E/4)
-
Tools: Tapestry needle for weaving in yarn ends
-
Finished Dimensions: Approximately 6.75 inches (17 cm) square
-
Gauge: 5 rounds of double crochet = 4 inches (10 cm)
Stitch Guide (US Terms)
-
ch: Chain
-
sl st: Slip stitch
-
sc: Single crochet
-
hdc: Half double crochet
-
dc: Double crochet
-
tr: Treble crochet
-
sk: Skip
-
sp / sps: Space / Spaces
-
st / sts: Stitch / Stitches
-
yo: Yarn over
-
3-dc cluster: (Yo, insert hook into stitch, yo, pull up a loop, yo, pull through 2 loops) 3 times in the same stitch. Yo, pull through all 4 loops on the hook.
Layer 1: The Lacy Floral Overlay
Using Color A, begin with an adjustable magic ring.
-
Round 1: Ch 4 (counts as 1 dc + ch-1 space). (Dc 1, ch 1) 8 times into the ring. Join with a sl st to the 3rd chain of the starting ch-4. (9 dc, 9 ch-1 spaces)
-
Round 2: Sl st into the first ch-1 space. Ch 2 (counts as the start of your cluster), complete a 3-dc cluster in the same space, ch 3. [3-dc cluster, ch 3] in every remaining ch-1 space around. Sl st to the top of the first cluster to join. (9 clusters, 9 ch-3 spaces)
-
Round 3: Sl st into the next ch-3 space. Ch 4 (counts as 1 dc + ch-1 space), (dc 1, ch 1) twice more in the same space. Work (dc 1, ch 1) 3 times into every ch-3 space around. Join with a sl st to the 3rd chain of the starting ch-4. (27 dc, 27 ch-1 spaces)
-
Round 4: Sl st into the next ch-1 space. Ch 2, complete a 3-dc cluster in the same space. (Ch 3, 3-dc cluster in next space, ch 1, sc 1 in next space, ch 1, 3-dc cluster in next space) 8 times. Ch 3, 3-dc cluster in next space, ch 1, sc 1 in next space, ch 1. Join with a sl st to the top of the first cluster. (18 clusters, 9 sc, 9 ch-3 spaces, 18 ch-1 spaces)
-
Round 5: Sl st into the next ch-3 space. Ch 5 (counts as 1 dc + ch-2 space), dc 1 in the same space. [Tr 1, ch 3, tr 1] into the next sc stitch, then [dc 1, ch 2, dc 1] into the next ch-3 space. Repeat from * to * 8 more times. [Tr 1, ch 3, tr 1] in the last sc stitch. Join with a sl st to the 3rd chain of the starting ch-5. (18 dc, 18 tr, 9 ch-2 spaces, 9 ch-3 spaces)
-
Round 6: Sl st into the first ch-2 space. Ch 2, complete a 3-dc cluster in the same space, ch 2. Work [3-dc cluster, ch 2] twice into every ch-2 and ch-3 space around. Join with a sl st to the top of the first cluster. (36 clusters, 36 ch-2 spaces) Note: The original print text had a minor mathematical typo in its final count here; it creates 36 total clusters.
-
Round 7: Sl st into the first ch-2 space. Ch 6 (counts as 1 tr + ch-2 space), (tr 1, ch 2) 4 times in the same space. Sk the next ch-2 space, dc 1 in the next space, ch 2, hdc 1 in the next space, ch 2, (sc 1 in the next space, ch 2) twice, hdc 1 in the next space, ch 2, dc 1 in the next space, ch 2. Sk the next ch-2 space, work [(tr 1, ch 2) 5 times] all into the next ch-2 space. Repeat from * to * 3 times total. Sk the next ch-2 space, dc 1 in the next space, ch 2, hdc 1 in the next space, ch 2, (sc 1 in the next space, ch 2) twice, hdc 1 in the next space, ch 2, dc 1 in the next space, ch 2. Skip the final ch-2 space, then join with a sl st to the 4th chain of the starting ch-6. (20 tr, 8 dc, 8 hdc, 8 sc, 44 ch-2 spaces)
Fasten off yarn and neatly weave in all loose ends.
Layer 2: The Solid Background Square
Using Color B, begin with an adjustable magic ring.
-
Round 1: Ch 4 (counts as 1 dc + ch-1 corner space here and throughout this section). (Dc 3 into the ring, ch 2) 3 times. Dc 2 into the ring, then join with a sl st to the 3rd chain of the starting ch-4. (3 dc per side, 4 corner spaces)
-
Rounds 2 through 8: Sl st into the corner space. Ch 4, dc 2 in the same space. Dc into every stitch across the side until you reach the next corner, then work [dc 2, ch 2, dc 2] directly into the corner space. Repeat this sequence around for all sides. On the final side, dc into each stitch across, then work 1 final dc into the starting corner space. Join with a sl st to the 3rd chain of the starting ch-4. (By the end of Round 8, you will have exactly 31 dc per side and 4 ch-2 corner spaces).
Do not fasten off. Ch 1, sl st into the corner space, ch 1, and turn your work so you are looking at the wrong side of the solid square. Tuck away and weave in only the starting center strand.
Assembly & Boarder
Stack Layer 1 directly on top of Layer 2. Make sure the smooth, right sides of both pieces are facing outward toward you.
Using the working yarn still attached to Layer 2, you will single crochet the two layers together by inserting your hook through the corresponding stitches of both pieces simultaneously.
-
Align the squares. Insert your hook from front to back through the 3rd ch-2 space of any corner on Layer 1, and then through the first stitch of the matching side on Layer 2. Work a sc.
-
Work a second sc through that exact same ch-2 space on Layer 1 and the next stitch on Layer 2.
-
Continue along the edge, matching the pieces:
-
Work 1 sc through each stitch (tr, dc, hdc, sc) of Layer 1 while matching it to the next available stitch on Layer 2.
-
Work 2 sc through the open ch-2 spaces of Layer 1 while matching them to the next two consecutive stitches on Layer 2.
-
When working across the central sc stitches of Layer 1, place 1 sc through the stitch, 1 sc through the adjacent ch-2 space, and 1 sc through the next stitch.
-
-
When you reach the exact corner point (the middle treble crochet of Layer 1’s corner fan and the ch-2 corner of Layer 2), work [sc 1, ch 1, sc 1] into that joint to create a clean turn.
-
Repeat this matching pattern around all four sides. Join with a sl st to your very first border stitch.
Adding the Hanging Loop
Without fastening off, ch 15. Skip 1 stitch on the border and sl st into the next stitch to anchor the loop. Ch 1, turn your work, and place 20 sc stitches evenly around the chain loop you just created. Join with a sl st to the base, fasten off, and weave in the final yarn tail.