Pattern Description:
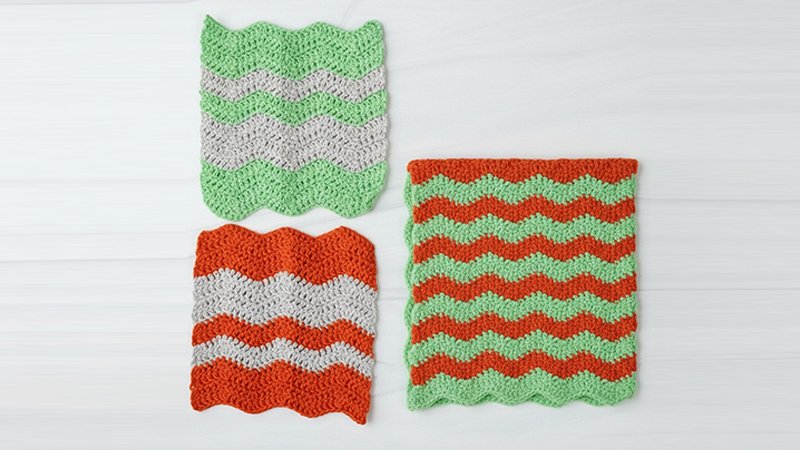
The Multi Chevron Washcloth is a colorful, textured cloth featuring crisp zigzag stripes created with simple stitch repeats.
Worked in three coordinating shades of cotton yarn, it produces a thick, absorbent fabric ideal for kitchen or bathroom use.
A practical hanging loop with a button adds convenience, while the bold chevron design brings a modern, decorative touch to everyday cleaning.
Materials Needed & Measurements:
- Yarn: Worsted-weight 100% cotton yarn in 3 colors
- Hook: 5.5 mm (US I/9) crochet hook
- Notions: ¾-inch button, yarn needle
- Finished Size: Approximately 15″ wide × 17″ tall (including hanging loop)
- Gauge: About 12 dc = 4″
Abbreviations Used
- ch – chain
- sc – single crochet
- dc – double crochet
- sl st – slip stitch
- sk – skip
- rep – repeat
- st(s) – stitch(es)
- RS – right side
- WS – wrong side
Instructions for Making the Multi Chevron Washcloth Pattern:
Foundation Row
- Using Color A, ch 57 (or any multiple of 14 + 1 for adjustment).
- Row 1 (RS): Sc in the 2nd ch from hook and in each remaining ch. Turn. This creates a firm base row that helps stabilize the peaks and valleys of the chevron design.
Establishing the Chevron Pattern
The chevron is formed by working increases at the peaks and decreases at the valleys.
- Row 2: Ch 1, sc in first st, sc2tog over next 2 sts, sc in next 5 sts, work 3 sc in next st (peak), sc in next 5 sts, sc2tog over next 2 sts, rep across until last st, sc in last st. Turn.
- Row 3: Ch 2 (counts as first dc), dc in next st, dc2tog over next 2 sts, dc in next 5 sts, 3 dc in next st, dc in next 5 sts, dc2tog over next 2 sts, rep across until 2 sts remain, dc in each of the last 2 sts. Turn.
- Row 4: Ch 1, sc in first st, sc2tog over next 2 sts, sc in next 5 sts, work 3 sc in next st, sc in next 5 sts, sc2tog, rep across until last st, sc in last st. Turn.
These three rows establish the repeating rhythm of the chevron pattern. You will alternate sc and dc rows to create texture and thickness.
Working the Color Changes
The classic multi-chevron look uses three colors. The color sequence may be customized, but a common pattern is:
Color A → Color B → Color C → repeat
Each color section typically uses 4 rows (2 sc rows, 2 dc rows).
Changing Colors
- Change colors on the last yarn-over of the final stitch of a row.
- After attaching the new color, gently tighten both working yarns to keep edges tidy.
- Carrying yarn up the side is optional since a border will later hide any floats.
Continue the Chevron Body
Repeat Rows 2-4 in the color sequence of your choice.
A standard washcloth uses 24-28 rows total. Adjust length as needed.
Pattern Notes While Continuing:
- Ensure the 3-st increase stays aligned with previous rows—this keeps peaks sharp.
- The sc2tog decreases must stay centered for the valleys to remain crisp.
- Count every few rows to ensure the stitch total remains consistent.
Preparing the Hanging Loop
The hanging loop is optional but adds convenient functionality.
Loop Setup
When the washcloth reaches your desired length, switch to Color A.
Row (Loop Base): Ch 1, sc evenly across. Turn.
Forming the Loop
- Ch 12 (or enough to comfortably fit your button).
- Sl st back into the same st you started the ch to form a loop.
- Sl st in next st for reinforcement.
- Fasten off and weave in ends.
- The loop will naturally sit at the center once the button is attached to the fabric.
Making the Button Tab
If your washcloth design uses a button tab instead of a top-corner loop:
- Rejoin Color A at the top center.
- Ch 1, sc in next 7 sts. Turn.
- Repeat sc rows for 6–8 rows to form a rectangular flap.
- Ch 1, sk 3 sts, sc in next st (buttonhole).
- Continue sc to end.
- Work one more row of sc and fasten off.
- Sew the button to the body so the flap can fold over and close securely.
Adding a Simple Border
A border makes the chevron edges more even and cohesive.
- Join Color A anywhere along an edge.
- Ch 1, work sc evenly around all sides.
- Place 3 sc in each corner.
- Join with sl st, fasten off.
Optional: Add a second round of crab stitch (reverse sc) for a textured finish.
Finishing
- Weave in all yarn tails securely.
- Lightly stretch and shape the cloth to emphasize the chevron peaks.
- Allow to dry flat for best stitch definition.