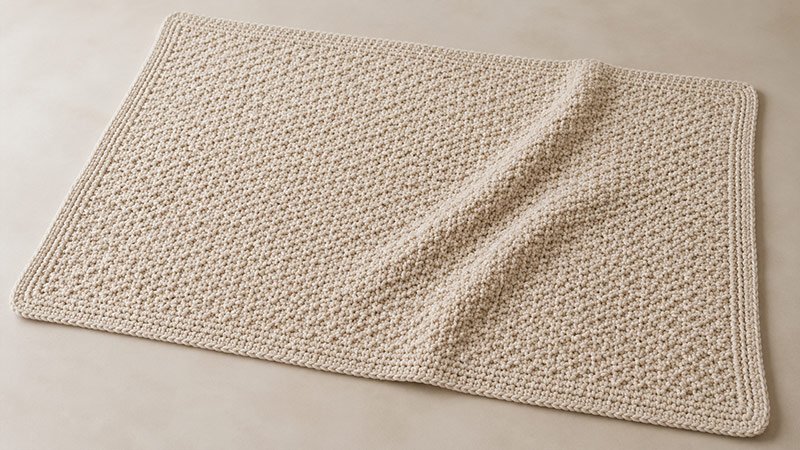
The Crochet Quinn Blanket is an original design that uses alternating single crochet and double crochet stitches to create a close, lightly textured fabric.
The same two stitches repeat across each row, making the pattern easy to follow once you have worked the first few rows.
A plain single crochet border frames the blanket and helps keep the edges neat. Make it in one color for a simple finish, or change colors at the end of a row to add stripes.
This pattern uses US crochet terms. The instructions below describe a newly written design rather than a reproduction of a published Quinn blanket pattern.
What You Need for the Quinn Blanket
THE YARN
- Approximately 1,300–1,500 yards of worsted-weight yarn, Category 4, including the border.
- Choose a smooth, washable acrylic, cotton blend, or soft wool blend.
- Buy yarn from the same dye lot when using one color.
- Allow extra yarn if you plan to enlarge the blanket or add a wider border.
Yarn use will vary with your tension, fiber choice, and finished measurements.
THE HOOK
- 5.5 mm crochet hook, or the size needed to obtain gauge.
- Optional: a hook one size larger for the foundation chain if your chains tend to be tight.
THE NOTIONS
- Yarn needle for weaving in ends.
- Scissors.
- Measuring tape.
- Four removable stitch markers.
- Optional: blocking mat and rustproof pins.
QUINN BLANKET DETAILS
FINISHED SIZE
Approximately 38 inches wide × 42 inches long, including the border.
The blanket body measures approximately 36 inches wide × 40 inches long before edging.
Measurements depend on your gauge and how firmly you work the border.
GAUGE
14 sts and 12 rows = 4 inches in the alternating sc and dc pattern, measured flat without stretching.
To make a gauge swatch:
- Ch 23.
- Sc in the 2nd ch from the hook, dc in the next ch.
- Rep sc in the next ch, dc in the next ch across. You will have 22 sts.
- Ch 1 and turn.
- Rep sc in the next st, dc in the next st across.
- Continue until the swatch measures at least 6 inches tall.
- Wash and dry as directed on the yarn label, then measure the center.
If you have too many sts within 4 inches, try a larger hook. If you have too few, try a smaller hook.
ABBREVIATIONS
- ch — chain.
- sc — single crochet.
- dc — double crochet.
- sl st — slip stitch.
- st / sts — stitch / stitches.
- rep — repeat.
- rnd / rnds — round / rounds.
- RS — right side.
- approx. — approximately.
- [ ] — work the enclosed instructions as directed.
- * * — repeat the instructions between the asterisks as directed.
SPECIAL STITCHES
Alternating sc and dc texture
Work 1 sc in one st, then 1 dc in the next st. Repeat this pair across the row.
Because each row contains an even number of sts, every row begins with sc and ends with dc. After turning, the sc stitches sit above the dc stitches from the previous row, and the dc stitches sit above the sc stitches.
Corner increase
Work 3 sc into the same corner st. Mark the middle sc. On the following rnd, work the next corner increase into that marked st.
PATTERN NOTES
- The turning ch 1 does not count as a st.
- Work into both loops of each st unless instructed otherwise.
- Each body row contains 126 sts: 63 sc and 63 dc.
- Count your sts regularly to keep the sides straight.
- Place a marker in the first and last st of the row if you have trouble finding the edges.
- The fabric is reversible. Choose either side as the RS before adding the border.
- To adjust the width, begin with any odd number of chains. This produces an even number of working sts.
- To adjust the length, add or remove body rows.
Pattern Instructions
Step 1: Make the Foundation Chain
Ch 127 loosely.
Keep the chains even and relaxed. A tight foundation can make the lower edge pull inward.
Step 2: Work Row 1
- Sc in the 2nd ch from the hook.
- Dc in the next ch.
- Rep sc in the next ch, dc in the next ch across the remaining chains.
- Stitch count: 126 sts.
- Your final st should be a dc.
Step 3: Work Row 2
- Ch 1, turn.
- Sc in the first st.
- Dc in the next st.
- Rep sc in the next st, dc in the next st across.
- Stitch count: 126 sts.
- Work the last dc into the final actual st of the previous row. Do not work into the turning ch.
Step 4: Repeat the Body Pattern
- Rows 3–120: Rep Row 2.
- Measure the blanket after laying it flat. At the stated gauge, the body should measure approx. 40 inches long.
- If needed, work more or fewer rows to reach that length. Record your final row count, as it will help you space the border sts.
- Do not fasten off if you are using the same yarn for the border.
Step 5: Check the Blanket Body
Before beginning the border:
- Confirm that the final row contains 126 sts.
- Lay the blanket flat.
- Check that the sides are reasonably straight.
- Check that the foundation edge is not pulling tightly.
- Choose the RS and keep it facing you while working the border.
Small differences in the edges can usually be evened out with careful stitch placement in the first border rnd.
Step 6: Work Border Round 1
Ch 1. Do not turn.
Top edge:
- Work 3 sc in the first st and mark the middle sc.
- Sc in each st across to the last st.
- Work 3 sc in the last st and mark the middle sc.
First side edge:
- Work sc evenly down the row ends.
- For a body of 120 rows, begin with approx. 140 sc along this side, excluding the corner groups. A useful starting rhythm is 7 sc across every 6 row ends: work 1 sc in each row end, placing an extra sc in one of those row ends.
- Spread the extra sts evenly.
Foundation edge:
- Work 3 sc into the underside of the first foundation corner and mark the middle sc.
- Sc across the unused foundation loops, working 1 sc beneath each body st between the corners.
- Work 3 sc into the final foundation corner and mark the middle sc.
Second side edge:
- Work sc evenly up the remaining side, matching the stitch count used on the first side.
- Sl st to the first sc to join.
- Lay the blanket flat. If a side ripples, reduce the number of side sts. If it pulls inward, add a few side sts before continuing.
Step 7: Work Border Rounds 2–4
- Rnd 2: Ch 1. Sc in each st around, working 3 sc in each marked corner st. Move each marker to the middle sc of the new corner group. Sl st to the first sc.
- Rnds 3–4: Rep Rnd 2.
- Keep your tension relaxed and consistent. Check after each rnd that the border lies flat.
- Fasten off, leaving a tail of approx. 6 inches.
Step 8: Weave in the Ends
Thread each yarn tail onto a yarn needle.
Weave through several stitches on the reverse side, change direction, and weave through a few more stitches to secure the tail.
Trim the excess without cutting close to the fabric.
Step 9: Wash and Shape
Follow the care instructions on the yarn label.
Gently reshape the damp blanket into a rectangle. Smooth the border and let the blanket dry flat. Avoid stretching the corners or applying direct heat unless the yarn manufacturer permits it.
Optional: Add Stripes
For broad stripes, change colors after every 12 rows.
To change colors:
- Work the final dc of the row until 2 loops remain on the hook.
- Yarn over with the new color.
- Pull through both loops to complete the dc.
- Ch 1, turn, and continue the pattern.
Leave tails long enough to weave in securely. Use one border color to frame the stripes.
Adjusting the Size
At the stated gauge, each additional 14 body sts adds approx. 4 inches to the width. Each additional 12 rows adds approx. 4 inches to the length.
For any width adjustment, keep an even number of working sts and add 1 extra ch for the foundation. For example, 140 working sts require ch 141.