Pattern Description:
Supplies and Tools Needed & Measurements:
- Supplies:
- 1 pair of striped socks
- A piece of felt for the face
- 2 buttons
- Polyfill stuffing
- Embroidery thread (2 colors- one for the face and one for mouth)
- Matching thread
- Tools:
- Scissors (or rotary cutter and a cutting mat)
- Ruler
- Iron and ironing board
- Sewing clips or pins
- Sewing machine
- Measurements:
- The size of the socks will determine the size of the monkey.
- Sewing lines are approximately 1/4 inch away from the cutting lines.
- The ladder stitch to close openings should be kept about an eighth-inch away from the edge.
- The mouth opening should be stuffed when it becomes about an inch wide.
Stitches & Abbreviations Used:
- Stitches:
- Ladder stitch
- Whip stitch
- Slip stitch
- Blanket stitch
- Baste stitch
- Embroidery branch stitches
Instructions for Making the Sock Monkeys Pattern:
Creating a sock monkey is a rewarding, beginner-friendly sewing project that combines the joy of crafting with making a beloved toy.
These instructions guide you through the process of creating your own sock monkey, ensuring an enjoyable experience:
STEP 1: Prepare the Pattern for Sock Monkey
Begin by downloading and printing the stuffed monkey pattern onto a piece of paper. Carefully cut out the necessary patterns, removing any excess fabric.
The specific patterns you will need depend on the size of the monkey you intend to make. For an adult monkey, use only the Adult eyes and adult ear patterns; for a baby monkey, cut out only the baby ear and eyes.
If you plan to make an entire monkey family, you will need to cut all the patterns out. The size of the socks you choose will determine the final size of your monkey.
To create a small monkey, use a pair of regular socks. If you desire a monkey with extra-large, huggable limbs, opt for long socks and remember to cut out the folded cuff before proceeding.
STEP 2: Prepare the Socks
Next, prepare the socks you have selected for your monkey puppet. Wash them thoroughly, then turn them wrong side out, and lightly iron them.
If your socks have a folded cuff, carefully remove its stitches. After this, iron the sock again, stretching it out slightly to prepare for the next step.
STEP 3: Transfer the Pattern and Start Sewing the Monkey Sock Puppet
This step requires two socks. One sock will be used for the monkey’s body, head, and legs, while the second sock will provide the fabric for the remaining body pieces.
Using your downloaded pattern, transfer the appropriate markings onto the socks with a washable pen or sewist chalk.
For an advanced touch, align the stripes on both fabric layers before you begin to sew and cut.
STEP 4: Sew
Once your patterns are transferred, sew along the designated sewing lines. These lines are typically positioned about 1/4 inch away from the cutting lines.
STEP 5: Cut
After sewing, proceed to cut along the cutting lines. Remember to round the corners of the limbs and tail to give them a softer, more finished appearance.
STEP 6: Turn Right Side Out
Now, carefully turn all the sewn and cut pieces right side out.
STEP 7: Stuff
Generously fill the body section, all limbs, and the tail with polyfill stuffing. Aim for the body and legs to be nice and tight, ensuring enough stuffing is used to form them well.
You can make your monkey firmer or softer, depending on your preference. Close any openings with a ladder stitch.
Keep this stitch approximately an eighth-inch away from the edge. To secure the thread, wrap it around the needle a few times, then run it through the puppet.
Push the thread inside the puppet and cut it off when the needle emerges at the other end. Finally, roll the limbs between your palms to help form the stuffing evenly.
STEP 8: Make the Ears
To create the ears, fill each ear section with stuffing. Fold the raw edge of the ear and close the opening with a ladder stitch.
Then, fold the ear vertically and ladder stitch along the seam line. If done correctly, each ear will resemble a fortune cookie. Repeat these actions for the second ear.
STEP 9: Pin All Parts to the Assigned Places
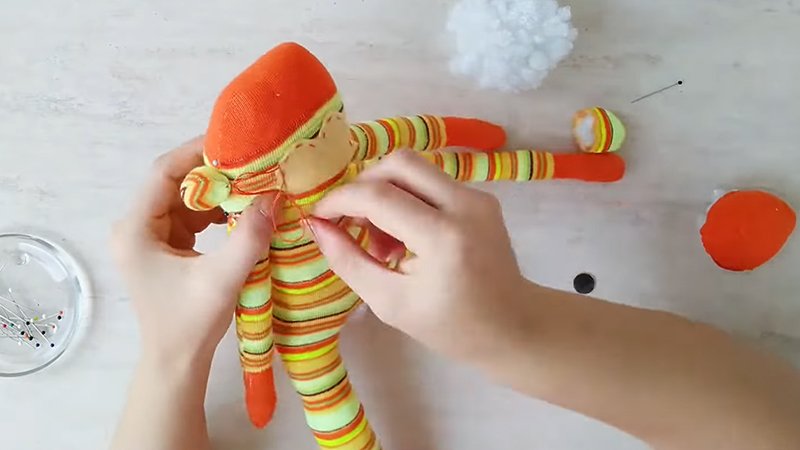
Carefully pin the arms, tail, felt eyes, mouth, and ears to their designated places on the monkey’s body.
Adjust the ears on the sides of the monkey’s head and whip stitch around them, ensuring they remain aligned with the side of the monkey.
STEP 9: Sew the Body to the Sock Monkey
Use a slip stitch to sew the arms, tail, and mouth onto the monkey’s body.
STEP 10: Let the Monkey See
Now it is time to give your monkey its eyes. Set the eye fabric in the center of the head and pin it in place. Stitch it in place with a blanket stitch.
You can use a contrasting thread here to add a pop of color to your monkey puppet. Next, sew the buttons onto their position.
For a tight and secured attachment, make sure to pull the needle out at the same side where you put it in, then tighten and knot the thread.
STEP 11: Let the Monkey Speak
To create the mouth, first, draw its desired position with a washable pen or sewist chalk. The shape should be a rounded rectangular, with its top edge aligning with the bottom edge of the eye felt section.
Fold the raw edge of the mouth and baste stitch it. Secure it with pins and sew with a ladder stitch all around the mouth section.
Stop when the opening becomes approximately an inch wide, and stuff the mouth through it. Finish the stitch and add embroidery branch stitches across the middle of the mouth for decoration.
STEP 11: (OPTIONAL) Adjust the Head
If your monkey’s head does not turn out perfectly round, you can adjust it. Pinch the fabric vertically on the top of the head and stitch it in place in that position.
Download Free PDF: