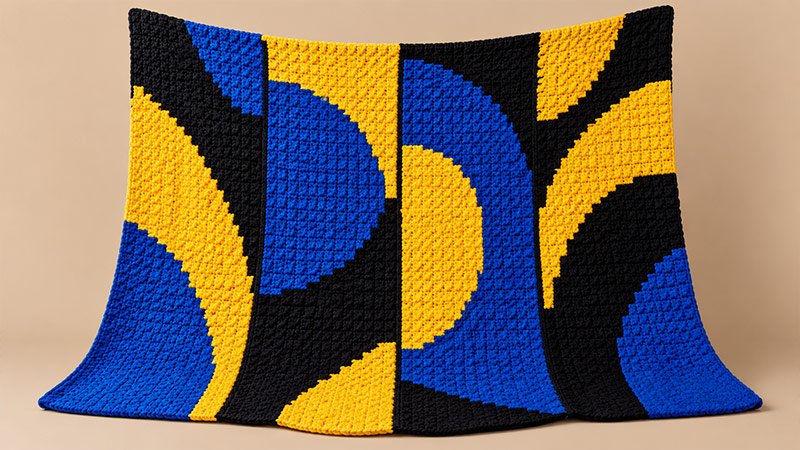
The Unwind Throw Blanket is a fun C2C crochet project. It has a bold look with neat shapes and lines. The design takes its look from wall art.
You make four panels, then join them to form one large throw. Each panel is quick and easy to work on.
Use thick yarn to help the work grow fast. Join the panels with single crochet stitches. The seams help hide yarn ends, so you have less to weave in.
You can turn or move the panels to try a new look. This lets you make a cozy throw with your own style.
Materials
-
Yarn: Bulky Weight (Category 5) – Lion Brand Rewind
- Color A (Black): 4 skeins / 805 yards
- Color B (Blue): 3 skeins / 640 yards
- Color C (Yellow): 3 skeins / 645 yards
-
Hook: Size K (6.5 mm)
-
Tools: Yarn needle, scissors
Pattern Details & Sizing
-
Finished Dimensions: 45 inches by 57 inches
-
Gauge: 4.25 blocks by 4.25 blocks = 4×4 inches
-
Terminology: Standard US Crochet Terms
Key Abbreviations & Terms
- Ch: Chain.
- Dc: Double crochet.
- Sc: Single crochet.
- Sl St: Slip stitch.
- RS / WS: Right side / wrong side.
- Square (Block): Slip stitch into the next chain-3 space. Chain 3. Make 3 double crochet stitches in that same space.
- Start or Add a Square: Chain 6. Make a double crochet in the 4th chain from the hook. Make a double crochet in each of the last 2 chains.
- Decrease Square: Turn your work. Slip stitch across the 3 double crochet stitches to reach the chain-3 space. Chain 3. Make 3 double crochet stitches in that space.
Step-by-Step Instructions
Section 1: Make the 4 Panels
Make four panels in a C2C style. Start at the bottom right corner. Add blocks until each row has 12 blocks. Keep 12 blocks in each row as you work. Then make each row less wide until one block is left.
Tie tight knots when you swap yarn colors. Leave short yarn ends.
Panel A
Step 1: Rows 1–12 (Add Blocks)
-
Add blocks until you have 12 in a row.
-
Rows 1–7: Use Color B.
-
Rows 8–12: Use Color A.
Step 2: Rows 13–60 (Keep the Same Width)
-
Keep 12 blocks in each row.
-
Add one block at one end.
-
Take one block off at the other end.
-
Use Color C, A, B, and A in the order shown on the chart.
Step 3: Rows 61–71 (Make Rows Shorter)
-
Take blocks off at both ends.
-
Row 61: Use Color A.
-
Rows 62–71: Use Color C.
-
Stop when one block is left.
-
Cut and tie off the yarn.
Panel B
Step 1: Rows 1–12 (Add Blocks)
-
Add blocks until you have 12 in a row.
-
Rows 1–9: Use Color A.
-
Rows 10–12: Use Color C.
Step 2: Rows 13–60 (Keep the Same Width)
-
Keep 12 blocks in each row.
-
Add one block at one end.
-
Take one block off at the other end.
-
Use Color C, B, A, C, B, and A in the order shown on the chart.
Step 3: Rows 61–71 (Make Rows Shorter)
-
Take blocks off at both ends.
-
Rows 61–67: Use Color B.
-
Rows 68–71: Use Color A.
-
Stop when one block is left.
-
Cut and tie off the yarn.
Panel C
Step 1: Rows 1–12 (Add Blocks)
-
Add blocks until you have 12 in a row.
-
Rows 1–11: Use Color B.
-
Row 12: Use Color C.
Step 2: Rows 13–60 (Keep the Same Width)
-
Keep 12 blocks in each row.
-
Add one block at one end.
-
Take one block off at the other end.
-
Use Color C, A, B, A, C, and B in the order shown on the chart.
Step 3: Rows 61–71 (Make Rows Shorter)
-
Take blocks off at both ends.
-
Row 61: Use Color C.
-
Rows 62–66: Use Color A.
-
Rows 67–71: Use Color B.
-
Stop when one block is left.
-
Cut and tie off the yarn.
Panel D
Step 1: Rows 1–12 (Add Blocks)
-
Add blocks until you have 12 in a row.
-
Rows 1–4: Use Color A.
-
Rows 5–6: Use Color B.
-
Rows 7–9: Use Color C.
-
Rows 10–12: Use Color A.
Step 2: Rows 13–60 (Keep the Same Width)
-
Keep 12 blocks in each row.
-
Add one block at one end.
-
Take one block off at the other end.
-
Use Color A, C, A, B, C, B, and A in the order shown on the chart.
Step 3: Rows 61–71 (Make Rows Shorter)
-
Take blocks off at both ends.
-
Rows 61–66: Use Color B.
-
Rows 67–71: Use Color C.
-
Stop when one block is left.
-
Cut and tie off the yarn.
Section 2: Panel Assembly
1. Lay the four panels side by side. Use this order: A, B, C, and D. You can flip or turn each panel to make a fun design.
2. Place Panel A and Panel B with the right sides face to face. This will keep the seams on the back.
3. Join the yarn at the base corner. Make sure the hook goes through both panels.
4. Work single crochet (sc) along the edge. Make about 3 sc in the side of each C2C block.
5. Lay the short yarn ends along the edge. Work sc over them as you go. This will hold the ends in place.
6. Join Panels B and C in the same way. Then join Panels C and D. Keep all seams on the same side.
Section 3: Finishing
Use a yarn needle to tuck in loose yarn ends at the edge of the blanket.
Optional: Add one row of single crochet all around the edge to hide any yarn ends that still show.