
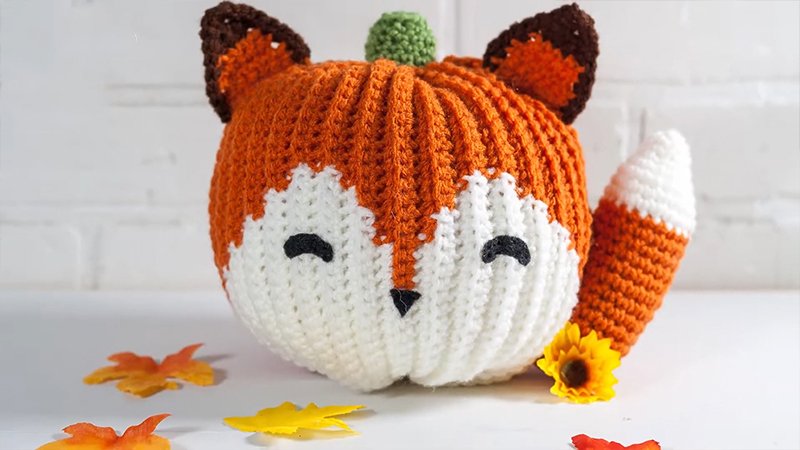
Pattern Description:
Create an adorable crochet fox pumpkin with this easy, beginner-friendly pattern! Using Back Loop Only Single Crochet (BLOSC), it forms a soft, ribbed texture.
The design includes both small and large sizes, made using the same instructions, simply adjust your hook size and yarn strands.
Perfect as a cozy fall or winter decoration, this plush fox pumpkin adds a handmade, woodland charm to any space.
Materials Needed & Measurements:
Materials Needed
- Yarn:
- 2.7-5.4 oz or 143-287 yds of Red Heart Super Saver, Carrot (Size 4 Yarn)
- 1-2 oz or 53-106 yds of Red Heart Super Saver, Soft White
- 10-20 yds of Red Heart Super Saver, Coffee or Tea Leaf
- Hooks:
- Size H 5mm Crochet Hook
- Size L 8mm Crochet Hook
- Notions & Tools:
- Yarn Needle
- Scissors
- Stuffing/Polyfil
- Stitch Marker
- Black Embroidery Floss (Black)
- Black Felt
Measurements and Gauge
The pattern is the exact same for both sizes; the size difference is achieved by changing the hook and the number of yarn strands used. Gauge is noted as not important for the overall pattern.
| Size | Hook & Yarn Requirement | Gauge | Dimensions (W x H) |
| Small Pumpkin | Size H 5mm hook and one strand of yarn | 7 SC X 7 Rows = 2 inches | 7″ wide by 8.5″ tall |
| Large Pumpkin | Size L 8mm hook and two strands of yarn held together | 5 SC X 5 Rows = 2 inches | 8.5″ wide by 13.5″ tall |
Note: For the large pumpkin, a trick for working with two strands of yarn from a single skein is to pull out the center of the skein to create two center pull skeins.
Abbreviations Used:
- CH – Chain
- SC – Single Crochet
- BLOSC – Back Loop Only Single Crochet
- CC – Change Colors
- MC – Magic Circle
- ST(s) – Stitch(es)
- SLST – Slip Stitch
Instructions for Making the Crochet Fox Pumpkin Pattern:
Crochet Pumpkin Base
Notes:
- This pattern is written in US terms.
- The pattern is exactly the same for both the small and large sizes.
- For the smaller pumpkin, use a Size H 5mm crochet hook and one strand of yarn for each color.
- For the larger pumpkin, use a Size L 8mm crochet hook and work with two strands of each color held together.
- From Row 13 through Row 51, you will change colors once in every row.
- CH 36 with Orange Yarn.
- Row 1: SC in the 2nd CH from the hook. SC in next 34 CH.
- Row 2–12: CH1, turn, BLOSC in next 35 STs.
- Row 13: CH1, turn, BLOSC 30 in Orange, CC, BLOSC 5 in White.
- Row 14: CH1, turn, BLOSC 7 in White, CC, BLOSC 28 in Orange.
- Row 15: CH1, turn, BLOSC 26 in Orange, CC, BLOSC 9 in White.
- Row 16: CH1, turn, BLOSC 11 in White, CC, BLOSC 24 in Orange.
- Row 17: CH1, turn, BLOSC 22 in Orange, CC, BLOSC 13 in White.
- Row 18: CH1, turn, BLOSC 14 in White, CC, BLOSC 21 in Orange.
- Row 19: CH1, turn, BLOSC 20 in Orange, CC, BLOSC 15 in White.
- Row 20: CH1, turn, BLOSC 16 in White, CC, BLOSC 19 in Orange.
- Row 21: CH1, turn, BLOSC 18 in Orange, CC, BLOSC 17 in White.
- Row 22: CH1, turn, BLOSC 18 in White, CC, BLOSC 17 in Orange.
- Row 23: CH1, turn, BLOSC 16 in Orange, CC, BLOSC 19 in White.
- Row 24: CH1, turn, BLOSC 20 in White, CC, BLOSC 15 in Orange.
- Row 25: CH1, turn, BLOSC 14 in Orange, CC, BLOSC 21 in White.
- Row 26: CH1, turn, BLOSC 22 in White, CC, BLOSC 13 in Orange.
- Row 27: CH1, turn, BLOSC 13 in Orange, CC, BLOSC 22 in White.
- Row 28: CH1, turn, BLOSC 22 in White, CC, BLOSC 13 in Orange.
- Row 29: CH1, turn, BLOSC 14 in Orange, CC, BLOSC 21 in White.
- Row 30: CH1, turn, BLOSC 19 in White, CC, BLOSC 16 in Orange.
- Row 31: CH1, turn, BLOSC 18 in Orange, CC, BLOSC 17 in White.
- Row 32: CH1, turn, BLOSC 13 in White, CC, BLOSC 22 in Orange.
- Row 33: CH1, turn, BLOSC 18 in Orange, CC, BLOSC 17 in White.
- Row 34: CH1, turn, BLOSC 19 in White, CC, BLOSC 16 in Orange.
- Row 35: CH1, turn, BLOSC 14 in Orange, CC, BLOSC 21 in White.
- Row 36: CH1, turn, BLOSC 22 in White, CC, BLOSC 13 in Orange.
- Row 37: CH1, turn, BLOSC 13 in Orange, CC, BLOSC 22 in White.
- Row 38: CH1, turn, BLOSC 22 in White, CC, BLOSC 13 in Orange.
- Row 39: CH1, turn, BLOSC 14 in Orange, CC, BLOSC 21 in White.
- Row 40: CH1, turn, BLOSC 20 in White, CC, BLOSC 15 in Orange.
- Row 41: CH1, turn, BLOSC 16 in Orange, CC, BLOSC 19 in White.
- Row 42: CH1, turn, BLOSC 18 in White, CC, BLOSC 17 in Orange.
- Row 43: CH1, turn, BLOSC 18 in Orange, CC, BLOSC 17 in White.
- Row 44: CH1, turn, BLOSC 16 in White, CC, BLOSC 19 in Orange.
- Row 45: CH1, turn, BLOSC 20 in Orange, CC, BLOSC 15 in White.
- Row 46: CH1, turn, BLOSC 14 in White, CC, BLOSC 21 in Orange.
- Row 47: CH1, turn, BLOSC 22 in Orange, CC, BLOSC 13 in White.
- Row 48: CH1, turn, BLOSC 11 in White, CC, BLOSC 24 in Orange.
- Row 49: CH1, turn, BLOSC 26 in Orange, CC, BLOSC 9 in White.
- Row 50: CH1, turn, BLOSC 7 in White, CC, BLOSC 28 in Orange.
- Row 51: CH1, turn, BLOSC 30 in Orange, CC, BLOSC 5 in White.
- Note: After Row 51, you are done with the white yarn. Leave a long piece (12–20 inches) of white yarn to gather the bottom of the pumpkin.
- Row 52–63: With Orange: CH1, turn, BLOSC in next 35 STs.
- Fasten off the orange yarn, leaving a very long yarn end. This long end will be used to sew the side and gather the top of the pumpkin.
Crochet Fox Pumpkin Tail
Notes: You will work in continuous rounds, using a stitch marker to track the end of each round.
- Row 1: With White: Work 4 SC into a MC. (4SC). (Alternative Row 1: CH2, Work 4 SC into 2nd CH from hook)
- Row 2: Work 2SC into next ST repeat from to a total of 4 times. (8SC).
- Row 3: SC into the next 8 STs. (8SC).
- Row 4: SC into next ST, 2SC into next ST repeat from to a total of 4 times. (12SC).
- Row 5: SC into next 2 STs, 2SC into next ST repeat from to a total of 4 times. (16SC).
- Row 6: SC into next 3 STs, 2SC into next ST repeat from to a total of 4 times. (20SC).
- Row 7–9: SC in next 20 STs. (20).
- Change your color to Orange.
- Row 10–23: SC in next 20 STs. (20).
- Fasten off, leaving a 20-inch yarn end. Stuff the tail.
- Use a yarn needle to thread the yarn end in and out of the last row of stitches. Pull tight to gather up the bottom of the fox tail.
- Do not fasten off; this yarn end will be used to sew the tail to the pumpkin.
Crochet Fox Pumpkin Ears (Make 2)
Use Brown yarn to start.
- Row 1: CH2. Work 2 SC into 2nd CH from Hook. (2SC).
- Row 2: CH1, turn, Work 2 SC into first ST. SC in next ST. (3SC).
- Row 3: CH1, turn, Work 2 SC into first ST. SC in next 2 STs. (4SC).
- Change to Orange Yarn.
- Row 4: CH1, turn, Work 2 SC into first ST. SC in next 3 STs. (5SC).
- Row 5: CH1, turn, Work 2 SC into first ST. SC in next 4 STs. (6SC).
- Row 6: CH1, turn, Work 2 SC into first ST. SC in next 5 STs. (7SC).
- Row 7: CH1, turn, Work 2 SC into first ST. SC in next 6 STs. (8SC).
- Row 8 (Optional for smooth look): Change to Brown: CH1, turn so you are working down the side of the rows. Work 1 SC into the side of each row. When you reach the top of the ear, CH2, and then work a SC into the other side of each row.
- When you reach the bottom of the second side, Fasten off and weave in your brown yarn ends. Leave enough of an orange yarn tail to sew the ear to the pumpkin.
Crochet Pumpkin Stem
Notes: Work in continuous rounds and use a stitch marker.
- Row 1: With Brown or Green: Work 6 SC into MC (6SC). (Alternative Row 1: CH2, Work 6 SC into 2nd CH from hook. (6SC))
- Row 2: Work 2SC in next ST repeat from to a total of 6 times. (12SC).
- Row 3: BLOSC in next 12 STs. (12SC).
- Row 4–7: SC in next 12 STs (12SC).
- Fasten off and weave in your ends.
Assembling the Crochet Fox Pumpkin
Adding a Fox Face
- Take black felt and cut out two eyes and a triangle nose.
- Stretch the pumpkin base out a bit to account for stretching when stuffed.
- Using black embroidery thread, sew the felt eyes and nose onto the pumpkin base.
Sewing, Gathering, and Adding the Stem
- Line up the two short ends of the pumpkin base.
- Use the long orange yarn end to sew these two ends together using a whip stitch or blanket stitch.
- Once you reach the top, leave the orange yarn end alone.
- Thread the white yarn end onto your needle and weave it in and out of the rows on the bottom of the pumpkin (working through every fourth row is suggested).
- Pull tightly on the white yarn end until the bottom gathers together.
- Make a stitch or two to close any remaining hole in the center of the gather, secure with knots, and weave in the white yarn end.
- Rethread the needle onto the orange yarn end at the top and use the same method to gather the top of the pumpkin.
- Before pulling the gather tight, stuff the fox pumpkin and the pumpkin stem.
- Pull the gather tight and stuff the bottom of the pumpkin stem into the center of the pumpkin.
- Secure the pumpkin stem in place with a few stitches, tie a knot, and weave in the ends.
Attaching the Fox Tail
- The tail should be sewn to the side of the pumpkin, right where the pumpkin sits on the surface.
- Use the long yarn end from the tail to secure the gathered bottom to the side of the pumpkin with several stitches.
- Move up the tail, making small stitches to secure the tail to the side of the pumpkin, continuing until right before the white part of the tail.
- Secure your work with a knot and weave in the ends.
Sewing on the Ears
- Use the orange yarn end left on the ears to sew them to the pumpkin.
- Position the ears about 1-2 inches away from the stem.
- Curve the ears slightly to achieve a more natural look.
Your fox pumpkin is now complete! It should be a soft and plush decoration perfect for fall and winter.
To visualize the difference between the two sizes, remember that while the steps above are identical, the small pumpkin (7″ wide by 8.5″ tall) uses a single strand of yarn, like a single thread weaving through a cloth, while the large pumpkin (8.5″ wide by 13.5″ tall) uses two strands together, making the resulting fabric thicker and the final piece larger, much like braiding two threads instead of one.


