Pattern Description:
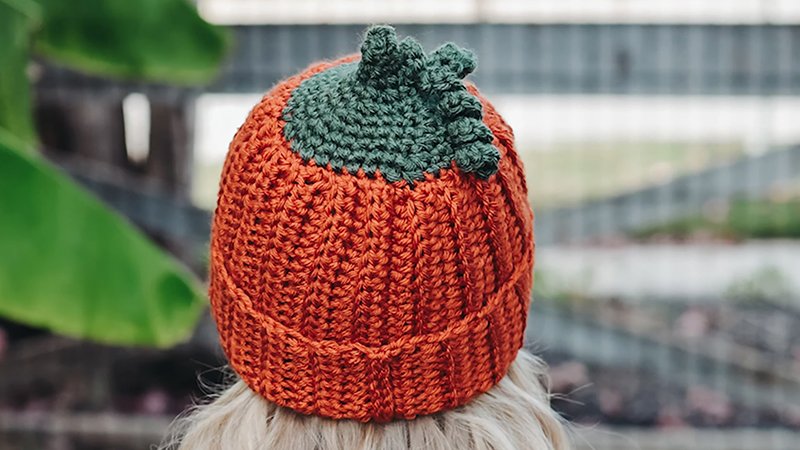
The Pumpkin Beanie is a cozy, top-down crochet hat pattern available in seven sizes, from premature baby to large adult.
Using simple post stitches like front and back post double crochet, it creates a charming pumpkin texture.
Finished with an attached stalk, leaf, and curly twirls, this fun autumn project is perfect for festive wear or seasonal gifts.
Materials Needed & Measurements:
Materials Needed
| Item | Details | |
| Yarn Type | Brava Worsted | |
| Yarn Weight | Worsted Weight (category 4), 100% Acrylic | |
| Yarn Specs | 208yds/100g | |
| Yarn Quantity | 1 ball per size of color A (for the pumpkin body, e.g., Persimmon) and about 10g of color B (for the stalk/leaf, e.g., Dublin, Fig, or Brindle) | |
| Hook | 4.5mm (G+) crochet hook | |
| Notions | Scissors and a Tapestry Needle |
Gauge
The gauge for the pattern is 14 stitches (sts) and 4.25 rounds, which should measure 10cm x 10cm (4″ x 4″) over double crochet (dc) stitches.
Sizes and Measurements
The pattern includes a total of seven sizes, ranging from premature baby up to large adult.
The following sizes correspond to the head circumference they are designed to fit:
| Size Category | Pattern Size | To Fit Head (in) |
| Child Sizes | Premature | 12-13 |
| 0-3 months | 14-15 | |
| 3-12 months | 16-17 | |
| Toddler (1-3 yrs) | 18-19 | |
| Child (3-10 yrs) | 19-20 | |
| Adult Sizes | Teen/Small Adult | 20 |
| Large Adult | 21 |
Abbreviations Used:
- ch (s) – chain(s)
- st (s) – stitch(es)
- sl st (ss) – slip stitch
- sc – single crochet (UK dc)
- hdc – half double crochet (UK htr)
- dc – double crochet (UK tr)
- FP – front post
- BP – back post
- rep – repeat
- sk – skip
- RS/WS – right side / wrong side
Instructions for Making the The Pumpkin Beanie Pattern:
Premature Baby Size
(To fit head: 12-13 in)
HAT CROWN
Using A, make a Magic Ring.
- Round 1: 12dc into Magic Ring, ss in 1st to join.
- Round 2: ch1, (dc, FPdc) in first st, (dc, FPdc) in next st, rep from around, ss in 1st to join.
- Round 3: ch1, 2dc in same st, FPdc in next st, 2dc in next st, FPdc in next st, rep from around, ss in 1st to join .
HAT BODY
- Round 1: ch1, dc in next 2 sts, FPdc in next st, rep from around, ss in 1st st to join .
- Rounds 2-5: Rep Round 1 of Hat Body.
HAT BAND
- Round 1: ch1, BPhdc in next st, FPhdc in next st, rep from around, ss in 1st to join .
- Round 2: Rep Round 1 of Hat Band.
- Round 3: ch1, reverse sc in each st around, ss in 1st to join .
Break yarn and weave in ends. Move to Leaf and Stalk Section.
Pattern Instructions: Teen/Small Adult Size
(To fit head: 20 in)
HAT CROWN
Using A, make a Magic Ring.
- Round 1: 12dc into Magic Ring, ss in 1st to join.
- Round 2: ch1, (dc, FPdc) in first st, (dc, FPdc) in next st, rep from around, ss in 1st to join.
- Round 3: ch1, 2dc in same st, FPdc in next st, 2dc in next st, FPdc in next st, rep from around, ss in 1st to join .
- Round 4: ch1, 2dc in same st, dc in next st, FPdc in next st, 2dc in next st, dc in next st, FPdc in next st, rep from around, ss in 1st to join .
- Round 5: ch1, 2dc in same st, dc in next 2sts, FPdc in next st, 2dc in next st, dc in next 2sts, FPdc in next st, rep from around, ss in 1st to join .
- Round 6: ch1, 2dc in same st, dc in next 3sts, FPdc in next st, 2dc in next st, dc in next 3sts, FPdc in next st, rep from around, ss in 1st to join .
HAT BODY
- Round 1: ch1, dc in next 5 sts, FPdc in next st, rep from around, ss in 1st st to join .
- Rounds 2-10: Rep Round 1 of Hat Body.
HAT BAND
- Round 1: ch1, BPhdc in next st, FPhdc in next st, rep from around, ss in 1st to join .
- Rounds 2-4: Rep Round 1 of Hat Band.
- Round 5: ch1, reverse sc in each st around, ss in 1st to join .
Break yarn and weave in ends. Move to Leaf and Stalk Section.
Pumpkin Hat Leaf and Stalk
(Instructions for the leaf and stalk are the same size for all hats, but can be increased or decreased if desired). Use Color B (e.g., Dublin, Fig, or Brindle).
STALK
Using B, make a Magic Ring. Leave a tail long enough to sew to hat. Work in continuous rounds.
- Round 1: 6sc into Magic Ring.
- Rounds 2-5: sc in each st around.
Slip stitch into the 1st st at the end of the final Round 5. Do not break yarn.
TWIRLS
Continue with yarn from Stalk.
- *ch19, ss in 2nd ch from hook and each ch to end, ss in same st of stalk, ss in next 2sts of stalk.
- Rep from * for the Second Twirl. Do not break yarn.
LEAF
Continue with yarn from Twirls.
- ch10, sc in 2nd ch from hook, sc in next 2chs, hdc in next 3chs, dc in next 3chs.
- ss into side of dc just worked, ss into st of stalk that has the leaf attached, ch1, rotate to work in unworked side of ch10.
- dc in next 3chs, hdc in next 3chs, sc in next 3chs.
Break yarn. Using the tail, sew the Stalk into place on the top of the hat and weave in ends to finish.