Pattern Description:
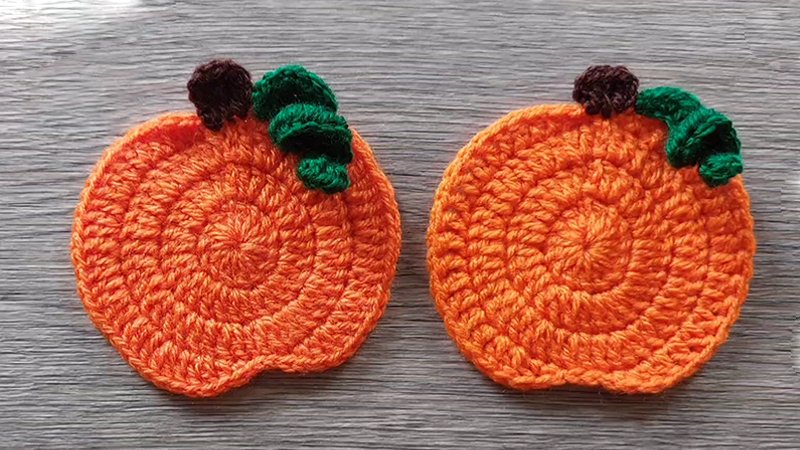
This easy and fun coaster pattern creates delightful crocheted pumpkins using worsted weight cotton yarn.
The project begins with three basic double crochet circle rows. Row 4 introduces specific stitch height variations to create the realistic pumpkin indent.
The stem is then crocheted directly on top using basic stitches, followed by sewing on a small, glorious leaf. The pattern is also suitable for making pumpkin appliques.
Materials Needed & Measurements:
| Item | Detail | |
| Crochet Hook | US G 6/4.00 mm crochet hook | |
| Yarn Type | Worsted Weight Cotton yarn | |
| Yarn Needed (For a set of 4 coasters) | Orange: 1-1/2 oz (Sample used Crafter’s Secret Cotton in Papaya) | |
| Brown: 1/8 oz (Sample used Crafter’s Secret Cotton in Brown) | ||
| Green: 6.5 yards (Sample used Lily Sugar ‘n Cream in Sage Green) | ||
| Other Tools | Yarn needle and scissors | |
| Finished Size | Approximately 4.5” wide |
The pattern uses basic crochet stitches such as the chain stitch, single crochet, and double crochet stitch. If you wanted to make a smaller pumpkin or use the pattern as an applique, you could try DK weight or thread weight yarn; for a much larger coaster, a bulky weight yarn is suggested.
Abbreviations Used:
- ch – chain
- dc – double crochet
- hdc – half double crochet
- sl st – slip stitch
- st(s) – stitch(es)
- R – round (or row)
- yo – yarn over
- rep – repeat
- beg – beginning
Instructions for Making the Great Harvest Pumpkin Coasters Pattern:
Start with Orange Color yarn, making a magic ring.
Pumpkin Coaster Base
The first three rows create the basic double crochet circle.
- R1: Ch 3 (counts as first dc here and throughout), work 11 dc into ring, join with sl st to top of starting ch. (12 sts).
- R2: Ch 3, dc in same st, 2 dc in each st around, join with sl st to top of starting ch. (24 st).
- R3: Ch 3, 2dc in next st, dc in next st, 2 dc in next. Repeat from around, join with sl st to top of starting ch. (36 st).
Shaping Row (R4)
- This row includes specific stitch height variations to give the coaster that realistic pumpkin indent.
- R4: Ch 1, sl st in each of the next 2 st, (hdc and dc) in the next st, [dc in next 2 st, 2 dc in next] four times, dc in next 2 st, (dc and hdc) in next st, Repeat from once, sl st to 1st sl st in row, changing to brown. (Note: You should sl st to the starting sl st in the row.)
Pumpkin Stem
- The stem is crocheted right on top without fastening off the orange yarn.
- Continuing with brown yarn:
- Stem: Ch 6, hdc in 3rd ch from hook, hdc in next 3 ch, sl st to 2nd sl st from R4.
- Fasten off brown and orange yarn and weave in ends.
Pumpkin Leaf
- This glorious leaf is made separately using the green yarn.
- With green yarn, Ch 5 and join to form a ring.
- R1 (Leaf): Work all of the following in the ring: ch 1, 4 hdc, (ch 2, sl st in 2nd ch from hook to form picot), 4hdc, ch 1, sl st.
Finishing
- Fasten off green yarn and sew the leaf to the coaster.
- The finished pumpkin coaster will be approximately 4.5” wide.