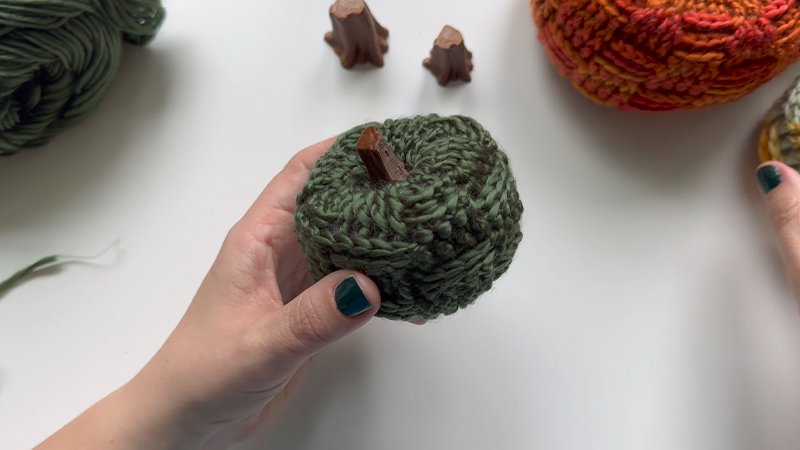
Pattern Description:
This is a free and easy checkered crochet pumpkin pattern, perfect for fall decorating through Halloween and Thanksgiving.
It uses the Linked Double Crochet Stitch (LDC) to create fabric without large gaps, ensuring you can stuff the pumpkin thoroughly.
The design utilizes a spiral patchwork technique, working in the round without a join or seam.
Color changes are managed by dropping and picking up yarn while crocheting over the non-working color, which prevents color bleed-through and minimizes weaving in ends.
Materials Needed & Measurements:
Materials Needed
- Yarn: Lion Brand Color Made Easy Weight 5/Bulky (100% acrylic).
- Color A (Birch): 2.1 oz / 75 yds.
- Color B (Anthurium): 2.2 oz / 80 yds.
- Note: Lion Brand Color Made Easy is discontinued; recommended substitutions include Lion Brand Hue + Me, Charisma yarn by Loops & Threads, or Premier Serenity Chunky yarn.
- Crochet Hook: K/10.5 (6.5 mm crochet hook).
- Scissors.
- Tapestry yarn needle.
- Sewing needle.
- Polyfil for stuffing.
Measurements
The approximate finished size varies depending on whether the item has been stuffed and sewn:
- Before stuffing and sewing: 7.5” tall x 10” wide.
- After stuffing and sewing: 4” tall x 8” wide.
Abbreviations Used:
- RS = right side
- ch = chain
- sl st = slip stitch
- yo = yarn over
- st = stitch
- sc = single crochet
- dc = double crochet
- LDC = linked double crochet
- MC = magic circle
Instructions for Making the Checkered Crochet Pumpkin Pattern:
Pumpkin Body Instructions
Use Color A (Birch) and Color B (Anthurium).
- Start: With Color A, leave a long tail (used later for sewing the bottom shut). ch 63, sc in the first ch to form a ring.
- Round 1 (RS): 1 sc in next st, 1 dc in next st, drop Color A, pull in Color B, 1 LDC in next 3 chs, drop Color B, pull in Color A, 1 LDC in next 3 chs, repeat from to to end. Do not sl st join. (63 sts).
- Round 2 – 14: drop Color A, pull in Color B, 1 LDC in next 3 sts, drop Color B, pull in Color A, 1 LDC in next 3 sts, repeat from to to end. Do not sl st join at end of round.
- To End: 1 hdc in next st, 1 sc in next st, 1 sl st in next st.
- Finishing the Body: Leave a long length of yarn (in your preferred color) to sew the top and create the ridges, then fasten off both colors. Weave in any remaining ends not left for sewing.
Pumpkin Stem
You can crochet the stem or substitute a small piece of wood or a cinnamon stick, which may need hot gluing.
- Crocheted Stem Instructions (With Color B):
- Start: Make MC.
- Round 1: ch 1, 6 sc in MC. Do not sl st join at end of round. (6 sts).
- Round 2 – 7: sc in each st. (6 sts).
- Finishing: Fasten off.
Assembly
- Sew Bottom Shut: Use the long yarn tail left at the beginning and a gathering stitch to gather the bottom of the pumpkin together. Pull the yarn tightly and sew the bottom shut. Weave in the end.
- Stuff: Fully stuff the pumpkin with Polyfil.
- Sew Top Shut: Use the long length of yarn left at the top and a gathering stitch to gather the top together. Pull tightly, but leave an opening for the stem. Knot the yarn at the first gathering stitch.
- Insert Stem: Insert the stem into the hole, then sew the stem in place and sew any remaining hole shut. If you plan to attach embellishments like buttons or crystals, they should be sewn to the right side (RS) of the pumpkin before this stage.
- Create Ridges: Create the pumpkin shape and ridges by inserting the needle from the top of the pumpkin through the bottom, repeating this process 6-8 times, spacing these long stitches evenly around the outside edge.
Tighten each ridge stitch to achieve the desired shape. Once complete, knot the yarn and weave in the end.
Creating the ridges is like cinching a balloon with evenly spaced strings, the long stitches pull the top and bottom toward each other, defining the characteristic pumpkin shape.