
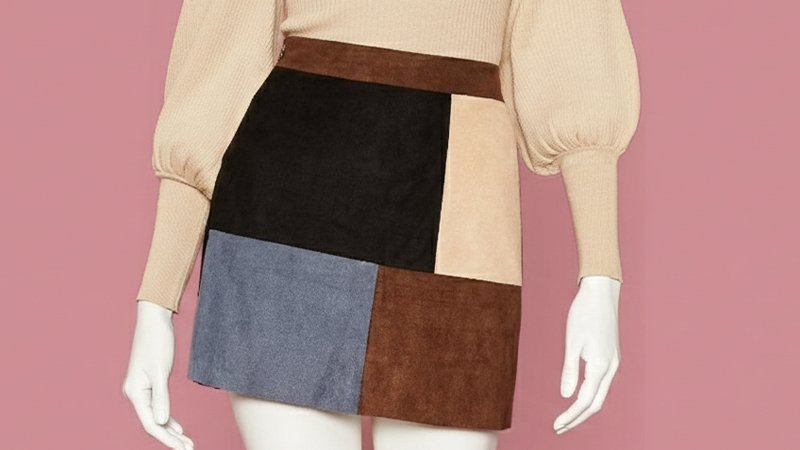
Pattern Description:
This color-block pencil skirt is quick and simple, utilizing a four-piece pattern. It uses two main panels (center front/back) and two rectangular side panels.
The center panels are shaped to the hip and slightly pegged, resulting in a fairly straight skirt. Side seams are positioned front and back, like a princess seam.
Materials Needed & Measurements:
Materials Needed:
- Pattern: Must be printed and assembled; it consists of just four pieces.
- Fabric: Needed for the center front and center back panels. A print fabric, such as a black and white animal print, can be used.
- Fabric: Used for the side panels.
- Elastic: One inch waistband elastic.
- Tools: Pins, a regular sewing machine, or optionally, a serger machine or overlocker for finishing seams.
- Stitching: A zig-zag stitch or a triple zig-zag stitch is recommended for sewing the elastic to the waist.
Measurements and Dimensions:
- Pattern Sizing: The pattern pieces should be cut out in your specific size.
- Side Panels: These are rectangles of fabric. The specific dimensions for cutting the side panels, particularly how wide to make them, depend on your size and are detailed in the instructions.
- Seam Allowance: The side seams are sewn right sides together with a half inch seam allowance.
- Waist Elastic Length: The length of the one-inch elastic is determined by wrapping it around your waist until you have exactly how much is needed for a comfortable fit.
- Skirt Shape Adjustments (Optional): The main pattern piece is fairly straight, but if you desire a skirt that is a little narrower at the bottom, you can taper it. This involves measuring in around half an inch and drawing a line 12 inches long up from the hem until it meets the side, and then cutting that piece off.
- Hem: Narrow hem stitched with a regular stitch, with the finished length being a matter of personal preference.
Instructions for Making the Colorblock Skirt Pattern:
Pattern Preparation and Cutting
The main pattern piece is shaped to the hip and then features a slight peg, resulting in a fairly straight skirt. If you desire a skirt that is a little narrower at the bottom, you may taper the pattern:
- Measure in about half an inch at the bottom.
- Draw a line 12 inches long up from the hem until it meets the side.
- Cut off this piece before using the pattern to cut your fabric. (The designer chose to leave their pattern untapered, resulting in a fairly straight skirt).
You must also cut out the side panels, which are rectangular pieces of fabric. The dimensions for how wide to make these panels are found in the pattern instructions.
Constructing the Side Seams
The skirt is assembled by attaching the side panels to the center panels.
- Place one central panel and one side panel right sides together.
- Start by matching and pinning the two edges down at the bottom near the hemline.
- Match and pin the two edges up at the top near the waist.
- Add pins all along the side seam. Do not worry if the rectangular side panel and the curved central panel do not lie perfectly flat; you are only sewing the edge.
- Sew the seam with a half inch seam allowance.
Finishing Seams and Completing the Skirt Tube
The seams should be finished to ensure a smooth interior. If you are using a serger or overlocker, you can sew, trim, and finish the seam in one step. If using a regular sewing machine, an optional method is available:
- Press both seam allowances over toward the side panel.
- From the front side, sew a second line of stitching parallel to the first seam, using a slightly smaller seam allowance. This technique catches the raw seam allowance at the back, making it lie smooth, and creates a double seam which acts as a line of interest on the outside of the skirt.
- Note: If this is your first time making the skirt, consider sewing the seams regularly and trying the skirt on for fit before applying the tidier seam finish, in case adjustments are needed.
Continue attaching the back panel to the other side of the side panel. Repeat the pinning and sewing process for the remaining three side seams. Once all four side panels are attached, the main part of the skirt will be finished, forming a tube. Note that the side seams are positioned front and back, similar to a princess seam, rather than along the immediate side of the body.
Preparing and Attaching the Elastic Waistband
- Determine the length of the one-inch wide waist elastic by wrapping it around your waist until you have the exact amount needed for a comfortable fit.
- Use a zig-zag stitch to sew the two ends together securely.
- Mark the elastic into quarters using pins (fold in half, then fold the halves together to find all four points).
- Mark the skirt fabric into quarters by matching up the seams and finding the center front and center back.
- Turn the skirt inside out. Match the quarters on the elastic with the quarters on the skirt fabric.
- Match the edge of the elastic just inside the raw edge at the top of the skirt and pin in place. (The elastic will typically be a little smaller than the skirt fabric to cinch it comfortably).
- Take the skirt to the machine and use a regular zig-zag stitch or a triple zig-zag stitch (recommended, as it is designed for stretch).
- As you sew, pull slightly on the elastic between the pins so that the loose fabric and the elastic become the same length. This distributes the fabric evenly.
Finishing the Waistband and Hem
- Turn the elastic down toward the inside of the skirt, ensuring a nice, neat fold along the top edge.
- Pin all the way around, gently pulling the fabric taut where necessary.
- Using the same zig-zag stitch, sew along the bottom of the elastic (not the top edge). This secures the elastic down and ensures plenty of stretch.
- Finally, try the skirt on to determine the finished length. Finish the bottom edge by turning up a narrow hem and stitching it with a regular stitch.


