Pattern Description:
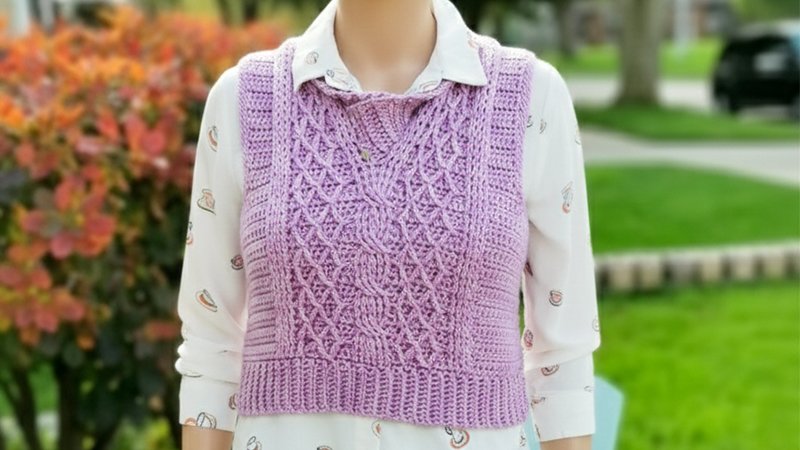
The Alice Cabled Vest is a warm, stylish layering piece featuring eye-catching crochet textures.
Designed with a swirling cable and Diamond Stitch panel, it creates a rich, dimensional look while remaining comfortable and close-fitting.
This beginner-friendly yet skill-building pattern lets crocheters practice post stitches and structured shaping.
Made in Lion Brand Basic Stitch yarn, the vest is durable, stretchy, and perfect for everyday cold-weather wear.
Materials Needed & Measurements:
Yarn and Materials
- Yarn: Lion Brand Basic Stitch (185yds/ 100g). The designer chose this yarn because it has a bit of stretch and sheen, and is machine washable.
- Color/Quantity: 4 (4, 4, 5, 5, 6, 6, 7, 8) balls of Prism.
- Hook: US Size H/8 (5.0mm) crochet hook.
- Other Materials: Yarn needle and scissors are required.
Size and Gauge
- Sizes: The pattern includes sizes Xs (Sm, Med, Lg, 1x, 2x, 3x, 4x, 5x).
- Fit: The vest is close-fitted; if you prefer a looser fit, you should choose one size larger. The size small is shown in the pattern photo.
- Bust Measurements (inches): 30 (34, 38, 42, 46, 50, 54, 58, 62).
- Gauge: 14 stitches (sts) x 10 rows equals 4 inches in pattern stitch rows 1-4. This gauge was measured across a series of several rows repeating rows 1-4.
Abbreviations Used:
- ch – chain
- sc – single crochet
- dc – double crochet
- hdc – half double crochet
- fphdc – front post half double crochet
- fpdc – front post double crochet
- bpdc – back post double crochet
- fptr – front post treble crochet
- FPtr2tog – front post treble two together
- sl st – slip stitch
- st(s) – stitch(es)
- yo – yarn over
- RS – right side
- WS – wrong side
- BLO – back loop only
- fpdc – front post double crochet
- fptr – front post treble crochet
- rep – repeat
- sk – skip
Instructions for Making the Alice Cabled Vest Pattern:
Pattern Stitch
- Row 1 (WS): Ch 2, dc in next 10 (14, 17, 21, 24, 28, 31, 35, 38) sts, bpdc around next 4 sts, dc in next 9 sts, bpdc around next 6 sts, dc in next 9 sts, bpdc around next 4 sts, dc in next 10 (14, 17, 21, 24, 28, 31, 35, 38) sts, turn.
- Row 2 (RS): Ch 1, sc in next 10 (14, 17, 21, 24, 28, 31, 35, 38) sts, fphdc around next 4 sts, sc in next 2 sts, FPtr2tog around 1st and next fptr below, sc in next 3 sts, FPtr2tog around last fptr worked and next fptr below, sc in next 2 sts*, skip next 3 sts, fptr around next 3 sts, working in front fptr around each skipped st, repeat from to , fphdc around next 4 sts, sc in next 10 (14, 17, 21, 24, 28, 31, 35, 38) sts, turn. Note: On first use, FPtr2tog is worked into the dc row below.
- Row 3: Repeat Row 1.
- Row 4: Ch 1, sc in next 10 (14, 17, 21, 24, 28, 31, 35, 38) sts, fphdc around next 4 sts, fptr around 1st FPtr2tog below, sc in next 3 sts, FPtr2tog around last fptr worked and next fptr below, sc in next 3 sts, fptr around last FPtr2tog worked, fpdc around next 6 sts; repeat from to , fphdc around next 4 sts, sc in next 10 (14, 17, 21, 24, 28, 31, 35, 38) sts, turn.
Back Panel
Hem
- Row 1: Ch 11, working in BLO, sc in 2nd ch from hook and across – 10 sc. Turn.
- Rows 2–52 (60, 66, 74, 80, 88, 94, 102, 108)
- Ch 1, sc BLO across, turn.
- Row 53 (61, 67, 75, 81, 89, 95, 103, 109)
- Rotate work. Sc evenly across row ends – 52 (60, 66, 74, 80, 88, 94, 102, 108) sc. Turn.
Back Panel Body
- Row 1 (WS): Work Pattern Stitch Row 1.
- Row 2 (RS): Ch 1, sc in 10 (14, 17, 21, 24, 28, 31, 35, 38), fphdc around next 4 sts, skip 2 sts of previous row, fptr around 3rd st of Row 1, sc in next 3 sts, FPtr2tog around last fptr worked and skip 3 sc of Row 1, finish FPtr2tog around next sc, sc in next 3 sts, fptr around last fptr worked*, fpdc around next 6 sts; repeat from to , fphdc around next 4 sts, sc in 10 (14, 17, 21, 24, 28, 31, 35, 38) sts, turn.
Continue Body
Work Pattern Stitch Rows 1–4 repeatedly until entire Back Panel measures:
9.5 (10, 10, 9.5, 9.5, 9, 8.5, 8.5, 8)” including hem, ending after Pattern Stitch Rows 2 and 3.
Back Panel – Shape Armholes
Fasten off, skip next 8 sts, join in 9th st.
- Row 1 (RS): Ch 1, sc in 2 (6, 9, 13, 16, 20, 23, 27, 30), fphdc around next 4 sts, fptr around 1st FPtr2tog below, sc 3, FPtr2tog around last fptr worked & next fptr, sc 3, fptr around last FPtr2tog*, fpdc around next 6 sts; repeat from to , fphdc around next 4 sts, sc in 2 (6, 9, 13, 16, 20, 23, 27, 30), leaving last 8 sts unworked, turn.
- Row 2 (WS): Ch 2, dc in 2 (6, 9, 13, 16, 20, 23, 27, 30), bpdc around 4 sts, dc 9, bpdc 6, dc 9, bpdc 4, dc in 2 (6, 9, 13, 16, 20, 23, 27, 30), turn.
- Row 3: Ch 1, sc in 2 (6…30), fphdc 4, sc 2, FPtr2tog, sc 3, FPtr2tog, sc 2*, skip 3 sts, fptr 3, working in front fptr around skipped sts; repeat to , fphdc 4, sc in 2 (6…30), turn.
- Row 4: Repeat Row 2.
Continue
Repeat Rows 1–4 until armhole measures:
6.5 (7, 7.5, 8, 8.5, 9, 9.5, 10, 10.5)”, ending on a RS row. Fasten off.
Front Panel
Work Hem and Body exactly as for Back Panel.
Shape Left Armhole
Fasten off, skip next 8 sts, join in 9th st.
- Row 1 (RS): Ch 1, sc in 2 (6, 9, 13, 16, 20, 23, 27, 30), fphdc 4, fptr around 1st FPtr2tog below, sc 3, FPtr2tog, sc 3, fptr around last FPtr2tog*, fphdc around next 3 sts, leaving remainder unworked — 18 (22, 25, 29, 32, 36, 39, 43, 46) sts. Turn.
- Row 2 (WS): Ch 2, bpdc 3, dc 9, bpdc 4, dc in 2 (6…30), turn.
- Row 3: Ch 1, sc in 2 (6…30), fphdc 4, sc 2, FPtr2tog, sc 3, FPtr2tog*, sc 2, fphdc 3, turn.
- Row 4: Repeat Row 2.
- Repeat Rows 1–4 to same armhole length as Back Panel.
- Fasten off.
Shape Right Armhole
Join in next fpdc left unworked at center cable.
- Row 1 (RS): Ch 2, fphdc 3, fptr around first FPtr2tog below, sc 3, FPtr2tog, sc 3, fptr around last FPtr2tog*, fphdc 4, sc 2 (6…30), leaving remainder, turn – 18 (22, 25, 29, 32, 36, 39, 43, 46) sts.
- Row 2 (WS): Ch 2, dc 2 (6…30), bpdc 4, dc 9, bpdc 3, turn.
- Row 3: Ch 2, fphdc 3, sc 2, FPtr2tog, sc 3, FPtr2tog, sc 2*, fphdc 4, sc 2 (6…30), turn.
- Row 4: Repeat Row 2.
- Repeat Rows 1–4 until armhole equals Back Panel. Fasten off.
Finishing
Seaming
- With WS facing, seam shoulders, leaving neckline opening.
- Seam sides from armhole to hem.
Collar (Optional)
- Row 1: Attach yarn at inside bottom of neckline. Ch 1, place 3 sc in each ch-2 at start of every other row. Turn.
- Row 2: Ch 9, sc in 2nd ch from hook and across – 8 sc. Sl st in next 2 sc of collar edging. Turn.
- Row 3: Ch 1, skip next 2 sl sts, sc BLO 8, turn.
- Row 4: Ch 1, sc BLO 8, sl st in next 2 sc on edging, turn.
- Repeat: Repeat Rows 3–4 around neckline. Fasten off and tack outer collar edges to shape V-neck.
Armhole Finishing
Join at underarm.
- Rnd 1: Ch 1, sc evenly around armhole, join.
- Rnds 2–3: Sl st BLO around, join.