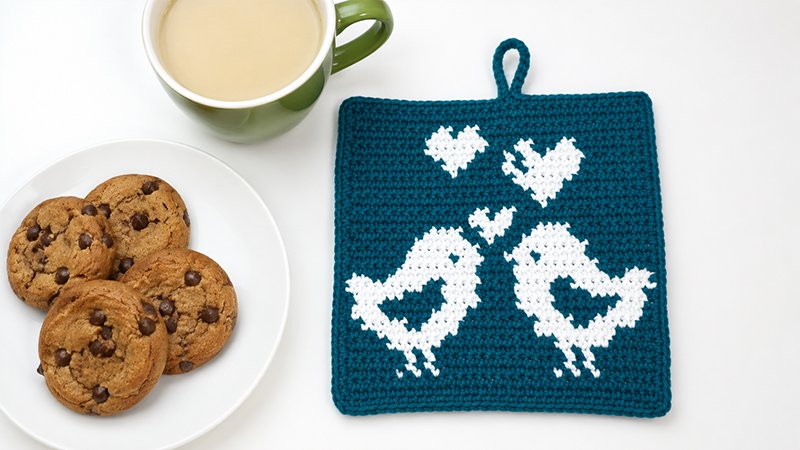
Add a handmade touch of romance to your kitchen with this charming tapestry crochet potholder. Featuring two sweet love birds, this design uses two contrasting colors of durable cotton yarn to create a thick, functional fabric perfect for handling hot dishes.
It is worked entirely in single crochet stitches using a standard color-switching technique, making it an enjoyable project for crocheters looking to practice two-color tapestry work.
Project Details
-
Finished Dimensions: Approximately ()
-
Gauge: 22.5 single crochets and 21 rows equal a () square in tapestry crochet.
-
Skill Level: Intermediate (requires managing two colors simultaneously).
Supplies Needed
-
Hook Size: 3.5 mm (US E/4)
-
Yarn: Medium weight / Aran (Category 4) 100% cotton yarn.
-
Color A (Main/Background): Red (approx. 48 yards)
-
Color B (Pattern/Birds): White (approx. 21 yards)
-
-
Tools: Tapestry needle for weaving in yarn tails.
Terminology & Guidelines (US Terms)
-
Ch: Chain
-
Sc: Single crochet
-
Sl St: Slip stitch
-
St(s): Stitch(es)
-
RS / WS: Right Side / Wrong Side
-
Color Changes: Carry the unused yarn strand inside your stitches. Change colors on the final pull-through (yarn over) of the stitch right before the new color is needed.
-
Row Count: Every row contains exactly 34 stitches. At the end of every row, chain 1 and turn your work. This turning chain does not count as a stitch.
-
Reading the Rows: Odd numbers indicate the front/Right Side of the piece; even numbers indicate the back/Wrong Side.
Step-by-Step Instructions
Main Body
Using Color A, chain 35.
-
Row 1 (RS): Starting in the second chain from your hook, single crochet across using Color A. (34 sts)
-
Row 2 (WS): Color A entirely.
-
Row 3 (RS): A 6, [B 1, A 1] twice, B 1, A 12, [B 1, A 1] twice, B 1, A 6.
-
Row 4 (WS): A 7, B 1, A 1, B 1, A 14, B 1, A 1, B 1, A 7.
-
Row 5 (RS): Work this row exactly like Row 4.
-
Row 6 (WS): A 5, B 6, A 12, B 6, A 5.
-
Row 7 (RS): A 4, B 9, A 8, B 9, A 4.
-
Row 8 (WS): A 2, B 5, A 2, B 4, A 8, B 4, A 2, B 5, A 2.
-
Row 9 (RS): A 1, B 4, A 5, B 4, A 6, B 4, A 5, B 4, A 1.
-
Row 10 (WS): A 1, B 3, A 7, B 4, A 4, B 4, A 7, B 3, A 1.
-
Row 11 (RS): A 1, B 6, [A 4, B 4] twice, A 4, B 6, A 1.
-
Row 12 (WS): B 9, A 2, B 4, A 4, B 4, A 2, B 9.
-
Row 13 (RS): B 3, A 2, B 10, A 4, B 10, A 2, B 3.
-
Row 14 (WS): A 6, B 9, A 4, B 9, A 6.
-
Row 15 (RS): A 7, B 5, A 1, B 3, A 2, B 3, A 1, B 5, A 7.
-
Row 16 (WS): A 7, B 8, A 4, B 8, A 7.
-
Row 17 (RS): A 8, B 6, A 3, B 1, A 2, B 6, A 8.
-
Row 18 (WS): A 9, B 4, A 2, B 3, A 3, B 4, A 9.
-
Row 19 (RS): A 15, B 5, A 14.
-
Row 20 (WS): A 14, B 2, A 1, B 2, A 15.
-
Row 21 (RS): A 11, B 1, A 22.
-
Row 22 (WS): A 21, B 3, A 10.
-
Row 23 (RS): A 9, B 5, A 20.
-
Row 24 (WS): A 19, B 7, A 8.
-
Row 25 (RS): A 7, B 6, A 1, B 2, A 5, B 1, A 12.
-
Row 26 (WS): A 11, B 3, A 4, B 1, A 1, B 7, A 7.
-
Row 27 (RS): A 7, B 4, A 1, B 2, A 1, B 1, A 3, B 5, A 10.
-
Row 28 (WS): A 9, B 7, A 3, B 2, A 3, B 2, A 8.
-
Row 29 (RS): A 18, B 7, A 9.
-
Row 30 (WS): A 10, B 2, A 1, B 2, A 19.
-
Rows 31 & 32: Color A entirely for both rows.
Cut yarn Color B and secure it. Do not cut Color A. Turn your work so you are facing the front (Right Side).
Edging & Hanging Loop
You will now work in a round completely around the outside of your potholder using Color A.
-
Top Edge & Loop: Single crochet in the first 17 stitches across the top. To make the loop, chain 15, then slip stitch back into the last single crochet you just made. Chain 1 and turn your work slightly to fill the loop: make 18 single crochets directly over/inside the chain loop. Slip stitch back into the same 17th base stitch to secure it. Single crochet in the remaining 17 stitches across the top edge. Chain 1 to form the first corner.
-
Left Side: Work 32 single crochets evenly down the left raw edge, then chain 1 for the corner.
-
Bottom Edge: Work 34 single crochets along the foundation chain edge, then chain 1 for the corner.
-
Right Side: Work 32 single crochets evenly up the right raw edge, chain 1 for the final corner, and slip stitch into your very first stitch to close the round.
Cut your yarn, pull it through the final loop, and weave in all loose ends securely with your tapestry needle.