Pattern Description:
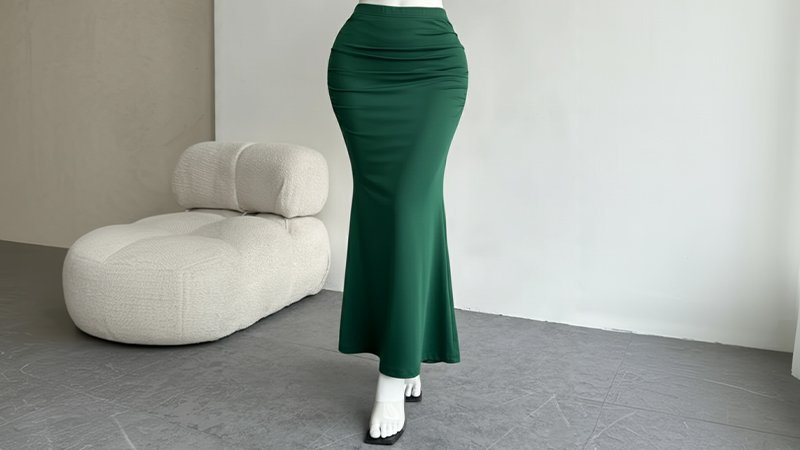
The Free Mermaid Skirt Pattern creates a sleek, figure-hugging silhouette that flares dramatically below the knee for a classic fishtail effect.
This shape is achieved by inserting four triangular godets into precisely cut slits along the lower skirt panels.
With a structured front facing, elasticized back waistband, and optional zipper opening, the design blends elegance with comfort, producing a beautifully flowing, body-shaping skirt.
Materials Needed & Measurements:
Materials Needed
- Fabric (for the main skirt, godets, facing, and tabs).
- Elastic piece (3/4 inch width).
- Zipper (either an invisible zipper or ordinary zipper).
- Interfacing (recommended for the front skirt top edge facing and hook tab).
- Hook and eye.
Body Measurements Required
- Waist round.
- Hip round.
- Knee round.
- Waist to knee length.
- The height of the skirt.
Material Measurements
Measurements for specific components include:
- Total Length: The height of the skirt plus 1 or 1.5 inches for a rolled hem, or an additional 1/2 inch for a regular hem.
- Elastic Length: Cut the elastic piece to be 1/2 of your waist minus 2 inches.
- Elastic Tabs: Two pieces of fabric 1 inch in length and 2 1/4 inches wide.
- Back Skirt Elastic Casing Fabric: Cut a piece 2.5 inches wide and 1 inch longer than the length of the top edge of the back skirt piece.
- Front Skirt Facing: Cut a piece matching the top edge of the front bodice with a height of at least 5 inches.
Instructions for Making the Mermaid Skirt Pattern:
Pattern Drafting Preparation
To begin making the pattern, several body measurements must be taken: the waist round, hip round, knee round, waist to knee length, and the height of the skirt.
The total length of the skirt fabric should be calculated as the height of the skirt plus 1 or 1.5 inches for a rolled hem, or an additional 1/2 inch for a regular hem.
Drafting the Front and Back Skirt Pieces
The following measurements are used to draft the front and back pattern pieces:
Back Mermaid Skirt Pattern
- A-B should equal 1/4 of the hip round plus 1/2 inch.
- C-D should equal 1/4 of the hip round plus 1.5 inches.
- F-E should equal 1/4 of the knee round plus 1.5 inches, where E is marked at the waist to knee measure.
- J-H should be 8 inches, and H-I should be 2 inches.
Front Mermaid Skirt Pattern
- A-C should equal 1/4 of the waist round plus 1 1/4 inches.
- A-B should be 1 inch, which accounts for a slight dip in the front waist.
- D-E should equal 1/4 of the hip round plus 1 1/4 inches.
- F-G should equal 1/4 of the knee round plus 1.5 inches.
- J-K should be 8 inches, and K-I should be 2 inches.
Once the patterns are made, cut out the back and front skirt pieces.
Mark and Cut Slits
On both the front and back pattern pieces, mark a line originating from the center fold. The measurement A-B for this line should be 1/8 of the hip round.
Mark the length of this line 18.5 inches up from the bottom edge. Cut through this marked line to form the slit.
Making and Sewing Godets
Four triangular-shaped godets are needed- two for the front slits and two for the back. Mark the godets on folded fabric and cut them out.
Next, sew the godet pieces to the four slits. Align the godet pieces on the cut space to ensure they fit, trimming the bottom if necessary.
Stitch the godet to the slit edge with right sides together. On the back of the piece, the seam allowance should be trimmed and clipped.
Front Skirt Top Edge Facing
Cut a piece of fabric for the front skirt top edge facing that matches the shape of the top edge of the front bodice, with a height of at least 5 inches.
It is recommended to interface this piece (using a sew-in or self-interfacing) to provide more structure and prevent the facing from wrinkling.
Finish the bottom edge of the facing. Place the facing on top of the front skirt (right sides together) and stitch the top edges.
Turn the facing to the other side. Understitch the seam allowance and the facing together to ensure the facing rolls easily to the back.
Back Skirt Elastic Band Casing
For the back skirt, cut a fabric piece 2.5 inches wide and 1 inch longer than the length of the top edge of the back skirt piece.
Keep this piece on top of the back piece (right sides together), allowing the fabric to slightly over-extend on the left side.
Stitch the top edge together, then turn it to the other side. Stitch the waistband casing and then trim the over-extended piece down to 1/2 inch.
Elastic Tabs
To prevent bunching at the side seams, create elastic tabs. Stitch two pieces of fabric, each 1 inch in length and 2 1/4 inches wide, into two tubes.
Turn the tubes inside out. Cut a piece of elastic (3/4 inch width) to a length that is 1/2 of your waist minus 2 inches. Insert the elastic inside the tabs and stitch it in place on either side.
Creating the Hook Tab
Make a separate tab for sewing the hook. Fold a piece of fabric (2.5 inches wide and 1 inch long), interfacing it for strength.
Sew the side and one top edge, then turn it to the other side. Secure this finished tab to the extension on one side of the back skirt using two or three stitching lines.
Sewing Side Seams
Sew one of the side seams (front and back skirts together), ensuring you select the side seam that does not have the hook tab.
While sewing this side seam, the facing should ideally be kept up. Afterward, bring the facing down and stitch the facing as well for a neater appearance.
For the other side seam, mark approximately 7 inches down from the top edge. Join the side seam, leaving the 7-inch distance unstitched where the zipper will be attached.
Attaching the Zipper
Attach the zipper. Using an invisible zipper foot can expedite the process by allowing sewing close to the zipper teeth. Stitch the zipper to both side edges.
Turn the top edge to the back of the skirt and secure it in place with hand or machine stitching. Top stitch the zipper coil using the ordinary zipper foot to stitch closely to the zipper teeth.
Inserting Elastic and Finishing the Waistband
Insert the tabbed elastic through the back waistband casing using a pin. Stitch the sides to secure the elastic on the waistband, and you can stitch through the elastic for double security.
Attach the hook to the tab that was made, and sew the eye(s) onto the skirt waistband.
Hemming
The final step is to hem the bottom edge of the skirt. A rolled edge finish can be done using a hemmer foot. The finished skirt can be worn with a petticoat for additional volume.