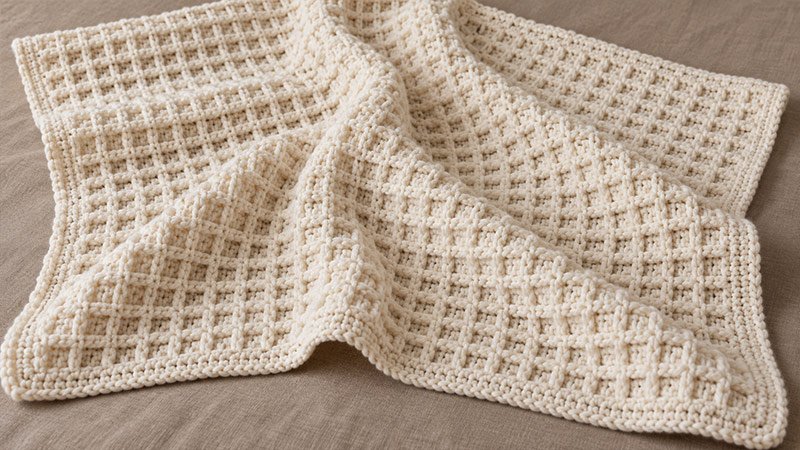
This waffle stitch crochet blanket has a raised grid on the front. The back feels more flat. Double crochet and front post double crochet form small squares. Work the first row. Then repeat two rows to build the fabric.
Use one color so the stitch texture is clear. A single crochet border gives the blanket a neat edge. Waffle stitch makes a thick fabric. It uses more yarn than plain double crochet.
Materials
- Yarn: About 2,000–2,400 yards of medium-weight #4 yarn. Choose a soft yarn suited to blankets. The amount will vary with your yarn, gauge, and border.
- Hook: 5.5 mm crochet hook, or the size needed to meet gauge.
- Yarn needle: For weaving in ends.
- Scissors
- Stitch markers: To mark the first and last stitch of each row.
- Measuring tape
Size (approximate):
43 inches wide × 52 inches long, including a border about 1 inch wide on each side.
The main blanket measures about 41 inches wide × 50 inches long before the border.
Gauge:
12 sts × 8 rows = 4 inches in waffle stitch.
Make a swatch before you start:
- Ch 26.
- Work Row 1 below to make 24 dc.
- Work Rows 2 and 3. Use seven repeats between the edge sts.
- Repeat Rows 2 and 3. Stop when the swatch is at least 6 inches tall.
- Lay the swatch flat. Do not stretch it. Measure at the center.
Use a larger hook if you have too many sts per inch. Use a smaller hook if you have too few.
Pattern Notes:
- Use US crochet terms.
- Work back and forth in rows.
- The ch-2 at each turn does not count as a st.
- On each texture row, work the first dc in the first st.
- Each blanket row has 122 sts.
- Keep one plain dc at each edge.
- Work FPdc around the post of the st below. Do not work into its top loops as well.
- Turn at the end of each row.
- Row 2 faces the front of the blanket. Row 3 faces the back.
- Keep post stitches loose. They should match the height of the plain dc.
- Count your sts after the first few rows.
- The stitch pattern needs a multiple of 3 sts, plus 2. Start with a chain that is a multiple of 3, plus 4.
- To change the length, end after a Row 3 repeat.
Abbreviations (US) & Skills:
- ch: Chain
- sc: Single crochet
- dc: Double crochet
- FPdc: Front post double crochet
- sl st: Slip stitch
- st / sts: Stitch / stitches
- rep: Repeat
- RS: Right side, or front
- WS: Wrong side, or back
Skill level: Advanced beginner.
You should know how to make chains, work dc, turn rows, and join a round with a sl st.
Front Post Double Crochet — FPdc
- Yarn over.
- Insert the hook from front to back beside the post of the next st.
- Bring the hook back to the front on the other side of that post.
- Yarn over and draw up a loop. You now have three loops on the hook.
- Yarn over and pull through two loops.
- Yarn over and pull through the last two loops.
Pattern Instructions
Step 1: Make the Starting Chain
Ch 124 loosely.
If your starting chain feels tight, use a hook one size larger for the chain. Switch to your main hook for Row 1.
Step 2: Work Row 1 — Base Row
- Dc in the 4th ch from the hook. Dc in each ch across.
- The three skipped chains count as the first dc in this row only.
- Stitch count: 122 dc, including the skipped ch-3.
Turn.
Step 3: Work Row 2 — RS
- Ch 2. Dc in the first st.
- *FPdc around the next st, dc in each of the next 2 sts; rep from * until 1 st remains.
- Dc in the last st.
- On this row, work the last dc into the top of the starting ch-3 from Row 1.
- Stitch count: 122 sts — 40 FPdc and 82 dc.
Turn.
Step 4: Work Row 3 — WS
- Ch 2. Dc in the first st.
- *Dc in the next st, FPdc around each of the next 2 sts; rep from * until 1 st remains.
- Dc in the last st.
- Stitch count: 122 sts — 80 FPdc and 42 dc.
Turn.
The plain dc in each repeat sits above the FPdc from Row 2. The two FPdc sit around the two plain dc from Row 2.
Step 5: Repeat the Waffle Stitch Rows
Repeat Rows 2 and 3 until you have worked 101 rows in total, including Row 1.
This gives you:
- 1 base row.
- 50 repeats of the two-row stitch pattern.
- A final row worked as Row 3.
At the stated gauge, the blanket body will be about 50 inches long.
For a different length, add or remove full two-row repeats. Check the length with the blanket laid flat.
Fasten off.
Step 6: Work Border Round 1
Place the blanket with the RS facing you. Join yarn in the first st of the top edge.
Ch 1. This does not count as a st.
- Work 3 sc in the first corner st.
- Sc in each st across the top, stopping before the last st.
- Work 3 sc in the last st to form the next corner.
- Work down the side, starting with about 2 sc around each row-end dc.
- Work 3 sc in the first foundation ch at the bottom corner.
- Sc in each unused foundation ch across the bottom, stopping before the last corner.
- Work 3 sc in the last foundation ch.
- Work up the other side, using the same spacing as the first side.
- Join with a sl st to the first sc.
Lay the blanket flat as you work. If the side border ripples, use fewer sc along that edge. If it pulls inward, add a few sc. Keep the spacing even on both sides.
Step 7: Work Border Rounds 2–4
- Ch 1.
- Sc in each st around. At each corner, work 3 sc in the center sc of the corner group.
- Join with a sl st to the first sc.
- Repeat until you have worked 4 border rounds in total, or until the border is about 1 inch wide.
Fasten off.
Step 8: Finish the Blanket
Use a yarn needle to weave in all ends.
Wash and dry the blanket as directed on the yarn label. Shape it while damp if needed. Keep the raised waffle texture relaxed when laying it flat.