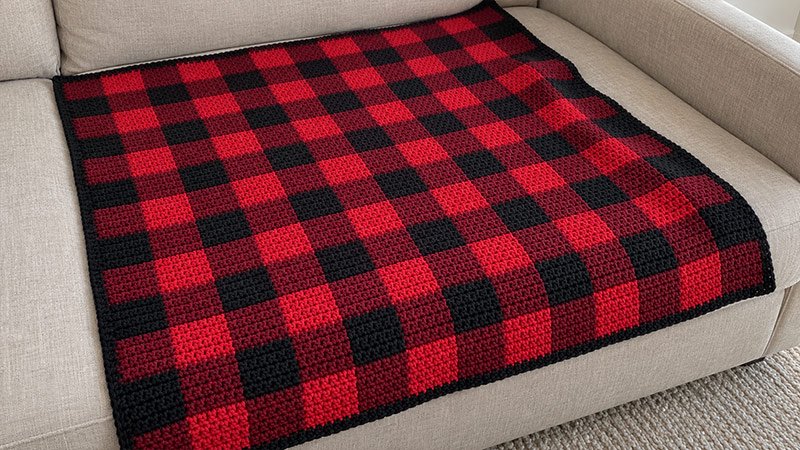
This buffalo check throw uses three shades to form a grid of squares. A light shade, a middle shade, and a dark shade create the check effect.
Each strip is worked in single crochet, with a color change after each square. Once the strips are done, join them side by side and add a plain border.
This method keeps each row short and avoids the need to carry yarn across the blanket.
Use red, burgundy, and black for a classic look, or choose three shades that suit your room. Check your gauge first to help keep the finished squares even.
Materials
- Worsted weight yarn, category 4, in three shades:
- Color A: Red, approximately 650 yards.
- Color B: Burgundy, approximately 1,300 yards.
- Color C: Black, approximately 900 yards, including joining and border.
- A 5 mm crochet hook, or the size needed to meet gauge.
- Yarn needle.
- Scissors.
- Tape measure.
- Stitch markers.
Yarn amounts are estimates. Keep extra yarn available if your gauge or border differs.
Gauge
16 sc × 20 rows = 4 × 4 inches, measured after washing and drying the swatch as you will the throw.
To check your gauge:
- Ch 21.
- Sc in the second ch from the hook and in each remaining ch. 20 sc.
- Ch 1, turn. Sc in each st across.
- Repeat Step 3 until you have 26 rows.
- Wash and dry the swatch. Measure the center 4 inches.
Use a larger hook if you have too many sts per inch. Use a smaller hook if you have too few.
Finished Measurements:
Approximately 42 × 50 inches, including a 1-inch border.
- Each check: 4 × 4 inches.
- Each strip: 4 × 48 inches.
- Joined blanket before the border: 40 × 48 inches.
- Layout: 10 checks across × 12 checks down.
The seams and your final gauge may affect the measurements slightly.
Pattern Notes
- Use US crochet terms.
- Make 10 strips: five Strip A and five Strip B.
- Work each strip back and forth in rows.
- Each row has 16 sc.
- The turning ch-1 does not count as a st.
- Turn at the end of each row.
- Each check contains 20 rows.
- Change colors after every 20 rows.
- Cut the old yarn at each color change. Leave a 6-inch tail.
- Choose a middle shade that falls between the light and dark shades. This helps form the buffalo check effect.
- Join the strips with a flat seam.
- To adjust the width, add or remove pairs of strips.
- To adjust the length, add or remove pairs of checks. Each pair adds or removes about 8 inches.
Abbreviations
- ch: Chain
- sc: Single crochet
- sl st: Slip stitch
- st / sts: Stitch / stitches
- RS: Right side
- WS: Wrong side
Pattern Instructions
Step 1: Make Strip A
Make five.
With Color A, ch 17.
Row 1: Sc in the second ch from the hook and in each ch across. 16 sc.
Rows 2–20: Ch 1, turn. Sc in each st across. 16 sc.
Change to Color B on the last sc of Row 20:
- Insert the hook into the last st.
- Yarn over with the current color and pull up a loop.
- Yarn over with the new color and pull through both loops.
- Cut the old yarn, leaving a 6-inch tail.
Rows 21–40: With Color B, ch 1, turn. Sc in each st across. 16 sc.
Continue changing colors every 20 rows:
| Rows | Color |
|---|---|
| 1–20 | A |
| 21–40 | B |
| 41–60 | A |
| 61–80 | B |
| 81–100 | A |
| 101–120 | B |
| 121–140 | A |
| 141–160 | B |
| 161–180 | A |
| 181–200 | B |
| 201–220 | A |
| 221–240 | B |
Fasten off after Row 240.
Each strip should measure approximately 4 × 48 inches.
Step 2: Make Strip B
Make five.
With Color B, ch 17.
Row 1: Sc in the second ch from the hook and in each ch across. 16 sc.
Rows 2–20: Ch 1, turn. Sc in each st across. 16 sc.
Change to Color C on the last sc of Row 20, using the method in Step 1.
Rows 21–40: With Color C, ch 1, turn. Sc in each st across. 16 sc.
Follow this color order:
| Rows | Color |
|---|---|
| 1–20 | B |
| 21–40 | C |
| 41–60 | B |
| 61–80 | C |
| 81–100 | B |
| 101–120 | C |
| 121–140 | B |
| 141–160 | C |
| 161–180 | B |
| 181–200 | C |
| 201–220 | B |
| 221–240 | C |
Fasten off after Row 240.
Step 3: Prepare the Strips
- Weave in the color-change tails on the WS.
- Wash or dampen the strips as directed on the yarn label.
- Lay each strip flat, measuring approximately 4 × 48 inches.
- Adjust the edges gently. Do not stretch the fabric.
- Let the strips dry fully.
Mark one face of each strip as the RS. Keep that face up when arranging the blanket.
Step 4: Arrange the Checks
Lay the strips side by side in this order:
A, B, A, B, A, B, A, B, A, B.
Keep all starting-chain edges at the same end.
The first band of checks will alternate red and burgundy. The next band will alternate burgundy and black. These two bands repeat down the throw.
Match each color-change point with the same point on the next strip. Place markers at these points to keep the checks aligned.
Step 5: Join the Strips
Use a yarn needle to make a flat mattress seam.
- Lay two strips side by side. Keep the RS up.
- Use Color B next to the red-and-burgundy checks. Use Color C next to the burgundy-and-black checks.
- Slide the needle under a small edge loop. Use the loop at a row end on the first strip.
- Slide the needle under the same row’s edge loop on the next strip.
- Keep going. Match each row end to the same row end.
- Once you have made a few stitches, pull the yarn with care. Stop when the edges meet.
- Keep the seam flat. Leave it loose enough to match the fabric.
- Change the seam yarn at each 20-row color change.
- Secure the seam ends. Weave in the tails.
Repeat these steps to join all 10 strips.
Step 6: Add the Border
Use Color C. Keep the RS facing you and work around the blanket without turning.
Round 1:
- Join yarn in an outer corner.
- Ch 1. Work 3 sc in that corner.
- Across the short edge, work 1 sc in each st or starting ch. Skip the corner already worked. Do not add an extra st at a seam.
- Work 3 sc in the next corner.
- Along the long edge, work approximately 4 sc for every 5 row ends, skipping corners already worked.
- Continue around, using the same spacing on opposite edges.
- Sl st in the first sc to close the round.
Place a marker in the middle sc of each 3-sc corner group.
The edge should lie flat. If it waves, use fewer sc along the sides. If it draws inward, use more.
Rounds 2–5: Ch 1. Sc in each st around, working 3 sc in each marked corner st. Move each marker to the new middle corner sc. Sl st in the first sc.
Five rounds should form a border about 1 inch wide. Adjust the number of rounds if needed.
Fasten off and weave in all remaining ends.
Step 7: Finish the Throw
- Check the seams for loose ends.
- Wash the throw according to the yarn label.
- Lay it flat and gently shape the edges.
- Let it dry fully before use.