

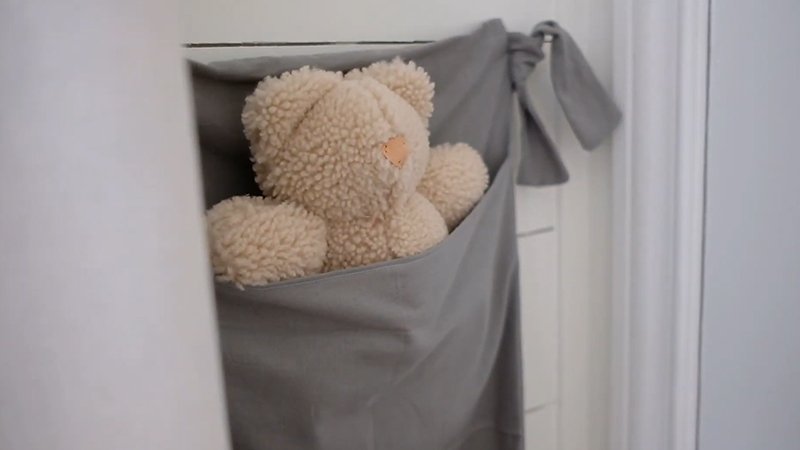
Stuffed animals have a special place in the hearts of both children and adults, serving as comforting companions and cherished collectibles.
The artistry behind stuffed animal patterns brings these beloved toys to life, transforming simple fabric into delightful characters that spark joy and imagination.
Whether it’s a cuddly bear or a whimsical unicorn, the right pattern can elevate a stuffed animal from ordinary to extraordinary.
Exploring various stuffed animal patterns opens up a world of creativity for crafters and enthusiasts alike. From classic designs to modern twists, these patterns provide endless possibilities for customization and personalization.
Dive into the enchanting world of stuffed animal patterns and discover how they can inspire your next creative project.
1. Sock Monkeys pattern

Creating a sock monkey is a fun and straightforward project. Start with a basic pair of colorful socks, ideally a long style for added versatility. Next, gather supplies like a sewing needle, thread, and stuffing to complete the monkey’s look.
Cut the socks carefully, separating the toe for the head and the leg sections for the body and limbs. Assemble the pieces by sewing them together, ensuring each limb is securely attached. Once stuffed, stitch up any openings to create a cuddly final product.
Add charming details like button eyes and a stitched smile to bring your monkey to life. Following these steps results in a delightful stuffed animal that can be cherished for years.
2. Unicorn plush pattern
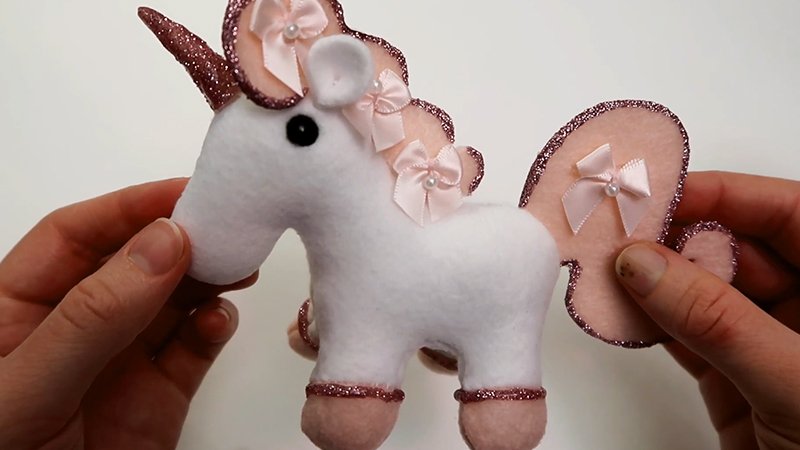
Creating a unicorn plush involves a few easy steps. First, gather your materials like soft fabric, stuffing, and sewing supplies.
Next, select a pattern that outlines the unicorn shape, which typically includes a body, head, legs, and horn. After that, cut out the fabric pieces according to the pattern, ensuring accuracy for a perfect fit.
Then, start assembling by sewing the body and attaching the legs, paying attention to alignment. Once the body is sewn, add the head, carefully securing it in place.
Fill the plush with stuffing, making it soft and cuddly, before closing up the seams. Finally, add details like embroidered eyes and a colorful mane to bring the unicorn to life.
3. Dragon pattern

Creating a dragon plush is an exciting adventure for crafters. First, gather materials like colorful fabric, thread, and stuffing. Next, choose a dragon pattern that resonates with your vision—there are countless designs, from cartoonish to realistic.
Once the pattern is selected, cut out the fabric pieces carefully, following the outlines precisely. Afterward, assemble the dragon by sewing the body parts together, leaving an opening for stuffing.
4. Fabric turtles pattern

Creating a fabric turtle begins with selecting the right materials. Crafters need soft fabric, stuffing, and sewing supplies that complement the turtle’s design.
Once materials are gathered, it’s important to choose a turtle pattern that fits one’s skill level and aesthetic preference. Many patterns are available online or in craft stores.
After selecting a pattern, the next step is to cut out the fabric pieces accurately. Following the instructions is essential for assembling the shell, body, and flippers properly.
Sewing the turtle involves carefully stitching the pieces together, leaving an opening for stuffing.
Finally, filling the turtle with stuffing and sewing the opening closed brings the delightful creation to life and results in a charming plush companion.
5. Sock Panda pattern

Creating a sock panda plush is both fun and rewarding. Start by gathering materials, including a pair of black and white socks, sewing supplies, and stuffing.
Next, cut one sock to form the panda’s body. Use the top portion for the head and save the toe section for the feet.
Following that, shape the head by folding and sewing the cut sock. Add ears using smaller pieces from the remaining white sock.
After that, stuff the body and head until they’re firm. Sew the openings securely, ensuring a cuddly finish.
6. Nessie the Loch Ness Monster pattern

Crafting a Nessie plush brings a touch of mythical wonder to any collection. Start by gathering materials like soft green fabric, stuffing, and sewing supplies, these basics are essential. Next, choose a Nessie pattern that captures the creature’s iconic long neck and playful features.
7. AMONG Us Crewmate pattern
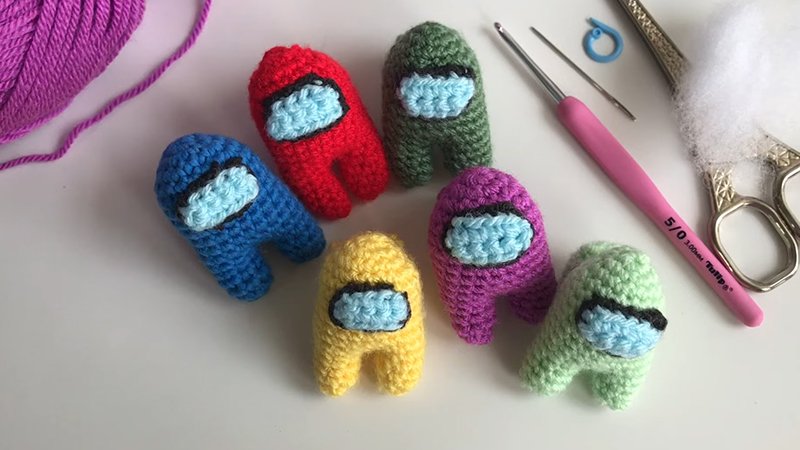
Creating an Among Us Crewmate plush starts with gathering materials like colorful felt, stuffing, and sewing supplies. Choosing a suitable pattern helps define the plush’s size and details.
Cutting out the fabric pieces accurately is crucial, as it sets the foundation for assembly. Sewing the body parts together requires precision, ensuring no seams are left open.
Stuffing the plush to the desired firmness gives it that perfect cuddle ability. Finally, adding features like eyes and a visor can bring the character to life, making it instantly recognizable. Enjoying the crafting process allows for customization, turning a simple pattern into a unique keepsake.
8. Wallace the whale pattern

Creating Wallace the whale is a delightful project for crafters of all skill levels. Gather materials such as soft blue fabric, stuffing, and sewing supplies to start your adventure. Select a whimsical pattern that captures the essence of a friendly whale.
Next, cut out the fabric pieces according to your chosen pattern. Assemble Wallace by sewing the body, leaving an opening for filling. Once assembled, stuff the whale to your desired firmness, ensuring it’s cuddly and plush.
Add final touches, like adorable eyes and a playful smile. Completing Wallace makes for a charming addition to any stuffed animal collection, bringing joy to both makers and recipients alike.
9. Squeakers the Otter pattern
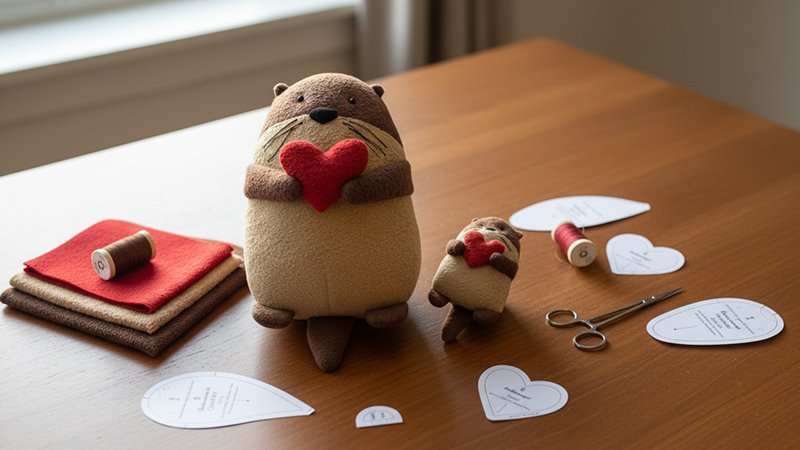
Creating Squeakers the Otter requires some fun materials. Gather soft brown and cream fabric, stuffing, along with sewing supplies.
Crafting begins by selecting a cute otter pattern. Cut out the pieces carefully, ensuring each shape resembles Squeakers.
Next, sew the body parts together, leaving an opening for stuffing. Remember to stuff it firmly for a cuddly feel.
Finish off by adding adorable eyes and a small nose. Personalizing details can really bring Squeakers to life, making it a charming plush companion.
10. Night Fury plush toy pattern
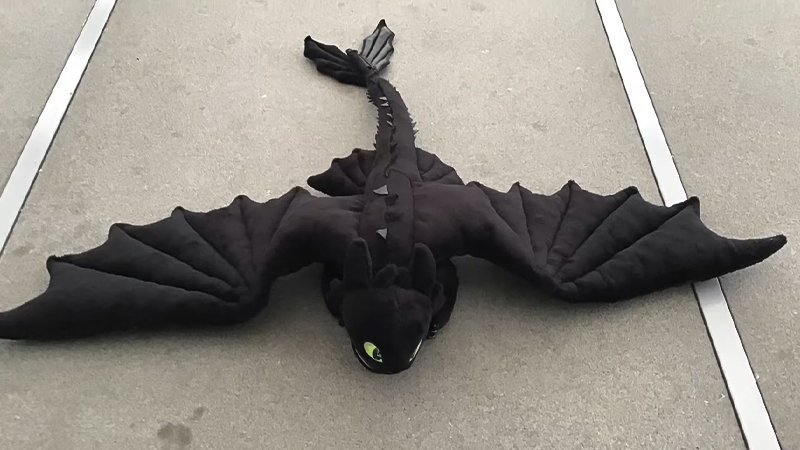
Creating a Night Fury plush toy is an exciting project for any crafter. First, gather your materials, including black fabric, stuffing, and sewing supplies. Next, choose a pattern that captures the iconic design of this beloved dragon.
After selecting your pattern, cut out the fabric pieces carefully to ensure accuracy. Assemble the plush by sewing the body parts together, leaving an opening for stuffing.
Once sewn, fill the toy with stuffing until it reaches the desired firmness. Finally, add unique features like embroidered eyes and detailed wings to bring your Night Fury to life, making it a cherished companion.
11. Mer-Kitty plush pattern
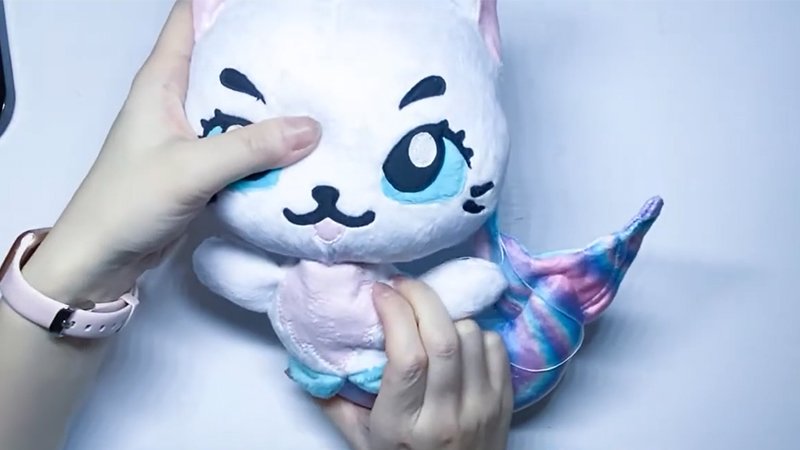
Creating a Mer-Kitty plush is an exciting way to combine the charm of cats and the magic of mermaids. Start by gathering materials such as soft fabric, stuffing, and sewing supplies. Choose a vivid color palette to bring your Mer-Kitty to life.
Next, select or design a pattern that captures both cat and mermaid features. Cut out each piece accurately, paying attention to the fins and ears. After cutting, sew the fabric pieces together, leaving an opening for stuffing.
Ensure to stuff the plush firmly, giving it a cuddly shape. Finally, add embellishments like sparkly eyes and decorative elements on the mermaid tail to personalize your creation.
12. Alpaca with embroidered saddle pattern
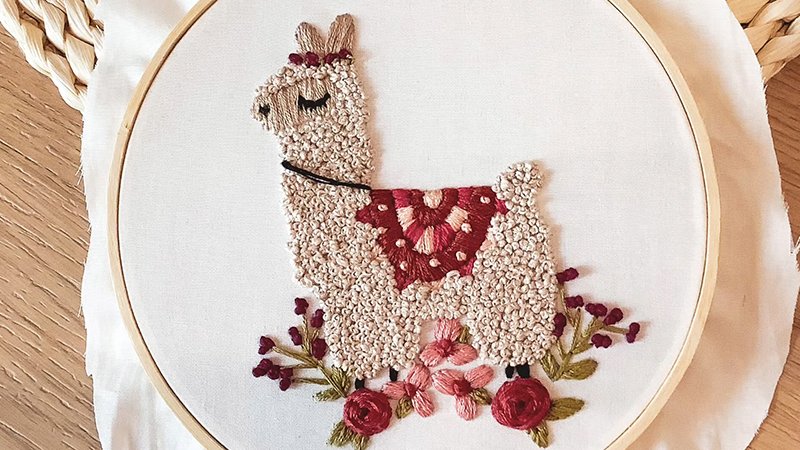
Creating an alpaca plush with an embroidered saddle is a delightful project for crafters. First, gather the necessary materials, including soft fabric, stuffing, embroidery thread, and sewing supplies.
Next, select a pattern that features the distinct shape of an alpaca, ensuring it includes details for the saddle. After cutting out the fabric pieces, sew the body parts together, leaving an opening for stuffing.
Once the plush is sewn, fill it with stuffing to the desired firmness. Finally, use embroidery thread to add decorative elements on the saddle, allowing for a colorful finish that enhances the alpaca’s charm.
13. Bunny pillow with the longest softest fur pattern

Making a bunny pillow requires soft, fluffy fabric, which gives that cozy feel. Start by selecting a pattern that showcases the bunny’s floppy ears and ample body. Cut the fabric pieces according to the chosen design, ensuring to leave seam allowances.
Next, stitch the pieces together, carefully following the outline of the pattern. It’s essential to leave an opening for stuffing. Once sewn, turn the pillow right side out and begin filling it with soft stuffing, aiming for a plush look.
Finally, close the opening with a neat hand stitch. Adding small details, like embroidered eyes and a cute nose, brings the bunny pillow to life, making it an adorable companion for any space.
14. Reversible Octopus pattern
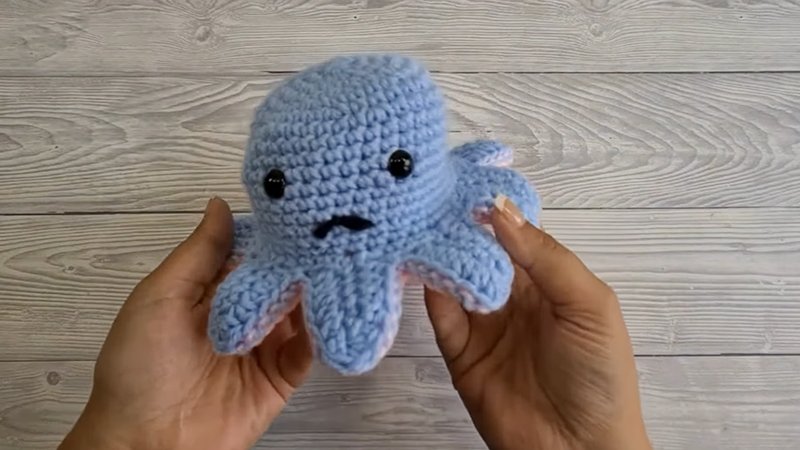
Creating a reversible octopus plush is a rewarding project. Gather soft fabric in your favorite colors, along with stuffing and basic sewing supplies. Start by choosing a simple pattern that clearly shows both sides.
Next, cut out the fabric pieces, ensuring that they mirror each other to achieve the reversible effect. Sew the pieces together, leaving an opening for stuffing.
Subsequently, fill the plush lightly with stuffing, making it soft yet stable. Finally, sew up the opening securely and add charming details like stitched eyes and a smiling mouth. This reversible octopus can flip to reveal different emotions, making it a playful companion.
15. Mama Kangaroo and joey pattern

Creating a Mama Kangaroo and her adorable joey can be a delightful project for crafters. Start with selecting soft brown or gray fabric, which captures the kangaroo’s natural look. Prepare the necessary materials, including stuffing and a sewing kit.
Cut out two main body pieces for Mama Kangaroo and one smaller piece for the joey. Then, sew the body pieces together, leaving an opening for stuffing. After turning it inside out, fill the body with stuffing to give it that huggable feel.
Attach the joey by sewing it into the front pouch of the Mama Kangaroo. Don’t forget to add features like stitched eyes and a smiling mouth, bringing the characters to life.
Finally, make sure all pieces are securely sewn to ensure durability. This charming plush duo adds a warm touch to any plush collection.
16. Sloth pattern

Creating a sloth plush is a fun, rewarding project for crafters. First, gather essential materials like soft brown fabric, eyes, stuffing, and sewing supplies.
Next, choose a sloth pattern that captures the creature’s unique features, including long limbs and a friendly expression.
After selecting the pattern, cut out the fabric pieces accurately to ensure a smooth assembly. When ready, sew the body parts together, leaving an opening for stuffing. It’s crucial to fill the plush with enough stuffing to achieve the right shape and ensure it’s cuddly.
Finally, close the opening securely and add finishing touches like stitched details or accessories to personalize the sloth. Crafters will love how their creations turn out, making each sloth plush a charming addition to any collection.
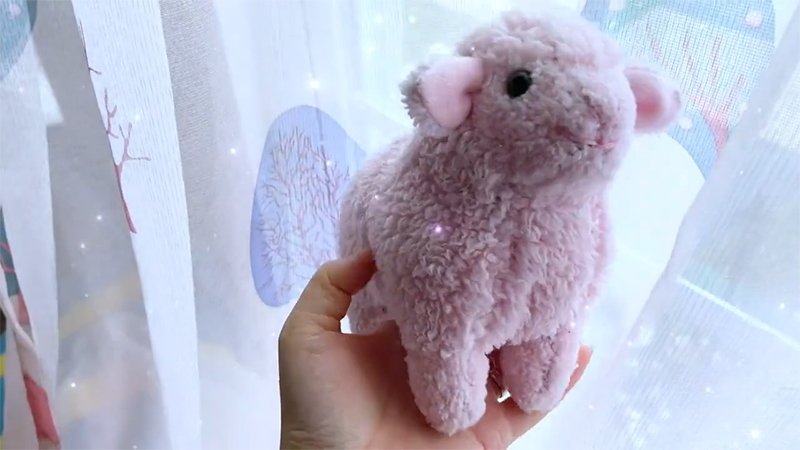
17. Cuddly Sheep pattern

Creating a cuddly sheep plush starts with selecting soft, fluffy fabric. Choose white or cream fabric for the body to achieve that classic sheep look.
Next, crafters should gather materials like stuffing and sewing supplies. Using a simple sheep pattern makes the sewing process easier.
When cutting out the fabric pieces, ensure to include legs, ears, and a face. After cutting, sew the body together, leaving an opening for stuffing.
Once stitched, fill the sheep generously to maintain its cuddly shape.
Finally, sew the opening closed and add details such as embroidered eyes and a cute tuft for a delightful finish.
18. Plushie sheep pattern
Creating a cuddly sheep plush starts with choosing soft, fluffy fabric in white or cream for the body. Next, crafters should gather stuffing and basic sewing supplies to ensure a smooth process. Selecting a simple sheep pattern helps make the sewing straightforward and enjoyable.
As for the assembly, cut out fabric pieces for the legs, ears, and face before sewing the body together. Leaving an opening for stuffing is crucial, as this allows for easy filling.
Once the sheep is generously stuffed, finalize the project by adding delightful touches, like embroidered eyes and a cute tuft on top, making it a charming addition to any collection.
19. Teddy Bear pattern
Creating a teddy bear plush begins with selecting the right materials. Soft, cuddly fabric like fleece or minky is often ideal for a comforting feel. Next, crafters should cut out the pattern pieces, including the body, arms, legs, and ears.
Assembling the bear comes next. She or he can sew the body parts together, ensuring to leave an opening for stuffing.
Filling the bear with polyester stuffing is essential; it gives the plush its huggable shape. Adding features like safety eyes and a stitched nose will bring the teddy bear to life.
Finally, closing up the opening completes the project. A teddy bear is perfect for personal touches, making it a cherished companion for anyone.
20. Swamp fun, bean bag frog pattern
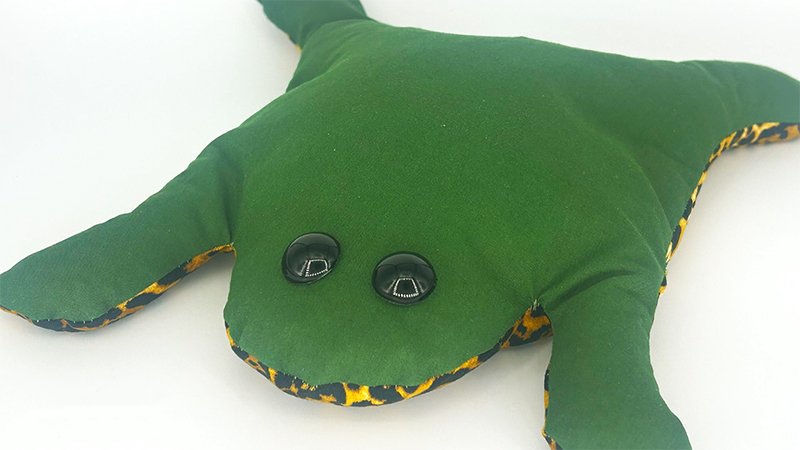
Creating a bean bag frog plush is a delightful project that combines fun and functionality. Begin by selecting a soft, green fabric for the body to mimic the iconic frog appearance. Consider cutting out two frog shapes, ensuring they’re slightly larger to allow for seams.
Next, stuff the frog with small plastic pellets or beans to give it that bean bag feel, allowing it to sit or mold into different shapes. After the stuffing, sew up the edges securely, leaving an opening for embellishments.
Finally, add adorable features like big, bulging eyes and a smile to bring the frog to life. This playful creation serves as a charming decor item or a comforting companion for anyone who loves whimsical patterns.
21. Squirrel pattern
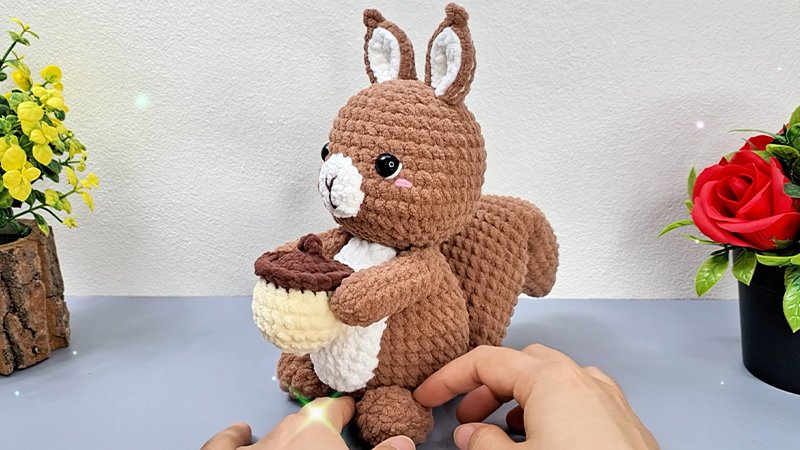
Creating a squirrel plush is an enjoyable project for crafters. Start by selecting soft gray or brown fabric, which mimics a squirrel’s natural fur. Cut out the body pieces, including the tail, ears, and paws, ensuring to have a sturdy base for stability.
Sew the body parts together, leaving an opening for stuffing. Add weight by filling it with polyester fiberfill or other stuffing materials. Later, attach the tail securely, giving it a fluffy appearance.
Embellish the squirrel with expressive features, such as embroidered eyes and a little stitched nose for that charming touch. Finally, top it off with small details like the inner ears in a contrasting color to enhance the overall design.
22. Fox pattern
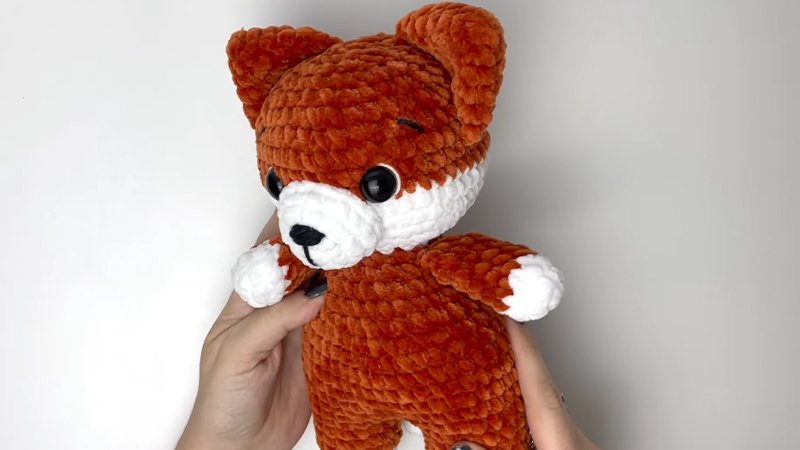
Creating a fox plush is a delightful project. Begin by selecting soft orange and white fabric to capture that iconic fox look.
Cut out your pattern pieces, including the body, ears, and tail. Assemble the body by sewing the sides together, ensuring to leave an opening for stuffing.
23. Seahorse pattern
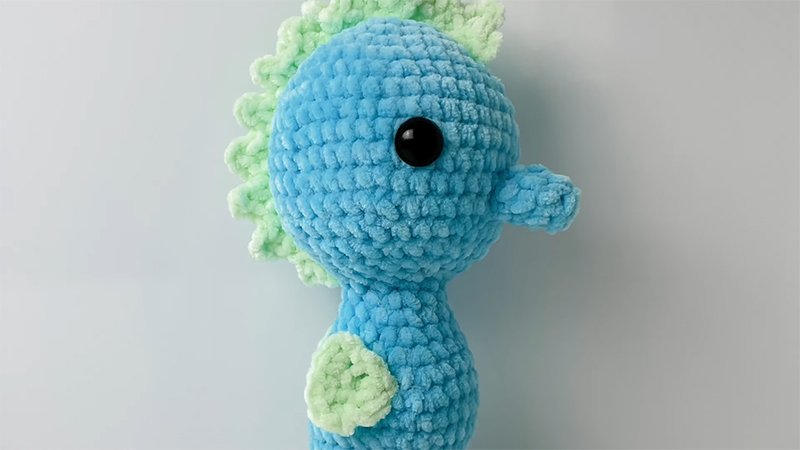
Creating a seahorse plush is an enchanting project for crafters. Choose a soft fabric in shades of blue or teal for a lifelike appearance.
Cut out the pattern pieces, focusing on the body, tail, and fins. Assemble the seahorse by sewing the body sections together, leaving an opening for stuffing.
Add a charming touch with safety eyes to give your seahorse personality. Once it’s stuffed with polyester fiberfill, sew the opening closed.
Finally, embellish with contrast stitching on the fins, making your seahorse a delightful addition to any collection.
24. Flamingo pattern
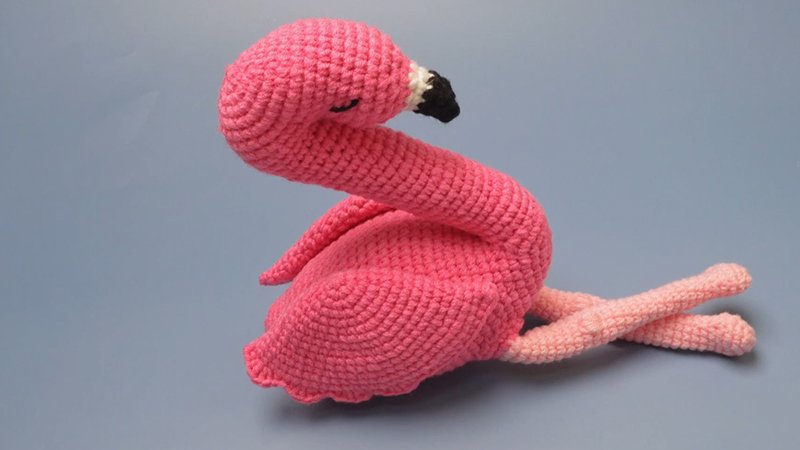
Crafters can create a whimsical flamingo plush that adds a splash of color to any space. Begin by choosing soft pink fabric, which mimics a flamingo’s vivid feathers.
Cut out pattern pieces for the body, wings, beak, and legs. Assemble the body by sewing the sides together, leaving an opening for stuffing.
Next, stuff the plush firmly with polyester fiberfill to give it shape. Add charm by sewing safety eyes and stitching a smile on the beak.
Finally, attach the wings and legs securely. This delightful flamingo plush makes an eye-catching decor piece or a special gift.
25. Giraffe pattern
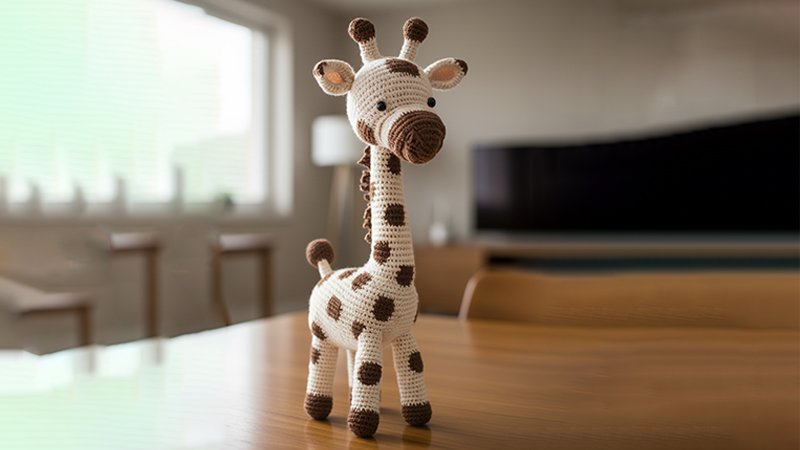
Giraffe plush toys bring a unique charm to stuffed animal collections. Begin by selecting a soft, patterned fabric in shades of yellow or brown to mimic a giraffe’s coat. Next, cut out the pieces for the body, neck, and legs, ensuring they fit together well.
Assemble the limbs first, attaching them securely to the body. After that, create the neck by connecting it to the body, giving it a sturdy base. It’s essential to leave an opening for stuffing, allowing for easy filling with polyester fiberfill.
Then, sew the plush closed and add delightful features like safety eyes and a stitched smile to give the giraffe personality.
For an extra touch, include unique markings on the fabric to enhance its design, making this plush toy a delightful companion for kids and collectors alike.
26. Christmas Mouse pattern
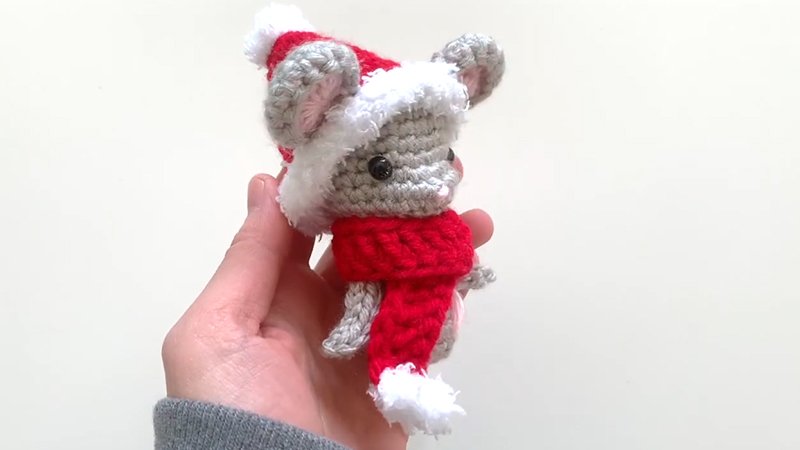
Creating a Christmas mouse plush can be a delightful holiday project. Start by selecting festive fabric in shades of red or green that captures the holiday spirit.
Next, cut out pattern pieces for the mouse’s body, ears, and tail, ensuring they’re proportional for an adorable result.
Assemble the pieces by sewing the body, leaving an opening for stuffing. Afterward, fill the mouse with plush stuffing for a cuddly feel, then stitch the opening securely.
For the finishing touches, add charming details like oversized buttons for eyes and a stitched smile to bring the mouse to life.
Consider including a small scarf or mini Santa hat for a festive flair that enhances its Christmas charm.
27. Moose pattern

Creating a moose plush involves selecting soft brown fabric that mimics the animal’s natural color. Crafters should start by cutting out pattern pieces for the body, head, legs, and antlers. Next, assembling the pieces involves sewing the legs to the body and attaching the head securely.
Stuffing the plush appropriately gives it that cuddly feel, making it an ideal companion. Adding safety eyes and embroidery for facial features brings the moose to life.
Finally, including contrasting colors for the antlers can elevate its design, ensuring the moose plush stands out in any collection.
28. Scottie Dog Pattern

Crafting a Scottie dog plush starts with choosing soft black or tartan fabric for an authentic look. Next, crafters should cut out detailed pattern pieces for the body, legs, and head.
Assembling the plush involves sewing the pieces together while leaving an opening for stuffing. After that, it’s essential to stuff the Scottie dog firmly, ensuring it has a cuddly shape.
Finally, adding features like safety eyes and an embroidered nose brings the character to life, making it a delightful companion for all ages.
29. Reindeer pattern
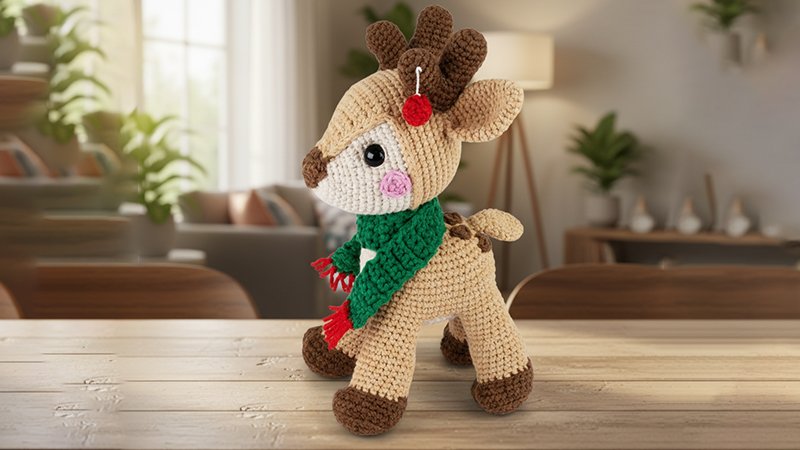
Crafters can start by selecting a soft brown fabric to mimic the reindeer’s fur. Next, they should cut out the various pattern pieces, including the body, legs, head, and antlers.
It’s essential to sew the legs onto the body securely, ensuring stability. After assembling, they should stuff the plush adequately to achieve a cuddly feel.
To bring the reindeer to life, adding safety eyes and embroidered facial features adds charm. Finally, crafters can decorate with a festive red nose and a cute scarf, perfect for creating a seasonal companion that’s delightful for kids and collectors alike.
30. Elephant pattern

Creating an elephant plush starts with selecting soft, gray fabric to emulate the animal’s unique coloring. Next, crafters cut out pattern pieces for the body, large ears, trunk, and legs.
After cutting, assembling involves sewing the body sections together, ensuring to leave an opening for stuffing.
Once assembled, crafters fill the plush with polyester fiberfill to achieve a cuddly texture. Adding details like safety eyes and a stitched mouth enhances the elephant’s charm.
Finally, finishing touches such as contrasting inner ear fabric and small tail bring the adorable design to life, creating a delightful companion for all ages.
31. Nutmeg the Rabbit pattern
Creating Nutmeg the Rabbit offers a delightful crafting opportunity. Start by selecting soft, cuddly fabric in pastel colors to reflect a gentle bunny aesthetic. Cut out the pattern pieces, including the body, ears, and legs, ensuring ample allowance for seams.
Assemble Nutmeg by sewing the body parts together, leaving an opening for stuffing. Stuff the plush generously with fiberfill to give it a huggable shape.
Add unique touches like embroidered eyes and a cute nose to bring Nutmeg to life. Don’t forget to give the ears a dash of contrasting fabric for charm. Complete the project by stitching the opening closed, securing Nutmeg as a cherished companion.
32. Shiba Cube Plush pattern

Creating a Shiba Cube plush is an engaging project for any crafter. Start by gathering materials, including soft fabric in brown, cream, or black colors, and stuffing. Cut the fabric into square pieces to form the cube shape.
Next, sew the squares together, leaving one side open for stuffing. After assembling, fill the cube with stuffing to give it a plush feel. Subsequently, stitch the opening shut securely.
Finally, add embellishments like embroidered eyes and a cute nose to bring the Shiba puppy to life. This adorable plush combines creativity with simplicity, making it a delightful addition to any collection.
33. Dolphin plushie pattern
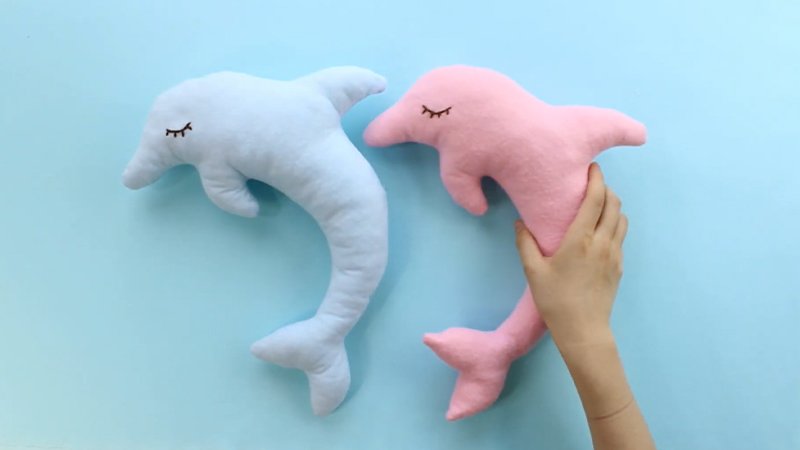
Creating a dolphin plushie involves several enjoyable steps. First, choose soft, aquatic-themed fabric in shades of blue or gray.
Next, cut the fabric into the necessary shapes, including the body, fins, and tail. It’s essential to sew the body pieces together while leaving an opening for stuffing.
After assembling the main body, turn it inside out to reveal the smooth side. Then, stuff it with soft filling to achieve the desired plumpness.
Adding delightful features like embroidered eyes or a stitched smile makes your dolphin even more charming. Finally, sew the opening closed and secure any final touches to celebrate your creativity.


