Pattern Description:
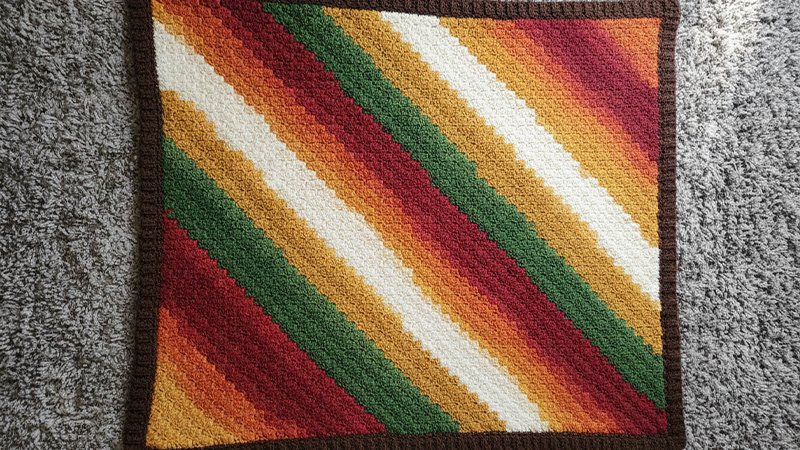
The Caspian Crochet Blanket is a colorful, yet simple C2C blanket suitable for beginners. It is made using the diagonal box stitch technique, resulting in a rectangle shape.
The project teaches basic C2C methods and includes instructions for adding a single crochet edge followed by a ribbed blanket border.
Materials Needed & Measurements:
Materials
Yarn:
- Weight: DK Weight / 3 / Yarn.
- Sample Yarn: Lion Brand Mandala Baby in Echo Caves. This self-striping yarn (100% acrylic, 590 yards / 540 m / 150 g / 5.3 oz) was used for the sample, allowing for diagonal stripes without needing to weave in many ends.
- Substitution: You may use ANY weight yarn desired. The gauge is not crucial.
Tools and Notions:
- Crochet Hook: I/9/5.50mm, or the size needed to obtain gauge. It is suggested to use a hook at least one size larger than the size listed on the chosen yarn’s ball band to achieve the desired drape.
- Locking Stitch Markers.
- Scissors.
- Yarn Needle.
Measurements
The pattern is written for 3 sizes: Baby, Lapghan, and Large Throw, but it can easily be adjusted to make any size blanket.
- Size Options (W x L):
- Baby: Approximately 30″ W x 36″ L.
- Lapghan: Approximately 38″ W x 46″ L.
- Large Throw: Approximately 58″ W x 70″ L.
ABBREVIATIONS (US TERMS)
- ch(s): chain(s)
- sl st(s): slip stitch(es)
- st(s): stitch(es)
- yo: yarn over
- sp(s): space(s)
- sc: single crochet
- hdc: half double crochet
- hdc2tog: half double crochet 2 together
- dc: double crochet
- SM: stitch marker
- Rep: repeat
- Rnd: round
- RS: Right Side
- BLO: back loop only
Instructions for Making the Caspian Blanket Pattern:
Beginning Rows
- Beginning Row 1 (RS): With yarn and a 5.50mm crochet hook, ch 6. Working into the back humps of the foundation ch, dc in the 4th ch from your hook, dc in each of the next 2 chs. Turn. (1 block) Pro Tip: Work the ch-3 tightly to help lessen gaps.
- Beginning Row 2: Ch 6, dc in the 4th ch from your hook, dc in each of the next 2 chs, ( sl st, ch 3, 3 dc ) into the next ch-3 sp. Turn. (2 blocks)
- Do not fasten off.
Increase Rows
- Note: Each row increases by 1 block, increasing both width and length. Rep until the blanket reaches the desired width.
- Increase Row 1: Ch 6, dc in the 4th ch from your hook, dc in each of the next 2 chs, ( sl st, ch 3, 3 dc ) into each ch-3 sp across. Turn. Row increases by 1 block.
- Rep Increase Row 1 until your blanket measures approximately 30″ (38″, 58″) W, or desired width. Do not fasten off.
Rectangle Rows
- Note: One end increases while the other decreases; the number of blocks per row remains the same, increasing length only.
- Rectangle Row 1: Ch 6, dc in the 4th ch from your hook, dc in each of the next 2 chs, ( sl st, ch 3, 3 dc ) into each ch-3 sp across to the last ch-3 sp, sl st in the last ch-3 sp. Turn.
- Rectangle Row 2: Sl st in each dc across to the next ch-3 sp, ( sl st, ch 3, 3 dc ) into each remaining ch-3 sp across. Turn.
- Rep Rectangle Rows 1 – 2, ending with a Rectangle Row 2, until your blanket measures approximately 36″ (46″, 70″) L, or desired length. Do not fasten off.
Decrease Rows
- Note: Each row decreases by 1 block until 2 blocks remain.
- Decrease Row 1: Sl st in each dc across to the next ch-3 sp, ( sl st, ch 3, 3 dc ) into each ch-3 sp across to the last ch-3 sp, sl st in the last ch-3 sp. Turn.
- Rep Decrease Row 1 until you have 2 blocks remaining. Do not fasten off.
Final Row
- Sl st in each dc across to the next ch-3 sp, ( sl st, ch 3, 3 dc ) into the ch-3 sp, sl st into the last ch-3 sp. (1 block)
- Fasten off.
BORDER INSTRUCTIONS
Prepare Edge for C2C Crochet Border
- Place a locking SM into each corner st. Choose either side as the RS.
- Rnd 1 (RS): With a 5.50mm crochet hook, join yarn with a standing sc in any corner. Work 2 more sc in the same corner. ( Working along the next edge, work 2 sc into each horizontal dc and work 1 sc into the bottom or top of each vertical dc, then work 3 sc into the next corner st ). Rep from ( to ) 3 times. Working along the last edge, work 2 sc into each horizontal dc and work 1 sc into the bottom or top of each vertical dc. Join with a sl st to the 1st st.
- Move SMs up to the middle sc in each corner. Do not fasten off.
Ribbed Border – Edge #1
- Set-up: Sl st over to the next corner st.
- Row 1 (RS): Ch 5. Working into the back hump of the ch, hdc in the 2nd ch from your hook, hdc in each of the next 2 chs. Hdc2tog in the next ch & same st as ch 5. Do not turn. (4 sts)
- Row 2: ( sl st into the next st along the edge of the blanket ) 2 times (these 2 sl sts do not count as sts). TURN. BLO hdc in each st across the previous row. Turn. (4 sts)
- Row 3: Ch 1. BLO hdc in the first st, BLO hdc in each of the next 2 sts. Hdc2tog in the BLO of the next st and both loops of the next st along the edge of the blanket. Do not turn. (4 sts)
- Rep Rows 2 – 3 across the edge until you reach the next corner marked with a SM.
Ribbed Border – Edges #2, #3, & #4
- Rep Ribbed Border Instructions Rows 1 – 3, then rep Rows 2 – 3 across the edge of the blanket until you reach the next corner marked with a SM.
- Note: Special instructions apply if you end with 1, 2, or 3 sts before the corner SM. For example, if 1 st remains after the last Row 3 rep, work a Modified Row 2.
- Modified Row 2: sl st into the next st along the edge of the blanket (1 time) (does not count as a st). TURN. BLO hdc in each st across the previous row. Turn. (4 sts)
- Weave in any remaining ends. Blocking is recommended for a professional finish.
This response provides the instructions for the Nordic Reindeer Dishcloth pattern, utilizing subheadings and the abbreviations listed in the sources.
The dishcloth is worked using the corner-to-corner (C2C) double crochet (dc) technique. The written instructions detail the number of blocks to work in each color. Color A is Ecru, and Color B is Maroon. For example, the instruction (A) 2, (B) 4 means you work 2 C2C blocks with Color A, and then 4 C2C blocks with Color B. The total number of blocks per row is indicated within brackets at the end of each row’s instructions.
Abbreviations (US Terms)
The following abbreviations are used in the pattern:
- Ch – Chain
- RS – Right Side
- Sc – Single Crochet
- Sl St – Slip Stitch
- St – Stitch
- WS – Wrong Side
The pattern also utilizes the Corner to Corner Stitch (C2C).
C2C Reindeer Dishcloth Pattern (Increase Phase: Rows 1–25)
The increase phase progresses from 1 block up to 25 blocks.
| Row | Direction | Instruction | Total Blocks | Source |
| Row 1 | ↗ WS | (B) 1. | (1) | |
| Row 2 | ↙ RS | (B) 2. | (2) | |
| Row 3 | ↗ WS | (B) 3. | (3) | |
| Row 4 | ↙ RS | (A) 3, (B) 1. | (4) | |
| Row 5 | ↗ WS | (B) 2, (A) 3. | (5) | |
| Row 6 | ↙ RS | (B) 3, (A) 1, (B) 2. | (6) | |
| Row 7 | ↗ WS | (B) 3, (A) 4. | (7) | |
| Row 8 | ↙ RS | (A) 3, (B) 1, (A) 1, (B) 3. | (8) | |
| Row 9 | ↗ WS | (B) 4, (A) 5. | (9) | |
| Row 10 | ↙ RS | (A) 4, (B) 1, (A) 4, (B) 1. | (10) | |
| Row 11 | ↗ WS | (B) 2, (A) 6, (B) 1, (A) 2. | (11) | |
| Row 12 | ↙ RS | (A) 2, (B) 1, (A) 2, (B) 4, (A) 1, (B) 2. | (12) | |
| Row 13 | ↗ WS | (B) 3, (A) 7, (B) 1, (A) 2. | (13) | |
| Row 14 | ↙ RS | (A) 1, (B) 3, (A) 5, (B) 1, (A) 1, (B) 3. | (14) | |
| Row 15 | ↗ WS | (B) 4, (A) 4, (B) 1, (A) 1, (B) 2, (A) 3. | (15) | |
| Row 16 | ↙ RS | (A) 4, (B) 3, (A) 3, (B) 1, (A) 4, (B) 1. | (16) | |
| Row 17 | ↗ WS | (B) 2, (A) 8, (B) 2, (A) 5. | (17) | |
| Row 18 | ↙ RS | (A) 5, (B) 2, (A) 4, (B) 4, (A) 1, (B) 2. | (18) | |
| Row 19 | ↗ WS | (B) 3, (A) 9, (B) 1, (A) 6. | (19) | |
| Row 20 | ↙ RS | (B) 1, (A) 3, (B) 3, (A) 8, (B) 1, (A) 1, (B) 3. | (20) | |
| Row 21 | ↗ WS | (B) 4, (A) 9, (B) 2, (A) 1, (B) 1, (A) 4. | (21) | |
| Row 22 | ↙ RS | (A) 1, (B) 1, (A) 4, (B) 3, (A) 1, (B) 3, (A) 3, (B) 1, (A) 4, (B) 1. | (22) | |
| Row 23 | ↗ WS | (B) 2, (A) 8, (B) 3, (A) 9, (B) 1. | (23) | |
| Row 24 | ↙ RS | (B) 1, (A) 1, (B) 4, (A) 1, (B) 1, (A) 3, (B) 3, (A) 3, (B) 4, (A) 1, (B) 2. | (24) | |
| Row 25 | ↗ WS | (B) 3, (A) 8, (B) 3, (A) 9, (B) 2. | (25) |
Corner (Row 26)
Row 26 marks the first row of decreasing blocks.
| Row | Direction | Instruction | Total Blocks | Source |
| Row 26 | ↙ RS | (B) 1, (A) 4, (B) 1, (A) 6, (B) 2, (A) 6, (B) 1, (A) 1, (B) 2. | (24) |
C2C Reindeer Dishcloth Pattern (Decrease Phase: Rows 27–49)
The pattern decreases from 24 blocks down to 1 block.
| Row | Direction | Instruction | Total Blocks | Source |
| Row 27 | ↗ WS | (B) 2, (A) 4, (B) 1, (A) 3, (B) 2, (A) 7, (B) 4. | (23) | |
| Row 28 | ↙ RS | (B) 3, (A) 1, (B) 1, (A) 10, (B) 1, (A) 3, (B) 1, (A) 2. | (22) | |
| Row 29 | ↗ WS | (A) 6, (B) 1, (A) 11, (B) 3. | (21) | |
| Row 30 | ↙ RS | (B) 2, (A) 1, (B) 4, (A) 4, (B) 1, (A) 1, (B) 2, (A) 3, (B) 2. | (20) | |
| Row 31 | ↗ WS | (A) 2, (B) 1, (A) 1, (B) 4, (A) 9, (B) 2. | (19) | |
| Row 32 | ↙ RS | (B) 1, (A) 4, (B) 1, (A) 4, (B) 6, (A) 2. | (18) | |
| Row 33 | ↗ WS | (A) 2, (B) 2, (A) 2, (B) 1, (A) 6, (B) 4. | (17) | |
| Row 34 | ↙ RS | (B) 3, (A) 1, (B) 1, (A) 3, (B) 3, (A) 2, (B) 1, (A) 2. | (16) | |
| Row 35 | ↗ WS | (A) 12, (B) 3. | (15) | |
| Row 36 | ↙ RS | (B) 2, (A) 1, (B) 4, (A) 2, (B) 1, (A) 2, (B) 1, (A) 1. | (14) | |
| Row 37 | ↗ WS | (A) 4, (B) 1, (A) 6, (B) 2. | (13) | |
| Row 38 | ↙ RS | (B) 1, (A) 4, (B) 1, (A) 6. | (12) | |
| Row 39 | ↗ WS | (A) 7, (B) 4. | (11) | |
| Row 40 | ↙ RS | (B) 3, (A) 1, (B) 1, (A) 5. | (10) | |
| Row 41 | ↗ WS | (A) 6, (B) 3. | (9) | |
| Row 42 | ↙ RS | (B) 2, (A) 1, (B) 4, (A) 1. | (8) | |
| Row 43 | ↗ WS | (A) 5, (B) 2. | (7) | |
| Row 44 | ↙ RS | (B) 1, (A) 4, (B) 1. | (6) | |
| Row 45 | ↗ WS | (A) 1, (B) 4. | (5) | |
| Row 46 | ↙ RS | (B) 3, (A) 1. | (4) | |
| Row 47 | ↗ WS | (B) 3. | (3) | |
| Row 48 | ↙ RS | (B) 2. | (2) | |
| Row 49 | ↗ WS | (B) 1. | (1) |
Fasten off Color A. Continue to the Border using Color B.
Border
The Border is worked with Color A.
Round 1 [RS]. With Color A, Ch 1 and turn [RS]. Work Sc all around the dishcloth, placing 3 sts on the top or side of each block of 3 dc.
- At the bottom and top right corners, Ch 1 and continue crocheting on the next side.
- At the top, left corner, Ch 15 for the hanging loop, and then continue crocheting on the next side.
Sl st in the first st of the round to join.
Fasten off and weave in all your ends.
The completed project is the C2C Crochet Nordic Christmas Reindeer Dishcloth.