
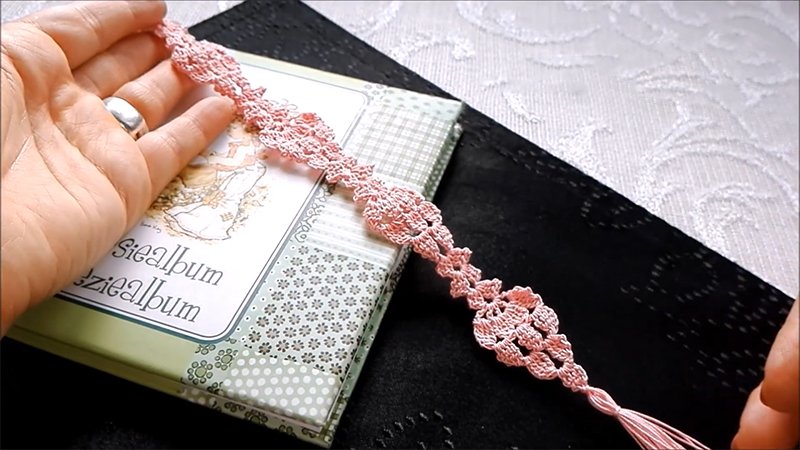
Pattern Description:
This vintage-style bookmark pattern features a beautiful floral design. It uses delicate crochet stitches, including shells (made of puff stitches) and V-stitches, and is perfect for spring.
It has intermediate difficulty because the edges require some “eyeballing” during placement. The finished bookmark makes a sweet gift for book lovers.
Materials Needed & Measurements:
Materials Needed:
- Thread: 15-20 yards #30 Extra Fine Aunt Lydia’s Crochet Thread in Natural or a color of your choice.
- Optional Accent Trim: 3-4 yards of Embroidery floss in a color of your choice.
- Hook: 1.15mm steel hook.
- Tools: Fine embroidery needle, Scissors, Pins, Stitch markers, Starching spray of your choice, and a blocking board.
- Cord/Tassel Specifics (for components): 6 twelve-inch lengths of thread for the cord, and an 8-inch piece of thread for tying the tassel.
Measurements (Finished Size after blocking):
- Width: 1 3/4” wide
- Height: 6” or 7″ tall
- Gauge: 18 sc in 1.5”
Abbreviations (US Terms):
- sl st = slip stitch
- ch/chs = chain/chains
- sc = single crochet
- dc = double crochet
- st/sts = stitch/stitches
- sp/sps = space/spaces
- sk = skip
- prev = previous
- puff (Puff Stitch): yo, pull up a loop 3 times in same st, yo, pull through 6 loops, yo, pull through final 2 loops.
- V-stitch: (dc, ch 1, dc) in same st.
- Picot = ch 3, sl st back into first ch.
Instructions for Making the Crochet Lace Bookmark Pattern:
Hope Bookmark Pattern
Ch 18.
- Row 1: sc in 2nd ch from hook, ch 1, sk 3 sts, ([puff, ch 2] 2 times, puff, ch 1) in next st, sk 3 sts, sc in next st, this will create a “shell”; rep from , ch 3 (counts as first dc of next row), turn. (3 sc, 2 shells).
- Row 2: dc in first st, ch 3, sk to top of first “shell” in prev row (this is the second puff of the “shell”) sc, ch 3, sk to sc between shells, V-stitch, ch 3, sk to top of next “shell” in prev row, sc, ch 3, sk to sc at end of row, 2 dc in final st, ch 3, (counts as first dc of next row), turn. (4 dc, 2 sc, 1 V-stitch, 4 ch-3 sps).
- Row 3: (puff, ch 2, puff) in first st, ch 1, sk 3 chs, sc in top of sc from prev row, ch 1, sk 3 chs to ch-1 sp at center st of V-stitch from prev row, ([puff, ch 2] 2 times, puff, ch 1) in ch-1 sp, sk 3 chs, sc in top of sc from prev row, ch 1, sk 3 chs, (puff, ch 2, puff, dc) in final st (top of ch-3 from prev row), ch 1, turn. (1 shell, 2 half-shells, 2 sc, 2 dc).
- Row 4: sc in first st, ch 3, sk to sc between shells, V-stitch, ch 3, sk to top of next shell in prev row, sc, ch 3, sk to sc between shells, V-stitch, ch 3; sc in final st (top of ch-3 from prev row), ch 1, turn. (4 ch-3 sps, 2 V-stitches, 3 sc).
- Row 5: sc in first st, ch 1, sk to ch-1 sp at center of V-stitch from prev row, ([puff, ch 2] 2 times, puff, ch 1) in ch-1 sp, sk to next sc, sc in top of sc from prev row, ch 1, sk to ch-1 sp at center of V-stitch from prev row, ([puff, ch 2] 2 times, puff, ch 1) in ch-1 sp, sk to final st of row, sc, ch 3 (counts as first dc of next row), turn. (2 shells, 3 sc, 4 ch-2 sps, 4 ch-1 sps).
- Repeat rows 2-5, 4 or 5 times, or until your bookmark is approximately 5 1/2″ or 6 1/2” long. You may repeat these rows as many or as few times as desired to adjust length. Then, repeat Row 2, but omit the ch-3 at the end; instead, ch 1, turn. Once the bookmark is about a half-inch to an inch shorter than the desired finished size, continue to the edging.
Bookmark Edging
- Round 1: sc in next 2 sts, 3 sc in ch-3 sp, sc in next st, ch 1, sk 3 chs ([puff, ch 1] 4 times) in ch-1 sp, sk 3 chs, sc in next st, 3 sc in ch-3 sp, sc in next 2 sts, ch 1, place st marker (first corner). Cont working sc evenly down the side, ch 1, place st marker. Cont working sc evenly across bottom edge (should total 17 sts: 3 sc in each ch-3 sp, sc in bottom of each shell, 2 sc on each end, and one in the middle). Ch 1, place st marker, cont working evenly up the other side (ensure st count matches the first edge). At end of row, ch 1, place st marker, join with sl st to first sc of rnd.
- Note: The following round is not an exact science and may require “eyeballing” to keep things even. Try to make the side edge stitch counts a multiple of 6, minus 2, for the picot edge to align.
- Round 2: ch 1, sc in next 5 sts, sk st, 3 sc in each of next 5 ch-1 sps, sk st, sc in next 5 sts, (sc, ch 1, sc) in corner. sc in next 2 sts, picot, sc in next 6 sts, picot rep to to end of side, (sc, ch 1, sc) in corner. sc in next 2 sts, picot, sc in next 7 sts, picot, sc in next 6 sts, picot, sc in next 2 sts, (sc, ch 1, sc) in corner. sc in next 2 sts, picot, sc in next 6 sts, picot rep to to end of row, (sc, ch 1, sc) in corner, join with sl st to first sc.
- Round 3: (You may use a contrasting color.) Working between rnds 1 and 2: sl st across next 5 sts, sl st in sc sts at top of 4-petaled lily at center top of bookmark. Working between rnds 1 and 2: sl st across next 5 sts, cont working sl sts down edge, across bottom and up the other side.
- Fasten off and weave in ends. Block the bookmark and stiffen it with starch, glue, or stiffening spray.
Cord and Tassel Instructions
- Cord Creation:
- Twist 6 12″ lengths of thread into a cord.
- Ensure the threads are flat and tape one end to a table.
- Start twisting the threads in one direction until the cord tightens up and begins to twist back on itself.
- Thread the cord through the flower at the top of the bookmark.
- Fold the strands in half, then stretch the twists out with your fingers until they are even.
- Knot the ends together using an overhand knot.
- Tassel Creation:
- Cut an 8″ piece of thread and thread it half-way through an embroidery needle to create a 4″ piece of double thickness thread for tying the center. Set this aside.
- Wrap thread around a 2″ piece of cardboard or a credit card until the tassel is the desired thickness (recommended: 1 1/2″ to 2″ in width).
- Thread the 4″ piece of thread through the bundle and tie it tightly around the bundle at the top, then snip the bottom loops.
- Thread the bundle through the cord just above the knot at the end (you may need to gently untwist the cord slightly, but do not undo the knot).
- Fold the bundle in half, ensuring the 4″ center-tie knot is on the inside.
- Wrap another piece of thread around the tassel several times about 1/2″ from the top, and fasten this off securely.
- Use scissors to trim the tassel ends so they are all the same length.


