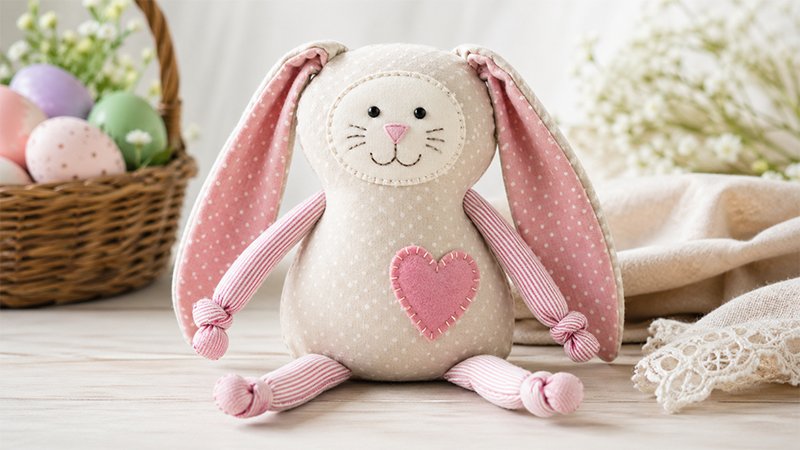
Easter is the perfect time to create something soft, sweet, and handmade. This floppy-eared fabric bunny is beginner-friendly, uses small fabric scraps, and makes a meaningful gift that lasts far longer than candy. Follow these expanded instructions for a smooth sewing experience from start to finish.
Materials & Tools
Fabric & Notions
- 1 fat quarter (18” x 22”) cotton fabric – main body
- Fleece scrap (9” x 7”) – face or body accent
- Felt scrap (6” x 6”) – heart appliqué
- Knit fabric scrap (6” x 10”) – arms and legs
- Embroidery thread (black, pink, or desired colors) – facial details
- Polyfil stuffing – filling
- (Optional) Double-sided fusible web – for easy appliqué
Tools
- Sewing machine
- Hand sewing needle
- Small embroidery hoop
- Fabric scissors + small snips
- Pins or clips
- Ruler or measuring tape
- Iron
- Fabric marking pen (preferably heat-erasable)
Step 1: Cutting Your Pieces
Careful cutting is key to a neat final result.
- Print and cut out your pattern pieces (body, ears, face, heart, etc.).
- Lay the fabric flat and smooth out wrinkles.
- Cut:
- 2 body pieces (front + back) from cotton
- 2 ear sets (4 pieces total if lined)
- 1 face piece (fleece)
- 1 heart piece (felt)
- 1 strip (6” x 10”) knit fabric for limbs
Tip: Use sharp scissors and cut slowly—small inaccuracies will show later.
Step 2: Attaching the Face & Heart
Face Placement
- Take the front body piece.
- Measure 1¼ inches (3 cm) down from the top edge.
- Center the face piece horizontally.
- Pin securely.
Sewing the Face
- Use a straight stitch.
- Set your machine to short stitch length (2.0–2.5) for smoother curves.
- Sew slowly around the edge.
Tip: Pivot the fabric slightly as you go to keep curves smooth.
Adding the Heart Appliqué
- Position the felt heart on the body.
- If using fusible web:
- Iron it in place following the instructions.
- Stitch using a blanket stitch or zigzag stitch:
- Reduce stitch width/length slightly for neatness.
Step 3: Embroidering the Face
- Place your piece in an embroidery hoop.
- Lightly sketch the face (eyes, nose, mouth) using a marking pen.
- Use backstitch with embroidery thread:
- Small stitches = cleaner lines
- Keep tension even
Tip: Start simple—two dots for eyes and a small “Y” shape for the nose/mouth works beautifully.
Adding the Tail
- Stack tail pieces (or use a small pom-pom).
- Attach to the back body piece, near the bottom center.
Step 4: Making Ears
- Place the earpieces right sides together (if lined).
- Sew around edges, leaving the bottom open.
- Clip curves carefully (don’t cut stitches).
- Turn the right side out.
- Press flat with an iron.
Shape the Ears
- Fold each ear in half lengthwise at the base.
- Sew a 1-inch straight stitch at the bottom to hold shape.
Tip: Use a pin or blunt tool to push out the ear tips gently.
Step 5: Creating Arms & Legs
- Cut the knit fabric into 4 strips.
- Fold each strip in half lengthwise.
- Tie a tight knot near one end of each strip.
These knots act as hands and feet and give a playful, floppy look.
Step 6: Assembly
Attach Limbs & Ears
- Place limbs and ears onto the front body piece:
- Ears at the top
- Arms on sides
- Legs at the bottom
- Important: All pieces should point inward (toward the center).
- Pin securely.
Sewing Body Together
- Place the back body piece on top, right sides facing.
- Pin around the entire edge.
- Sew with a ¼-inch seam allowance.
- Leave a 2–3 inch gap on one side for turning.
Step 7: Turning & Stuffing
- Clip curves and corners carefully.
- Turn the bunny right side out through the gap.
- Push out edges gently.
- Lightly press with the iron.
Stuffing
- Fill with polyfil gradually.
- Distribute evenly for a soft, plush feel.
Tip: Don’t overstuff—keep it slightly squishy.
Step 8: Closing
- Use a ladder stitch (invisible stitch) by hand to close the opening.
- Knot securely and tuck the thread inside.
Final Thoughts
This floppy bunny is more than just a craft—it’s a keepsake. With its soft body, knotted limbs, and sweet embroidered face, it’s perfect for cuddles, gifting, or decorating.
Take your time, enjoy the process, and don’t worry about perfection—each bunny will have its own personality.
Happy sewing!