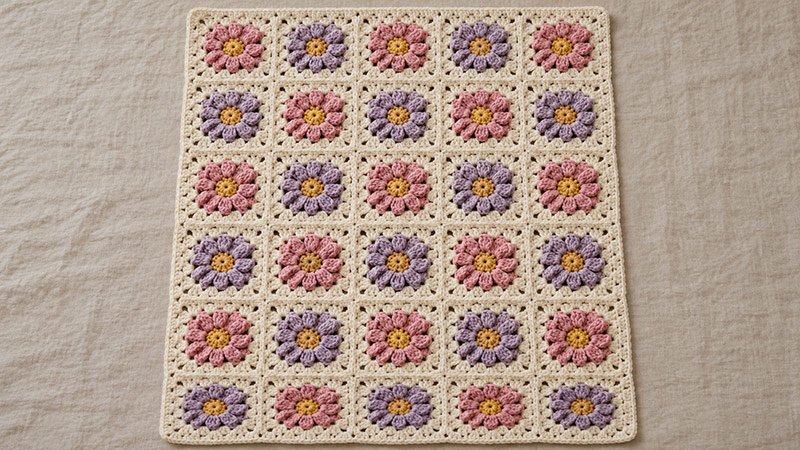
The Flower Granny Square Blanket has small flowers in square frames. Each flower has eight petals. One round of double crochet makes the flower a square. Three more rounds form the frame.
Make each square on its own. Then sew the squares into rows. Add a single crochet border. Use one flower shade for all the squares. Or mix the three shades in the color key.
This pattern uses common crochet stitches and methods. Make one square first. Check its size before you start the rest.
Materials
- Yarn: Worsted-weight yarn, category #4.
- For the lapghan: About 1,400–1,700 yards in all.
- For the small throw: About 2,100–2,500 yards in all.
- Hook: 5 mm, or the size needed to meet gauge.
- Yarn needle.
- Scissors.
- Stitch markers.
- Tape measure.
- Blocking mat and pins.
Choose yarn that can be washed in the same way for all four colors.
Lapghan/Child’s Size:
- Layout: 5 squares across × 6 squares down.
- Squares needed: 30.
- Blocked square size: 7 × 7 inches.
- Size before the border: About 35 × 42 inches.
- Finished size: About 37 × 44 inches, with a border about 1 inch wide.
Small Throw Blanket Size:
- Layout: 6 squares across × 8 squares down.
- Squares needed: 48.
- Blocked square size: 7 × 7 inches.
- Size before the border: About 42 × 56 inches.
- Finished size: About 44 × 58 inches, with a border about 1 inch wide.
Seam width, yarn, and tension may change the final size.
Gauge
One square through Rnd 6 = about 7 × 7 inches after blocking.
Make one full square to check gauge.
- If it is too small, try a larger hook.
- If it is too large, try a smaller hook.
- Block it gently. Do not stretch it hard to reach the size.
Pattern Notes
- Use US crochet terms.
- Work each square in joined rnds.
- Do not turn between square rnds.
- The first ch 3 counts as 1 dc.
- The first ch 2 in the petal rnd does not count as a st.
- Each granny group has 3 dc.
- Each square corner has (3 dc, ch 2, 3 dc).
- Use ch 1 between granny groups on each side.
- Work square groups into chain sps. Do not work them into the tops of dc sts.
- Join each square rnd as stated.
- Use the same hook for all squares. Keep the same tension, too.
- Block all squares before you join them.
- Turn after each border rnd. This helps keep the edge straight.
Abbreviations
- ch: Chain.
- sl st: Slip stitch.
- sc: Single crochet.
- dc: Double crochet.
- st / sts: Stitch / stitches.
- sp / sps: Space / spaces.
- rnd / rnds: Round / rounds.
- rep: Repeat.
- sk: Skip.
- yo: Yarn over.
- RS: Right side.
- WS: Wrong side.
- cl: Cluster.
- beg: Beginning.
Petal Cluster — 4-dc cl
Work all four partial dc into the same st:
- Yo. Insert the hook into the stated st. Yo and pull up a loop.
- Yo and pull through 2 loops. Keep the last loop of this partial dc on the hook.
- Rep Steps 1–2 three more times in the same st. You now have 5 loops on the hook.
- Yo and pull through all 5 loops.
This makes one petal.
Color Key
- A — Cream: Square frames, seams, and border.
- B — Golden yellow: Flower centers.
- C — Dusty pink: Half of the flowers.
- D — Soft lilac: Half of the flowers.
Suggested Yarn Split
| Color | Lapghan | Small throw |
|---|---|---|
| A | 1,000–1,200 yards | 1,500–1,750 yards |
| B | 100–130 yards | 150–200 yards |
| C | 150–185 yards | 225–275 yards |
| D | 150–185 yards | 225–275 yards |
These amounts include some room for swatching and yarn tails.
Pattern Instructions
Step 1: Make the Flower Center
Rnd 1 — Use B
- Ch 4.
- Join with a sl st to the first ch to form a ring.
- Ch 3. This counts as the first dc.
- Work 15 dc into the ring.
- Join with a sl st to the top of the beg ch 3.
- Fasten off B.
Count: 16 dc, including the beg ch 3.
Step 2: Make the Flower Petals
Rnd 2 — Use C or D
- Join the petal color in any dc. Use a sl st.
- Ch 2. This does not count as a st.
- Work 1 cl in the same st.
- Ch 3.
- Sk the next dc.
- Work 1 cl in the next dc. Ch 3. Sk the next dc.
- Rep from * to * six more times.
- Join to the top of the first cl. Use a sl st.
- Fasten off the petal color.
Count: 8 petals and 8 ch-3 sps.
If needed, push each petal gently toward the RS.
Step 3: Turn the Flower into a Square
Rnd 3 — Use A
- Join A with a sl st in any ch-3 sp.
- Ch 3.
- Work (2 dc, ch 2, 3 dc) in the same sp. This makes the first corner.
- Ch 1.
- Work 3 dc in the next ch-3 sp.
- Ch 1.
- *Work (3 dc, ch 2, 3 dc) in the next ch-3 sp.
- Ch 1.
- Work 3 dc in the next ch-3 sp.
- Ch 1.*
- Rep Steps 7–10 two more times.
- Join with a sl st to the top of the beg ch 3.
Count: 36 dc, 8 ch-1 sps, and 4 ch-2 corner sps.
Each side has 9 dc, counted from one corner sp to the next.
Step 4: Build the Square Frame
Rnd 4 — Continue with A
- Sl st across the next 2 dc. Then sl st into the ch-2 corner sp.
- Ch 3.
- Work (2 dc, ch 2, 3 dc) in this same corner sp.
- Ch 1.
- Work 3 dc in each of the next 2 ch-1 sps. Ch 1 after each group.
- Work (3 dc, ch 2, 3 dc) in the next corner sp.
- Ch 1.
- Work 3 dc in each of the next 2 ch-1 sps. Ch 1 after each group.
- Rep Steps 6–8 two more times.
- Join with a sl st to the top of the beg ch 3.
Count: 48 dc, 12 ch-1 sps, and 4 corner sps.
Rnd 5 — Continue with A
- Sl st across the next 2 dc and into the corner sp.
- Ch 3.
- Work (2 dc, ch 2, 3 dc) in the same corner sp.
- Ch 1.
- Work 3 dc in each ch-1 sp along the side. Ch 1 after each group.
- Work (3 dc, ch 2, 3 dc) in the next corner sp.
- Ch 1.
- Rep Steps 5–7 around.
- Join with a sl st to the top of the beg ch 3.
There are 3 side sps to fill between each pair of corners.
Count: 60 dc, 16 ch-1 sps, and 4 corner sps.
Rnd 6 — Continue with A
- Work as for Rnd 5.
- Fill all 4 side sps between each pair of corners.
- Join with a sl st to the top of the beg ch 3.
- Fasten off.
Count: 72 dc, 20 ch-1 sps, and 4 corner sps.
Each finished side has 18 dc and 5 ch-1 sps, plus a corner sp at each end.
Step 5: Make the Rest of the Squares
Lapghan
- Make 15 squares with C petals.
- Make 15 squares with D petals.
- Use B for all centers and A for all frames.
Small Throw
- Make 24 squares with C petals.
- Make 24 squares with D petals.
- Use B for all centers and A for all frames.
Step 6: Block the Squares
- Weave in the ends on the WS.
- Block each square to about 7 × 7 inches, using a method suited to the yarn.
- Keep the sides straight and the corners square.
- Let all squares dry fully before joining.
Step 7: Lay Out the Blanket
- Place the squares with the RS facing up.
- Alternate C and D flowers across the first row.
- Start the next row with the other flower color.
- Keep this order for all rows.
Use:
- 5 squares per row and 6 rows for the lapghan.
- 6 squares per row and 8 rows for the small throw.
Step 8: Sew the Squares Together
Use A and a yarn needle.
- Place 2 squares side by side with the RS facing up.
- Cut yarn about 3 times the seam length.
- Secure the yarn at the first pair of corner sps.
- Whipstitch through the outer edge loops of matching dc sts.
- At each pair of ch-1 sps, pass through both sps once.
- At the last pair of corner sps, pass through both sps and secure the yarn.
- Keep the seam loose enough for the squares to lie flat.
- Join all squares in one row.
- Make the rest of the rows in the same way.
- Sew the rows together. Match all square corners and seams.
- Weave in the joining tails on the WS.
Step 9: Add the Border
Border Rnd 1 — Use A
- With the RS facing you, join A in any outer corner sp.
- Ch 1. This does not count as a st.
- Work 3 sc in the same corner sp.
- Work 1 sc in each dc and 1 sc in each ch-1 sp along the edge.
- At each seam, work 1 sc in each of the two corner sps that meet there.
- Work 3 sc in each of the four outer blanket corners.
- Continue around the blanket.
- Join with a sl st to the first sc.
- Place a marker in the middle sc of each 3-sc corner.
- Turn.
Check that the edge lies flat. Adjust the sc spacing at a seam if it pulls or forms a small wave.
Border Rnds 2–4
- Ch 1.
- Work 1 sc in each st around.
- Work 3 sc in each marked corner st.
- Move each marker to the middle sc of the new corner.
- Join with a sl st to the first sc.
- Turn.
After Rnd 4, check the border width. Add more rnds in the same way if needed to reach about 1 inch.
Fasten off after the last rnd.
Step 10: Finish the Blanket
- Weave in all loose ends on the WS.
- Check the seams for gaps.
- Lay the blanket flat.
- Gently block the border if needed.
- Let the blanket dry fully before use.