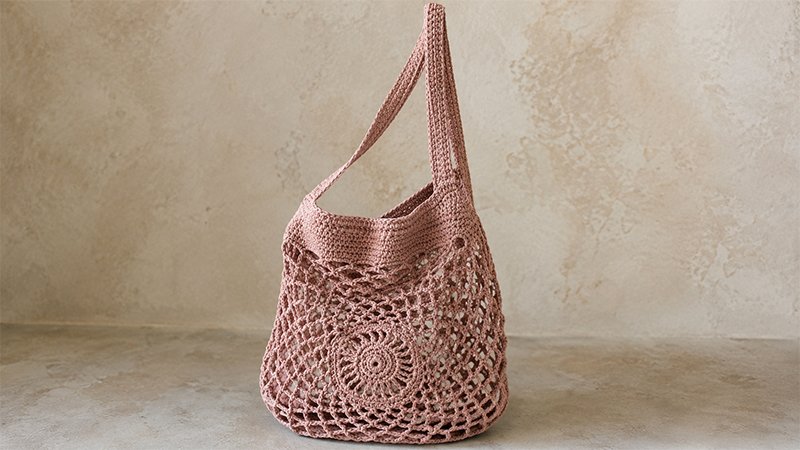
A beautifully handcrafted tote combines traditional lace artistry with everyday functionality.
Creating a mandala-inspired shopping bag is a rewarding project that transforms simple yarn into a stunning, medallion-patterned accessory.
Featuring a radiant central wheel, open mesh lace, and decorative fan motifs, this design captures an intricate boho aesthetic while remaining lightweight and durable.
By working radial rounds into a structured tote shape with sturdy integrated handles, you create an eco-friendly Market Carrier that easily holds daily essentials, farmers’ market produce, or casual weekend gear with effortless style.
Materials & Specifications
-
Yarn: Approximately 390 yards (360 meters) of DK weight yarn (50/50 merino-nylon blend or 100% cotton works exceptionally well).
-
Hook Size: 3.50 mm (US E/4) crochet hook.
-
Notions: Tapestry needle, scissors, and a stitch marker.
-
Gauge: 12 half double crochets by 8 rows measure 2 inches by 2 inches (5 cm x 5 cm).
-
Dimensions: 12 inches (30.5 cm) wide; 13.5 inches (34 cm) long without handles; 20 inches (51 cm) long including straps.
Pattern Conventions & Terminology
-
ch: chain
-
sc: single crochet
-
hdc: half double crochet
-
dc: double crochet
-
tr: treble crochet
-
sl st: slip stitch
-
st(s): stitch(es)
-
sp(s): space(s)
-
lp(s): loop(s)
-
sk: skip
Main Wheel Instructions (Make 2 Panels)
-
Round 1: Form a foundation ring by chaining 6 and joining with a sl st to the first chain. Work 12 sc directly inside the ring. Join with a sl st into the back loop of the initial sc.
-
Round 2: Working exclusively in back loops, execute 2 sc into the same base stitch as the join, then place 2 sc into every remaining stitch around. Join with a sl st to the back loop of the starting sc. (24 sts)
-
Round 3: Working again in back loops only, place 1 sc into each stitch around. Join with a sl st through both top loops of the first sc. (24 sts)
-
Round 4: Ch 6 (counts as 1 tr plus a ch-2 sp). Treble crochet into the next stitch, ch 2; repeat from * to * around. Join with a sl st into the 4th chain of the opening ch-6. (24 spokes, 24 chain-spaces)
-
Round 5: Sc in the same base as the join. Work 2 sc inside the next chain space, then 1 sc directly into the top of the treble stitch; repeat from * to * around, ending with 2 sc in the final space. Join with a sl st to the back loop of the first sc. (72 sts)
-
Round 6: Work 1 sc into the back loop of every stitch around. Join with a sl st to the first sc. (Note: The piece may ruffle slightly, but later rounds will flatten the design.)
-
Round 7: Sc into the joining space. Ch 4, sk 2 sts, 1 sc into the next st (aligning over the spokes of Round 4); repeat from * to * around, ending the final repeat with ch 2 and 1 dc into the starting sc to anchor in the center of the loop. Place a marker to track rounds. (24 mesh loops)
-
Rounds 8–9: Sc directly into the active loop. Ch 5, sc into the next loop; repeat from * around, ending each round with ch 2 and 1 dc into the starting sc.
-
Rounds 10–12: Sc into the active loop. Ch 6, sc into the next loop; repeat from * around, ending each round with ch 2 and 1 tr into the starting sc.
-
Round 13 (Fan Accents):
-
Step A: Sc into the current loop, *ch 6, sc into the next loop, turn work, sl st back into the loop just made, ch 3, work 9 dc inside the same loop, sc into the next base sc.
-
Step B: Ch 4, turn, sk 2 dc, 1 dc into next dc, (ch 1, sk 1 dc, 1 dc into next dc) 3 times, ch 1, sk 1 dc, 1 dc into the 3rd chain of the turning ch-3, ch 6, sc into the same base loop.
-
Step C: (Ch 6, sc into the next loop) 3 times.*
-
Repeat from Step A around. You will form 8 radiating fan structures across the circular boundary. On the final repeat, replace the last sc with a sl st to the beginning sc.
-
-
Round 14: Sl st up the side of the end dc and across the next 3 chains to reach the top edge of the fan block. Sc into the last sl st. Ch 6, sk 2 dc and ch-1 sp, sc in next ch-1 sp, ch 6, sk 2 dc and ch-1 sp, sc into final space. Ch 6, sk 1 loop from previous round, (sc in next space, ch 6, sc in next space); repeat around to the final two spaces, finishing with ch 2 and 1 tr into the opening loop.
-
Rounds 15–17: Repeat the sequence for Rounds 10–12.
-
Round 18: Work 6 sc inside every chain space around, skipping the anchoring single crochets between spaces. Join with a sl st. (240 sts)
-
Rounds 19–20: Work 1 hdc into each stitch around. Join with a sl st to the first stitch of the round.
Top Shaping & Handles
-
Top Edge Flattening: Mark the end of Round 20. Count back across 9 mesh loop spaces from the underlying round and place a second marker. Across this selected zone, execute a decrease pattern: work half-double crochet two together (hdc2tog) across 2 sts, then 1 hdc in the next st; repeat between markers to create a flattened upper edge. (38 sts)
-
Upper Extension (Rows 22–23): Ch 3 (counts as dc), turn. Work 1 dc in each stitch across the flattened edge. Turn. Repeat for one additional row.
-
Strap Construction: Ch 80, turn, ch 1. Work 1 hdc in each chain across to build the strap length. Turn and work 3 additional rows of hdc back and forth along the chain strip. Fasten off leaving a long tail for assembly.
Assembly & Finishing
-
Joining Panels: Align the two circular panels with right sides facing inward. Using a crochet slip-stitch join or tapestry needle, join the outer borders together. Begin joining 10 stitches below the handle bridge on one side, working continuously around the circumference until reaching 10 stitches below the opposite side of the handle bridge.
-
Attaching Straps: Securely sew the loose ends of the top handle band onto the corresponding sides of the straight top edge using your yarn needle.
-
Reinforcements: Weave in all loose ends securely with a tapestry needle. Lightly steam block the finished piece to open up the openwork mesh and fan details.
-
Optional Fabric Lining: To prevent items from slipping through the open lace motifs, cut two fabric circles matching the panel size up to the hdc rows. Hem the fabric edges, place the lining inside the inside-out tote, and hand-sew it around the solid hdc band. For additional support, stitch a matching ribbon or canvas strip along the underside of the handles.