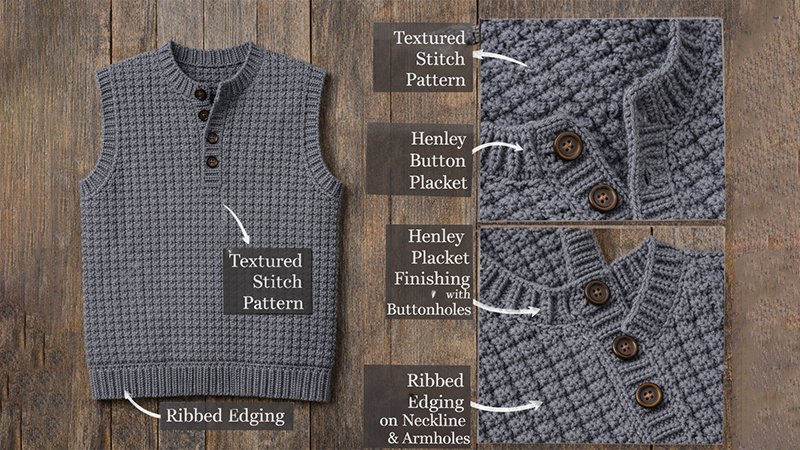
This Men’s Textured Henley Vest combines subtle stitch definition with tailored shaping and a functional Henley-style placket. The textured stitch pattern creates a firm yet flexible fabric that holds its shape well, making it ideal for layering over shirts or thermals.
The vest is worked in separate panels (Back, Left Front, Right Front) and seamed at shoulders and sides. Ribbed edging is added to armholes and neckline for a polished finish.
Skill Level
Intermediate
You should be comfortable with:
- Front and back post stitches
- Basic shaping (increases/decreases)
- Working buttonholes
- Seaming panels
Sizes
Small (Medium, Large, XL, XXL)
Finished Chest Measurement:
38 (42, 46, 50, 54) inches
Length:
26 (27, 28, 29, 30) inches
Materials
- Worsted weight yarn (900–1300 yards depending on size)
- Crochet hook size H/8 (5.0 mm) or size needed for gauge
- 3–4 buttons (¾–1 inch)
- Stitch markers
- Yarn needle
- Scissors
- Measuring tape
Gauge
16 sts x 18 rows = 4 inches in textured pattern (blocked)
Take time to make a swatch to ensure correct sizing.
Abbreviations
- ch – chain
- st(s) – stitch(es)
- sl st – slip stitch
- sc – single crochet
- hdc – half double crochet
- dc – double crochet
- FPdc – front post double crochet
- BPdc – back post double crochet
- RS – right side
- WS – wrong side
- rep – repeat
Texture Stitch Pattern
Multiple of 4 + 2.
Row 1 (RS): Ch 2 (counts as hdc), hdc in next st, *FPdc in next 2 sts, BPdc in next 2 sts; rep from * to last 2 sts, hdc in last 2 sts. Turn.
Row 2 (WS): Ch 2, hdc in next st, *BPdc in next 2 sts, FPdc in next 2 sts; rep from * to last 2 sts, hdc in last 2 sts. Turn.
Repeat Rows 1–2 for pattern.
This creates a subtle ribbed basket texture that gives structure and visual depth.
Back Panel
Foundation
Ch 70 (78, 86, 94, 102).
Row 1: Hdc in 3rd ch from hook and in each ch across. Turn.
You should have:
68 (76, 84, 92, 100) sts.
Ribbed Hem
Work 2 inches in hdc through back loop only (hdc BLO). Turn each row.
Switch to Texture Stitch Pattern.
Body
Work in Texture Pattern until piece measures:
16 (17, 18, 19, 20) inches total length.
Armhole Shaping
Row 1: Sl st across first 4 (5, 5, 6, 6) sts to shape armhole. Work in pattern across until 4 (5, 5, 6, 6) sts remain unworked. Turn.
Row 2: Sl st across first 4 (5, 5, 6, 6) sts. Work in pattern to end. Turn.
Continue decreasing 1 stitch at each armhole edge every other row 4 (5, 6, 7, 8) times.
Work straight until armhole measures 8 (9, 9, 10, 10) inches.
Fasten off.
Front Panels
Divide stitch count in half.
Each front should have:
34 (38, 42, 46, 50) sts.
Left Front
Work hem ribbing same as back.
Continue in Texture Pattern until piece measures
14 (15, 16, 17, 18) inches.
Shape Neckline
When armhole shaping begins:
At neck edge:
Decrease 1 stitch every other row 5 (6, 6, 7, 7) times.
Continue working until shoulder matches back.
Fasten off.
Right Front
Work same as left front, but create buttonholes.
Buttonholes
Place 3–4 evenly spaced buttonholes along placket edge.
Buttonhole Row (RS):
Work 3 sts in pattern, ch 1, skip 1 st, continue in pattern.
On next row, work into ch-1 space.
Continue shaping neckline and armhole as mirror of left front.
Shoulder Seams
With RS facing, align shoulders and seam using slip stitch or mattress stitch.
Side Seams
Seam sides from hem to armhole edge.
Armhole Ribbing
Join yarn at underarm.
Round 1: Sc evenly around armhole. Join with sl st.
Round 2–4: Ch 1, sc in BLO around.
Fasten off.
Repeat for second armhole.
Neckline & Henley Placket
Join yarn at bottom of right placket.
Row 1: Sc evenly up right front edge, across neckline, down left front edge.
Row 2–4: Work sc BLO for ribbed effect.
For reinforced placket:
Work 2 additional rows of sc along vertical edges only.
Fasten off.
Finishing
- Weave in all ends securely.
- Sew buttons opposite buttonholes.
- Lightly steam block to relax stitches.
Customization Tips
For Slim Fit:
Reduce foundation chain by 4–8 stitches.
For Relaxed Fit:
Add 4–8 stitches evenly.
For Longer Length:
Add rows before armhole shaping.
For Deeper Henley Opening:
Begin neckline shaping 1–2 inches earlier.
Styling Suggestions
- Wear over a plaid button-down for a rugged look.
- Pair with dark jeans and boots for casual style.
- Layer under a jacket during colder months.
Care Instructions
- Machine wash cold (if yarn permits)
- Lay flat to dry
- Avoid high heat
- Store folded to maintain structure