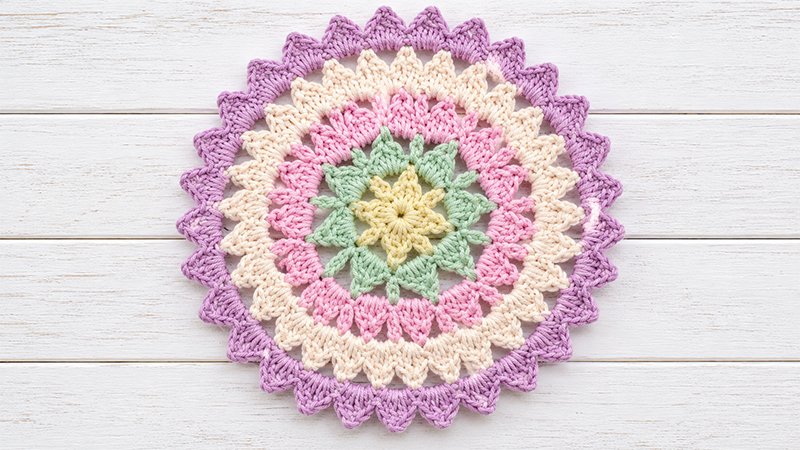
Infuse your living space with the vibrant, refreshing energy of spring using the Petal Patch Doily. This exquisite crochet project features a blooming, layered flower petal motif that expands beautifully from the center outward.
Striking the perfect balance between vintage charm and modern geometry, this intermediate-level pattern is an excellent way to practice cluster stitches and color changes.
Whether draped over a coffee table, placed under a favorite vase, or gifted to a loved one, this eye-catching doily brings a handmade touch of elegance to any room.
Project Overview
-
Skill Level: Advanced Beginner / Intermediate
-
Finished Size: Approximately 10.5 inches in diameter
-
Design Feature: Concentric rings of textured flower petals separated by delicate chain mesh.
Materials Needed
-
Yarn: Medium-weight cotton yarn (such as Mainstays 100% Cotton), approximately 75 yards total. Tip: Pick 2 or 3 contrasting spring colors for a vibrant look!
-
Hook: Size G (4.25 mm) crochet hook
-
Notions: Tapestry needle for weaving in ends, sharp scissors
Stitch Abbreviations & Special Techniques
This pattern uses US Crochet Terms.
-
CH: Chain
-
SL: Slip Stitch
-
ST / sts: Stitch / Stitches
-
SC: Single Crochet
-
DC: Double Crochet
-
CH SP: Chain Space (the loop formed by chains in previous rounds)
Special Stitch: The Petal Cluster (CL)
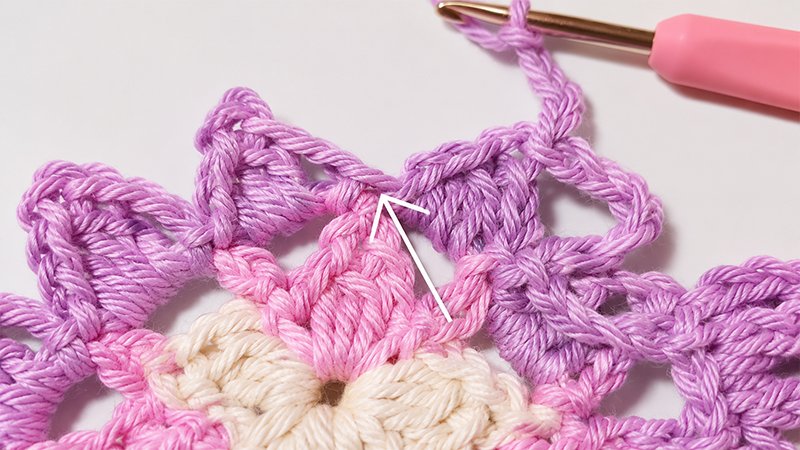
Each “petal” is a unique cluster that incorporates a tiny decorative point (a picot) at its peak. To create a Cluster (CL):
-
Slip stitch into the designated chain space, then CH 2.
-
DC3Tog (Double Crochet 3 Together): Yarn over, insert hook into the same space, yarn over, pull up a loop, yarn over, draw through 2 loops (2 loops left on hook). Repeat this two more times in the same space until you have 4 loops on your hook. Yarn over and draw through all 4 loops.
-
The Picot: CH 3, then SL directly into the very top of the 3 merged loops you just created. This forms a tiny decorative loop.
-
Close the Petal: CH 2, then SL right back down into the same chain space to secure the petal.
Step-by-Step Pattern Instructions
The Foundation
To begin, CH 6. Bring your hook around to the very first chain you made and SL into it to connect, creating a secure center ring.
Round 1: The Inner Bud
-
Working directly into the center ring you just created, complete a total of 4 Clusters (CL).
-
Do not fasten off. You will have 4 distinct petals pointing outward.
Round 2: Building the Base Mesh
-
CH 6, then SL into the top picot of the first petal cluster.
-
Repeat the following sequence 3 times: CH 6, insert your hook between the current petal and the next one to make a SL, then CH 6 and SL into the picot of the next petal.
-
To finish the round, CH 6 and SL into the final space between the last two clusters.
-
Fasten off your yarn.
Round 3: Expanding the Blooms (Color Change)
-
Securely attach your second color of yarn to any of the CH 6 spaces from Round 2.
-
Work 8 Clusters (CL) total around this row (distribute 2 clusters into each CH 6 space).
-
Join the round by making a SL into the first chain of your very first CH 2 from the beginning of the round.
Round 4: Expanding the Mesh
-
CH 6, then SL into the picot of the first cluster.
-
Repeat the following sequence 7 times: CH 6, SL into the space between the current cluster and the next one, CH 6, then SL into the picot of the next cluster.
-
To finish the round, CH 6 and SL into the final space between the clusters. Fasten off your yarn.
Round 5: Double the Petals (Color Change)
-
Attach your third color (or revert to your first color) to any CH 6 space.
-
Work a total of 16 Clusters (CL) around the perimeter (distribute 2 clusters per CH 6 space).
-
Join the round by making a SL into the first chain of your beginning CH 2.
Round 6: The Large Mesh Ring
-
CH 6, then SL into the first picot.
-
Repeat the following sequence 15 times: CH 6, SL in the space between the clusters, CH 6, then SL into the next picot.
-
To finish the round, CH 6 and SL into the final space between the clusters. Fasten off your yarn.
Round 7: The Grand Bloom (Color Change)
-
Attach your chosen yarn color to any CH 6 space.
-
Work a total of 32 Clusters (CL) around the entire circle (distribute 2 clusters per CH 6 space).
-
Join the round with a SL into the first chain of your beginning CH 2. Fasten off your yarn.
Round 8: The Finishing Lace Border (Color Change)
-
Attach your final yarn color directly to the picot loop of any cluster from the previous round.
-
Repeat this sequence 32 times: CH 5, then SL into the picot loop of the very next cluster. This creates a delicate, wavy frame around the doily.
Round 9: The Final Edge
-
SL into the first CH 5 space of the border.
-
Work 32 Clusters (CL) total, placing exactly 1 cluster into each CH 5 space all the way around.
-
Join with a SL into the very first picot loop of the round to perfectly close the circle.
Finishing Touches
-
Cut your yarn, leaving a 4-inch tail, and pull it securely through the loop to tie off.
-
Thread your tapestry needle and carefully weave all loose yarn tails into the back of the stitches to hide them.
-
Optional but Recommended: Gently wet-block your finished doily by dampening it with water, pinning the outer picots down in a perfect circle on a foam mat, and letting it air dry. This will make your flower petals lay completely flat and showcase the intricate openwork lace!