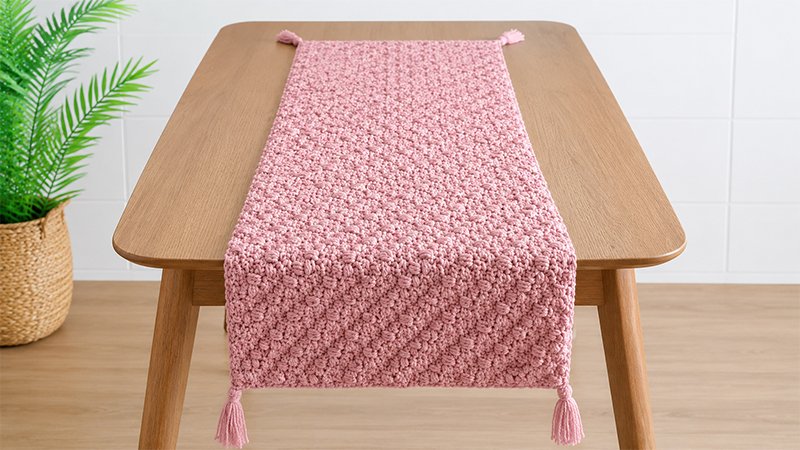
Elevate your home decor with the gorgeous texture of the Braided Beans Table Runner. This beautiful accent piece features a reversible design combining the cozy dimension of bean stitches with the classic drape of the Wattle stitch.
Worked from corner to corner (on the bias), this pattern is surprisingly easy to master once you establish the rhythm of the increases and decreases. It is the perfect weekend project to add a modern, handmade touch to your dining room or kitchen layout.
Pattern Specifications
Materials
-
Yarn: Worsted weight (#4) cotton yarn. Recommended: Lion Brand Re-Up cotton (Approx. 450 grams / 734 yards / 674 meters total).
-
Crochet Hook: 4.5 mm (or size needed to meet gauge).
-
Notions: 2 stitch markers, yarn needle, and scissors.
Dimensions & Gauge
-
Finished Size: 12 inches wide by 39.5 inches long (30.5 cm x 100 cm).
-
Gauge: Rows 1 through 9 should form a neat triangle with sides measuring exactly 4 inches (10 cm).
Stitch Dictionary & Abbreviations
This pattern uses US crochet terminology. Before diving in, familiarize yourself with these foundational and special stitches:
-
ch: Chain
-
st(s): Stitch(es)
-
sp: Space
-
sc: Single crochet
-
dc: Double crochet
-
ss: Slip stitch
-
yo: Yarn over
-
sc2tog (Single Crochet Two Together): Insert hook into first space, yo and pull up a loop. Insert hook into next space, yo and pull up a loop. Yo and draw through all 3 loops on your hook.
Special Textured Stitches
Wattle Stitch Cluster: Work [1 sc, ch 1, 1 dc] all into the exact same designated stitch or space.
Large Bean Stitch (LB): Insert hook into the designated stitch, yo and pull up a loop. (Yo, insert hook back into the same stitch, yo, pull up a loop) a total of 3 times. You will have 8 loops on your hook. Yo and pull carefully through all 8 loops.
Mini Bean Stitch (mb): Insert hook into the designated stitch, yo and pull up a loop. Yo, insert hook into the same stitch, yo, pull up a loop. You will have 4 loops on your hook. Yo and pull through all 4 loops.
Important Pattern Notes
-
Stitch Markers: To prevent losing your place, always insert a stitch marker into your starting chain-3 or chain-2 spaces at the beginning of every row.
-
Placement: Unless specified otherwise, all subsequent Wattle stitches are worked directly into the chain-1 spaces of the previous row’s clusters.
-
Bean Placements: The
[1 sc, ch 1, 1 LB]groupings are typically worked right into the top loops of the Bean stitches from the prior row.
Step-by-Step Instructions
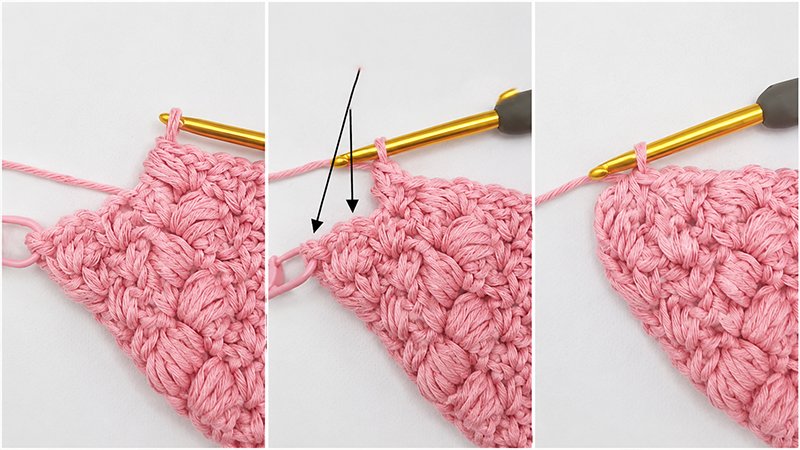
Step 1: The Increasing Triangle
We begin at one corner, building out a triangular shape.
Chain 4.
-
Row 1: Work a Wattle Stitch Cluster into the 4th chain from your hook. Secure a stitch marker around the beginning chain-3 space. Turn.
-
Row 2: Chain 3 (place marker). Skip the first dc. In the next ch-1 space, work
[1 sc, ch 1, 1 LB]. Skip the next sc, then work a Wattle cluster into the starting ch-3 space. Turn. -
Row 3: Chain 3 (place marker). Skip the first dc. Work a Wattle cluster into the next ch-1 space. Skip the next sc. Work
[1 sc, ch 1, 1 LB]into the top of the previous row’s Large Bean stitch. Skip the next ch-1 space and sc, then work a Wattle cluster into the ch-3 space. Turn. -
Row 4: Chain 3 (place marker). Skip the first dc. Work a Wattle cluster into the next ch-1 space. Skip the next sc. Work
[1 sc, ch 1, 1 LB]directly into the top of the Large Bean stitch. Skip the next 3 stitches (the ch-1 space, sc, and dc). Work a Wattle cluster into the next ch-1 space. Skip the next sc, then work a final Wattle cluster into the ch-3 space. Turn. -
Row 5: Chain 3 (place marker), skip the first dc. Work a Wattle cluster in the next ch-1 space, skip 2 stitches, and work another Wattle cluster in the next ch-1 space. Skip the next sc, then work
[1 sc, ch 1, 1 LB]in the top of the Large Bean stitch. Skip 3 stitches, work a Wattle cluster in the next ch-1 space, skip the next sc, and finish with a Wattle cluster in the ch-3 space. Turn. -
Row 6: Chain 3 (place marker), skip the first dc. (Work a Wattle cluster in the next ch-1 space, skip 2 stitches) twice. Work a Wattle cluster in the next ch-1 space. Skip the next sc, work
[1 sc, ch 1, 1 LB]into the top of the Large Bean stitch. Skip 3 stitches, work a Wattle cluster in the next ch-1 space, skip 2 stitches, work a Wattle cluster in the next ch-1 space. Skip the next sc, and end with a Wattle cluster in the ch-3 space. Turn. -
Row 7: Chain 3 (place marker), skip the first dc. Work
[1 sc, ch 1, 1 mb]into the next ch-1 space. (Skip 2 stitches, work a Wattle cluster in the next ch-1 space) twice. Skip the next sc, work[1 sc, ch 1, 1 LB]into the top of the Large Bean stitch. Skip 3 stitches, work a Wattle cluster in the next ch-1 space, skip 2 stitches, work a Wattle cluster in the next ch-1 space. Skip the next sc, and place a final Wattle cluster in the ch-3 space. Turn. -
Row 8: Chain 3 (place marker), skip the first dc. Work
[1 sc, ch 1, 1 mb]into the next ch-1 space. (Skip 2 stitches, work a Wattle cluster into the next ch-1 space) twice. Skip the next sc, work[1 sc, ch 1, 1 LB]into the top of the Large Bean stitch. Skip 3 stitches, work a Wattle cluster into the next ch-1 sp, skip 2 stitches, work a Wattle cluster into the next ch-1 space. Skip the next sc, work[1 sc, ch 1, 1 LB]into the top of the Mini Bean stitch. Skip 2 stitches, work a Wattle cluster into the ch-3 space. Turn. -
Row 9: Chain 3 (place marker), skip the first dc. Work a Wattle cluster into the next ch-1 space. Skip the next sc, work
[1 sc, ch 1, 1 LB]into the top of the Large Bean stitch, skip 3 stitches, work a Wattle cluster into the next ch-1 space, skip 2 stitches, work a Wattle cluster into the next ch-1 space. Repeat from * until you reach the Mini Bean grouping. Skip the next sc, work[1 sc, ch 1, 1 LB]into the top of the Mini Bean stitch, skip 2 stitches, and work a Wattle cluster into the ch-3 space. Turn. -
Row 10: Chain 3 (place marker), skip the first dc, work a Wattle cluster into the next ch-1 space. Skip the next sc, work
[1 sc, ch 1, 1 LB]into the top of the Large Bean stitch. Skip 3 stitches, work a Wattle cluster into the next ch-1 space, skip 2 stitches, work a Wattle cluster into the next ch-1 space, skip the next sc, then work[1 sc, ch 1, 1 LB]into the top of the next Large Bean stitch. Repeat from * until you have 1 Wattle cluster left before your turning space. Skip 3 stitches, work a Wattle cluster into the next ch-1 space, skip the next sc, then work a Wattle cluster into the ch-3 space. Turn. -
Row 11: Chain 3 (place marker), skip the first dc, work a Wattle cluster into the next ch-1 space, skip 2 stitches, work a Wattle cluster into the next ch-1 space. Skip the next sc, work
[1 sc, ch 1, 1 LB]into the top of the Large Bean stitch. Skip 3 stitches, work a Wattle cluster into the next ch-1 space, skip 2 stitches, work a Wattle cluster into the next ch-1 space, skip the next sc, work[1 sc, ch 1, 1 LB]into the top of the next Large Bean stitch. Repeat from * until 1 Wattle cluster remains before the turning space. Skip 3 stitches, work a Wattle cluster into the next ch-1 space, skip the next sc, work a Wattle cluster into the ch-3 space. Turn. -
Row 12: Chain 3 (place marker), skip the first dc, work a Wattle cluster into the next ch-1 space, skip 2 stitches, work a Wattle cluster into the next ch-1 space. Skip the next sc, work
[1 sc, ch 1, 1 LB]into the top of the Large Bean stitch, skip 3 stitches, work a Wattle cluster into the next ch-1 space, skip 2 stitches, work a Wattle cluster into the next ch-1 space. Repeat from * across to the turning space. Skip the next sc, work a Wattle cluster into the ch-3 space. Turn. -
Row 13: Chain 3 (place marker), skip the first dc, work
[1 sc, ch 1, 1 mb]into the next ch-1 space, (skip 2 stitches, work a Wattle cluster into the next ch-1 space) twice. Skip the next sc, work[1 sc, ch 1, 1 LB]into the top of the Large Bean stitch, skip 3 stitches, work a Wattle cluster into the next ch-1 space, skip 2 stitches, work a Wattle cluster into the next ch-1 space. Repeat from * across to the turning space. Skip the next sc, work a Wattle cluster into the ch-3 space. Turn. -
Row 14: Chain 3 (place marker), skip the first dc, work
[1 sc, ch 1, 1 mb]into the next ch-1 space, (skip 2 stitches, work a Wattle cluster into the next ch-1 space) twice. Skip the next sc, work[1 sc, ch 1, 1 LB]into the top of the Large Bean stitch, skip 3 stitches, work a Wattle cluster into the next ch-1 space, skip 2 stitches, work a Wattle cluster into the next ch-1 space. Repeat from * until you hit the Mini Bean grouping. Skip the next sc, work[1 sc, ch 1, 1 LB]into the top of the Mini Bean stitch, skip 2 stitches, and work a Wattle cluster into the ch-3 space. Turn.
Rows 15–26: Cycle through the established stitch pattern by repeating Rows 9 through 14 two more times. Rows 27–29: Repeat Rows 9 through 11 once more. (Your triangle side edge should now measure roughly 12 inches / 30.5 cm).
Step 2: Growing the Length (Decreasing on One Side Only)
Now, we lock in the width of the runner while continuing to extend its length on the bias.
-
Row 30: Chain 3 (place marker), skip the first dc. Work a Wattle cluster into the next ch-1 space, skip 2 stitches, work a Wattle cluster into the next ch-1 space, skip the next sc, work
[1 sc, ch 1, 1 LB]into the top of the Large Bean stitch, skip 3 stitches. Repeat from * until you have 2 Wattle clusters remaining. Work a Wattle cluster into the next ch-1 space, skip 2 stitches, then work a sc2tog across the final ch-1 space and the ch-3 space. Turn. -
Row 31: Chain 2 (place marker), skip the sc2tog and the next dc, then work a Wattle cluster into the next ch-1 space. Skip the next sc, work
[1 sc, ch 1, 1 LB]into the top of the Large Bean stitch, skip 3 stitches, work a Wattle cluster into the next ch-1 space, skip 2 stitches, work a Wattle cluster into the next ch-1 space. Repeat from * across to your turning space. Skip the next sc, work a Wattle cluster into the ch-3 space. Turn. -
Row 32: Chain 3 (place marker), skip the first dc, work
[1 sc, ch 1, 1 mb]into the next ch-1 space, skip 2 stitches. Work a Wattle cluster into the next ch-1 space, skip 2 stitches, work a Wattle cluster into the next ch-1 space, skip the next sc, work[1 sc, ch 1, 1 LB]into the top of the Large Bean stitch, skip 3 stitches. Repeat from * until only 1 Wattle cluster is left before your turning chain. Skip the next 3 stitches, then execute a sc2tog across the final ch-1 space and the ch-2 space. Turn. -
Row 33: Chain 2 (place marker), skip the first sc2tog. Work
[1 sc, ch 1, 1 mb]into the top of the next Large Bean stitch, skip 3 stitches, work a Wattle cluster into the next ch-1 space, skip 2 stitches, work a Wattle cluster into the next ch-1 space. Skip the next sc, work[1 sc, ch 1, 1 LB]into the top of the Large Bean stitch, skip 3 stitches, work a Wattle cluster into the next ch-1 space, skip 2 stitches, work a Wattle cluster into the next ch-1 space. Repeat from * until you reach the final Mini Bean grouping. Skip the next sc, work[1 sc, ch 1, 1 LB]into the top of that Mini Bean stitch, skip 2 stitches, then work a Wattle cluster into the ch-3 space. Turn. -
Row 34: Chain 3 (place marker), skip the first dc, work a Wattle cluster into the next ch-1 space. Skip the next sc, work
[1 sc, ch 1, 1 LB]into the top of the Large Bean stitch, skip 3 stitches, work a Wattle cluster into the next ch-1 space, skip 2 stitches, work a Wattle cluster into the next ch-1 space. Repeat from * until you reach the final Mini Bean cluster before the turning chain. Skip the next 2 stitches, then complete a sc2tog across the last ch-1 space and the ch-2 space. Turn. -
Row 35: Chain 2 (place marker), skip the sc2tog and the next dc. Work a Wattle cluster into the next ch-1 space, skip 2 stitches, work a Wattle cluster into the next ch-1 space, skip the next sc, work
[1 sc, ch 1, 1 LB]into the top of the Large Bean stitch, skip 3 stitches. Repeat from * until only 1 Wattle cluster remains before the turning chain. Skip 3 stitches, work a Wattle cluster into that last ch-1 space, skip the next sc, then work a Wattle cluster into the ch-3 space. Turn.
Length Extension: Continually repeat Rows 30 through 35 until the longest straight side of your runner measures approximately 39 inches (100 cm). Ensure you finish on a Row 35 layout before moving to the final taper.
Step 3: Closing the Rectangle (Decreasing on Both Sides)
We will now bring the piece to a clean point by closing the remaining corner.
-
Row 36: Chain 2 (place marker), skip the first dc. Work a Wattle cluster into the next ch-1 space, skip 2 stitches, work a Wattle cluster into the next ch-1 space, skip the next sc, work
[1 sc, ch 1, 1 LB]into the top of the Large Bean stitch, skip 3 stitches. Repeat from * until you have 2 Wattle clusters remaining. Work a Wattle cluster into the next ch-1 space, skip 2 stitches, then sc2tog across the last ch-1 space and the ch-2 space. Turn. -
Row 37: Chain 2 (place marker), skip the sc2tog and the next dc. Work a Wattle cluster into the next ch-1 space, skip the next sc, work
[1 sc, ch 1, 1 LB]into the top of the Large Bean stitch, skip 3 stitches. Work a Wattle cluster into the next ch-1 space, skip 2 stitches, work a Wattle cluster into the next ch-1 space, skip the next sc, work[1 sc, ch 1, 1 LB]into the top of the Large Bean stitch, skip 3 stitches. Repeat from * until 2 Wattle clusters remain. Work a Wattle cluster into the next ch-1 space, skip 2 stitches, then sc2tog across the last ch-1 space and the ch-2 space. Turn. -
Row 38: Chain 2 (place marker), skip the sc2tog and the next dc. Work a Wattle cluster into the next ch-1 space, skip the next sc, work
[1 sc, ch 1, 1 LB]into the top of the Large Bean stitch. Skip 3 stitches, work a Wattle cluster into the next ch-1 space, skip 2 stitches, work a Wattle cluster into the next ch-1 space, skip the next sc, work[1 sc, ch 1, 1 LB]into the top of the next Large Bean stitch. Repeat from * until only 1 Wattle cluster is left. Skip 3 stitches, then sc2tog across the final ch-1 space and the ch-2 space. Turn. -
Row 39: Chain 2 (place marker), skip the first sc2tog. Work
[1 sc, ch 1, 1 mb]into the top of the Large Bean stitch. Skip 3 stitches, work a Wattle cluster into the next ch-1 space, skip 2 stitches, work a Wattle cluster into the next ch-1 space, skip the next sc, work[1 sc, ch 1, 1 LB]into the top of the next Large Bean stitch. Repeat from * until only 1 Wattle cluster remains. Skip 2 stitches, then sc2tog across the final ch-1 space and the ch-2 space. Turn. -
Row 40: Chain 2 (place marker), skip the first sc2tog. Work
[1 sc, ch 1, 1 mb]into the top of the Large Bean stitch, skip 3 stitches, work a Wattle cluster into the next ch-1 space, skip 2 stitches, work a Wattle cluster into the next ch-1 space. Skip the next sc, work[1 sc, ch 1, 1 LB]into the top of the Large Bean stitch, skip 3 stitches, work a Wattle cluster into the next ch-1 space, skip 2 stitches, work a Wattle cluster into the next ch-1 space. Repeat from * until you hit the final Mini Bean cluster. Skip 2 stitches, then sc2tog across the last ch-1 space and the ch-2 space. Turn. -
Row 41: Chain 2 (place marker), skip the sc2tog and the next dc. Work a Wattle cluster into the next ch-1 space, skip 2 stitches, work a Wattle cluster into the next ch-1 space. Skip the next sc, work
[1 sc, ch 1, 1 LB]into the top of the Large Bean stitch, skip 3 stitches, work a Wattle cluster into the next ch-1 space, skip 2 stitches, work a Wattle cluster into the next ch-1 space. Repeat from * until you hit the final Mini Bean cluster. Skip 2 stitches, then complete a sc2tog across the final ch-1 space and the ch-2 space. Turn.
Rows 42–59: Repeat the sequence of Rows 36 through 41 three more times total.
-
Row 60: Chain 2 (place marker), skip the sc2tog and the next dc. Work a Wattle cluster into the next ch-1 space, skip 2 stitches, work a Wattle cluster into the next ch-1 space. Skip the next sc, work
[1 sc, ch 1, 1 LB]into the top of the Large Bean stitch, skip 3 stitches. Work a Wattle cluster into the next ch-1 space, skip 2 stitches, then sc2tog across the last ch-1 space and the ch-2 space. Turn. -
Row 61: Chain 2 (place marker), skip the sc2tog and the next dc. Work a Wattle cluster into the next ch-1 space, skip the next sc, work
[1 sc, ch 1, 1 LB]into the top of the Large Bean stitch, skip 3 stitches. Work a Wattle cluster into the next ch-1 space, skip 2 stitches, then sc2tog across the last ch-1 space and ch-2 space. Turn. -
Row 62: Chain 2 (place marker), skip the sc2tog and the next dc. Work a Wattle cluster into the next ch-1 space, skip the next sc, work
[1 sc, ch 1, 1 LB]into the top of the Large Bean stitch, skip 3 stitches, then finish with a sc2tog across the last ch-1 space and ch-2 space. Turn. -
Row 63: Chain 2 (place marker), skip the first sc2tog. Work
[1 sc, ch 1, 1 mb]into the top of the Large Bean stitch, skip 3 stitches, then sc2tog across the final ch-1 space and ch-2 space. Turn. -
Row 64: Chain 2 (place marker), skip the sc2tog and the Mini Bean stitch, then complete a final sc2tog directly across the last ch-1 space and the ch-2 space. Turn.
-
Row 65: Chain 1, then work 1 slip stitch directly into the final chain-2 space.
Fasten off your yarn, cut a tail, and weave in all loose ends. For the best display, wet-block your table runner to flatten out the stitches and achieve perfectly straight edges.
Finishes: Creating and Attaching Tassels
Give your table runner a polished, bohemian flair with handmade corner tassels:
-
Cut the Strands: Cut 48 individual pieces of yarn, each roughly 12.5 inches (31 cm) long. This provides 12 strands for each of the four corners.
-
Bundle: Group 12 strands together and fold the entire bundle in half to form a loop at the top.
-
Attach: Insert your crochet hook through one of the runner’s corners from back to front. Catch the folded loop of the yarn bundle with your hook and pull it halfway through the corner stitch.
-
Secure: Pull the raw yarn tails completely through the pulled-up loop. Pull firmly to tighten the knot securely against the edge of the fabric. Repeat this process for the remaining three corners, then trim the ends evenly!