Pattern Description:
The Roll It Up pillowcase pattern uses the clever burrito method to create a neat, standard 30×20” pillowcase with no raw edges.
Featuring a red band and ladybug print body, it’s sewn using French seams for a clean, professional finish inside and out.
This beginner-friendly design is perfect for cotton fabrics and results in a durable, fully enclosed pillowcase.
Materials Needed & Measurements:
- Fabric Requirements (Quantities are for 44/45″-wide, 100% cotton fabrics):
- 3/8 yard red tone-on-tone (for the pillowcase band).
- 7/8 yard ladybug print (for the pillowcase body).
- (Note: Measurements include 1⁄2″ seam allowances, unless otherwise specified, such as the 1/4″ or scant 1/4″ seam allowances used for French seams).
- Specific Fabric Cuts:
- From red tone-on-tone: 1 – 10×41” strip.
- From ladybug print: 1 – 26 1⁄2×41” rectangle.
- Sinished Pattern Size: The finished pillowcase is 30×20″ and fits a standard-size bed pillow.
Instructions for Making the Roll It Up Pattern:
Preparation and Cutting
To begin the “Roll it Up!” pillowcase, the required fabrics must be cut precisely. The materials needed include 3/8 yard of red tone-on-tone fabric designated for the pillowcase band, and 7/8 yard of ladybug print fabric for the pillowcase body.
The example pattern utilizes fabrics from the Ladybugs collection by Debi Hron and the Sketch Basic collection, both manufactured by Timeless Treasures Fabrics.
Based on these materials, two key pieces must be cut:
- From the red tone-on-tone fabric (the band), cut 1—10×41” strip.
- From the ladybug print fabric (the body), cut 1—26 1/2×41” rectangle.
It is important to sew these pieces with right sides together unless specific instructions dictate otherwise.
The use of this particular technique, the “burrito” method, means that loose threads or frayed edges are not a concern initially, as the raw edges will ultimately be fully encased.
The “Burrito” Roll and Alignment
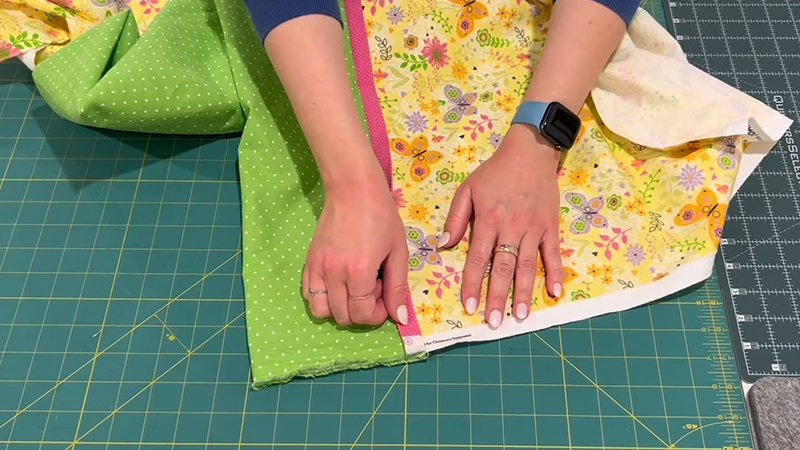
The next sequence of steps involves the unique rolling technique that gives the pattern its name. First, place the red tone-on-tone strip onto the work surface with its right side facing up.
Next, take the larger ladybug print rectangle and place it right side down directly atop the red tone-on-tone strip.
Ensure that the long edges of both fabric pieces are accurately matched up. If desired, the edges may be pinned together to hold them in alignment during the subsequent steps.
Starting from the lower long edge of the body fabric, begin to roll the ladybug print rectangle toward the red tone-on-tone strip.
This rolling motion is central to the method, and should continue until the fabric reaches a specific point.
Stop rolling when the fabric reaches about halfway up the red tone-on-tone strip. At this point, the upper raw edges of the red strip and the body fabric should still be perfectly aligned.
Forming the Band Tube
With the body fabric rolled securely inside, the red tone-on-tone band must be wrapped around the rolled section to form a tube.
Take the remaining portion of the red strip and wrap it around the rolled ladybug print rectangle. This action creates the tube that will ultimately form the finished band of the pillowcase.
Next, pin the three raw edges that are now aligned together. It is crucial to ensure that the rolled rectangle portion of the ladybug print fabric does not get inadvertently caught or pinned within this seam allowance. Sew these pinned edges together using a 1/2” seam allowance.
Pressing and Initial Seam Encasing
Once the seam is sewn, the fabric unit must be pulled from the tube. This action is similar to pulling a sleeve from a sweater.
Pull the ladybug print body from the tube, which will simultaneously turn the red tone-on-tone band right side out. This completes the initial pillowcase unit.
At this stage, the band must be pressed flat. Pull slightly on the red tone-on-tone band while pressing the band flat.
Crucially, the seam allowance should be directed and pressed toward the band. Turn the unit over and repeat this pressing action on the opposite side to ensure a smooth finish.
The ladybug print body rectangle should then be unrolled. Upon inspection, the worker will see that all seam allowances are entirely encased within the red tone-on-tone band, leaving no raw edges on either side of the band. This successful encapsulation forms the foundation for a fray-free pillowcase.
Finishing with French Seams (Side and Bottom)
To fully complete a truly fray-free pillowcase, the remaining side and bottom edges must be finished using French seams, ensuring that no raw edges remain exposed.
- First Seam (Side): Ensure the wrong sides are together. Sew together the long raw edges of the pillowcase unit using a scant 1/4” seam allowance.
For the highest accuracy, the sewer should begin sewing at the band intersection and continue toward the body corner.
Pinning the intersection where the band meets the body is recommended to ensure that the seams align properly.
- Pressing and Turning: Turn the pillowcase unit wrong side out and press the seam allowance flat.
For best results, it may be necessary to roll the seam between the fingers to nudge it fully to the edge prior to pressing.
- Second Seam (Side): With the wrong side still facing out, sew the long edge of the pillowcase unit again, this time using a 1/4” seam allowance.
This second pass fully encloses the seam previously sewn. This step ensures that “even the side seams are enclosed”.
- Finishing the Bottom: Repeat this exact sequence of steps (the initial scant 1/4″ seam, pressing, turning wrong side out, and the final 1/4″ enclosing seam) along the bottom raw edges of the body to complete the pillowcase.
The dual application of French seams ensures that the final product is fully enclosed and fray-free.