Pattern Description:
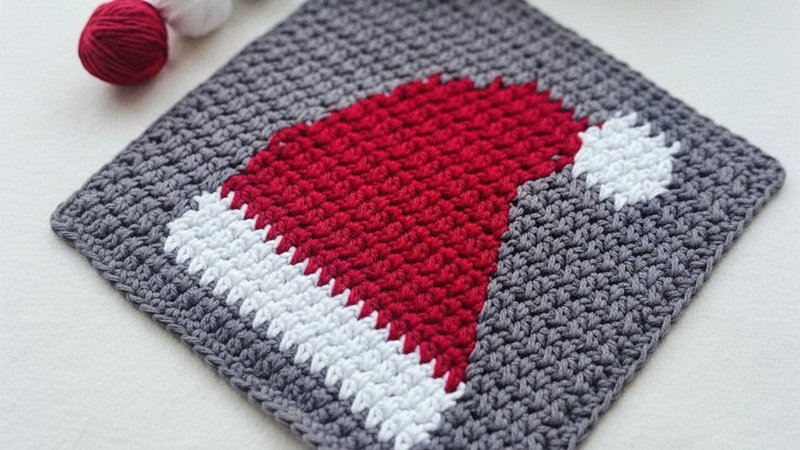
The Santa Hat Washcloth is a festive illusion-crochet project worked in single and half-double crochet stitches to form a hidden Santa Hat that appears only when viewed from an angle.
Made with cotton yarn and finished with a textured crab-stitch border, this washcloth combines functionality with holiday charm and is perfect for gifting or decorating.
Materials Needed & Measurements:
Materials
- Cotton Yarn in red and white (light DK #3).
- The designer specifically used: Cascade Arns Ultra Pima in red and Berroco Pima 100 in white.
- 4.0mm hook.
- Scissors.
- Tapestry needle.
Measurements
- Gauge: 4 rows x 4 sts = 1 square inch.
- Final Size: 7 1/4 (length) x 9 1/4 (width) inches.
Abbreviations (US Terms)
- ch – chain
- sc – single crochet
- hdc – half double crochet
- flo – front loop only
- leftover loop – back loop left unworked in the previous row
- sts – stitches
- R – row
- crab stitch – reverse single crochet
Instructions for Making the Santa Hat Washcloth Pattern:
Foundation
Starting Chain
- With white yarn, ch 41.
Main Body of Washcloth
The washcloth consists of 38 total rows. Stitches shift between red and white, moving between flo and leftover loop placements to create the illusion effect.
Below is a written sequence of all rows for clarity and ease of use.
Section A – Establishing the Base (Rows 1-6)
R1 (White): Starting in 2nd ch from hook, 1 sc in each st, turn.
R2 (White): Sc across, turn.
R3 (Red): Switch to red; sc across, turn.
R4 (Red): Sc in first 4 sts, hdc flo in next 32 sts, sc in last 4 sts, turn.
R5 (White): Sc in first 4 sts, hdc in leftover loops for next 32 sts, sc in last 4, turn.
R6 (White): Work sc across, turn.
Section B – Establishing Diagonal Ridges (Rows 7-14)
R7–11: Repeat the color-switching rhythm:
- Odd rows in red with simple sc rows
- Even rows in red using hdc flo in the center block
- Following white rows using hdc leftover loop
Pattern becomes:
- R7 Red: sc across
- R8 Red: 4 sc, 32 hdc flo, 4 sc
- R9 White: 4 sc, 32 hdc leftover loop, 4 sc
- R10 White: sc across
- R11 Red: sc across
- R12 Red: 8 sc, 24 hdc flo, 8 sc
- R13 White: 8 sc, 24 hdc leftover loop, 8 sc
- R14 White: sc across
This begins forming the angled top of the Santa Hat.
Section C – The Main Hat Shape (Rows 15-33)
Rows progress using the same technique:
- Red rows introduce the raised hdc (flo).
- White rows fill the leftover loops to continue the illusion.
Highlights include:
- R16: 10 sc, 20 hdc flo, 10 sc
- R17: 10 sc, 20 hdc leftover loop, 10 sc
- R20-21: Repeat the same structure for even shaping
- R24-25: Introduce two raised blocks to shape the fluffy white brim
- R28-29: More detailed shaping with multiple small raised segments
- R32-33: A large central raised block forms the main hat tip
The height and shadow placement form the iconic Santa Hat silhouette.
Section D – Finishing the Image (Rows 34-38)
R34: White – sc across R35: Red – sc across
R36–37: Shape the last raised sections on the lower right side of the design:
- R36 Red: 5 sc, 4 hdc flo, 2 sc, 10 hdc flo, 19 sc
- R37 White: reverse the loop placement with leftover loops
R38: White – sc across. Cut yarn.
Border & Finishing
Single Crochet Border
With white yarn:
- Work 1 round of sc around all edges.
- Place 3 sc in each corner to keep the fabric flat.
Crab Stitch Edge
- Work reverse single crochet around the washcloth.
- This creates a twisted, rope-like edge that complements the raised illusion stitches.
Final Steps
- Weave in all ends securely.
- Block lightly if needed to square the edges.