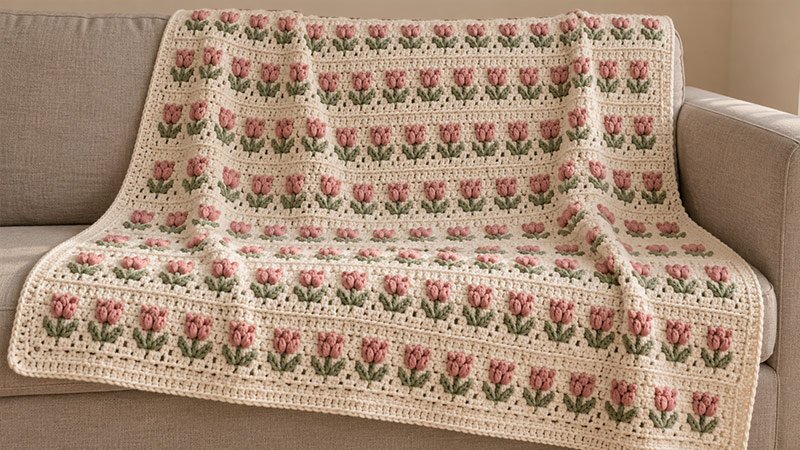
This tulip blanket has small, raised blooms. They sit in neat rows. Green V-sts form the stems and leaves. Puff sts make the flower heads. Cream rows leave space between the tulip rows.
Work the blanket flat in one piece. Use one shade for all the blooms. Or change the shade with each tulip row. A plain sc border frames the blanket.
Yarn needs and the final size are estimates. Make a swatch before you start. Check the stitch pattern, drape, and size.
Pattern Details
Skill Level
Confident beginner.
You should know how to work sc, dc, ch, and sl st. The pattern also uses V-sts, puff sts, and color changes.
Size
About 42 × 53 inches, including a border about 1 inch wide.
At the stated gauge, the main fabric measures about 40 × 51½ inches.
Materials
- Yarn: Worsted-weight yarn, Category 4.
- Color A — Cream: About 1,500–1,700 yards, including the border.
- Color B — Leaf green: About 350–450 yards.
- Color C — Tulip pink: About 350–450 yards.
- Total yarn: About 2,200–2,600 yards.
- Hook: US I/9, 5.5 mm, or the size needed to meet gauge.
- Yarn needle.
- Scissors.
- Stitch markers.
- Measuring tape.
Use yarns of the same weight and with similar care needs. If you use more than one flower shade, divide the Color C amount among those shades.
Abbreviations
US crochet terms
| Abbreviation | Meaning |
|---|---|
| ch | Chain |
| sc | Single crochet |
| dc | Double crochet |
| sl st | Slip stitch |
| st / sts | Stitch / stitches |
| sp / sps | Space / spaces |
| sk | Skip |
| rep | Repeat |
| rnd | Round |
| RS | Right side |
| WS | Wrong side |
| yo | Yarn over |
| V-st | V-stitch: (dc, ch 1, dc) in one st |
| puff | Puff stitch, explained below |
Gauge
With the main stitch pattern, after washing and laying flat:
- 16 stitch positions = 4 inches wide.
- 20 rows = 4 inches tall.
Check the gauge over a full pattern repeat. Count each sc, dc, puff, and ch-1 sp as one stitch position.
Make a Gauge Swatch
- With A, ch 34.
- Work Row 1 below to make 33 sc.
- Work Rows 2–5. Each tulip row will have 8 flowers.
- Rep Rows 2–5 four more times.
- The swatch now has 21 rows.
- Wash and dry it as directed on the yarn label.
- Lay it flat without stretching.
- Measure the center of the swatch.
If the swatch is too small, try a larger hook. If it is too large, try a smaller hook.
Adjust the Size
Change the Width
The main stitch count must be a multiple of 4, plus 1.
The foundation chain must be a multiple of 4, plus 2.
| Main stitch count | Starting chain | Tulips per flower row | Approximate main width |
|---|---|---|---|
| 121 | 122 | 30 | 30 inches |
| 161 | 162 | 40 | 40 inches |
| 201 | 202 | 50 | 50 inches |
| 241 | 242 | 60 | 60 inches |
A 1-inch border adds about 2 inches to the total width.
To plan a width at your own gauge:
- Choose the main fabric width.
- Multiply that width by your stitches per inch.
- Round to the nearest multiple of 4.
- Add 1 for the main stitch count.
- Add 1 more for the starting chain.
Change the Length
Each four-row repeat adds about ⅘ inch at the stated gauge.
- Add 5 repeats to add about 4 inches.
- Remove 5 repeats to shorten the blanket by about 4 inches.
- End after the second cream sc row of a repeat.
Allow about 2 more inches for the top and bottom border. Larger blankets will need more yarn.
Pattern Notes
- Work flat in rows.
- Turn at the end of each row.
- The starting ch 1 does not count as a st.
- On stem rows, the starting ch 3 counts as the first dc.
- Work through both loops unless told otherwise.
- Each row has 161 stitch positions.
- Each stem row has 40 V-sts.
- Each flower row has 40 puff sts.
- Work each puff in a V-st’s ch-1 sp.
- The chain that closes a puff does not count as a separate pattern stitch.
- Work two cream sc rows after each flower row. Then work the next stem row.
- Change colors on the last pull-through of the final st.
- Leave an 8-inch tail when you join or cut yarn.
- Push the flowers toward the face you like best. Mark that face as the RS. Do this before you add the border.
- Border ch 1 does not count as a st.
- Do not turn between border rnds.
Stitch Explanations
Single Crochet — sc
- Insert the hook into the stated st or sp.
- Yo and pull up a loop.
- Yo and pull through both loops.
Double Crochet — dc
- Yo.
- Insert the hook into the stated st.
- Yo and pull up a loop.
- Yo and pull through two loops.
- Yo and pull through the last two loops.
V-Stitch — V-st
Work all three parts into the same st:
- Dc.
- Ch 1.
- Dc.
The two dc sts form the sides of the stem. The ch-1 sp holds the flower in the next row.
Tulip Puff — puff
Keep the pulled-up loops loose so the flower does not pull the fabric tight.
- Yo.
- Insert the hook into the stated ch-1 sp.
- Yo and pull up a loop to about dc height.
- Rep Steps 1–3 three more times. You now have 9 loops on the hook.
- Yo and pull through all 9 loops.
- Ch 1 to close the puff.
That closing ch belongs to the puff. When the pattern says to ch 1 after the puff, make one more chain.
Change Colors
For a final sc:
- Insert the hook into the last st.
- Yo and pull up a loop with the old color.
- Yo with the new color.
- Pull through both loops.
For a final dc:
- Work the dc until two loops remain.
- Yo with the new color.
- Pull through both loops.
Use the new color for the starting chain of the next row.
Blanket Pattern Instructions
Foundation
With A, ch 162 loosely.
Row 1 — Cream Base
- Sc in the second ch from the hook.
- Sc in each ch across.
- Change to B on the last pull-through of the final sc.
- Turn.
Count: 161 sc.
Row 2 — Green Stems
With B:
- Ch 3. Count this as a dc in the first st.
- Sk the next st.
- Work a V-st in the next st.
- Sk the next st.
- Dc in the next st.
- Rep Steps 2–5 39 more times across the row.
- On the last pull-through of the final dc, change to C.
- Turn.
Count: 40 V-sts and 41 single dc sts. The single dc sts sit between the V-sts and at both ends.
Count the ch-1 sps, too. The row has 161 stitch positions.
Row 3 — Tulip Flowers
With C:
- Ch 1.
- Sc in the first dc.
- Ch 1.
- Work one puff in the next V-st ch-1 sp. Leave both dc sts of that V-st unworked.
- Ch 1.
- Sc in the next single dc between V-sts.
- Rep Steps 3–6 across the row 39 more times.
- Work the final sc into the top of the starting ch 3 from Row 2.
- Change to A on the last pull-through of that sc.
- Turn.
Count: 40 puffs, 80 ch-1 sps, and 41 sc.
The row has 161 stitch positions. Do not include the puff closing chains in this count.
Row 4 — First Cream Row
With A:
- Ch 1.
- Sc in the first sc.
- Sc in the next ch-1 sp.
- Sc into the top of the next puff. Do not add a stitch into its closing chain.
- Sc in the next ch-1 sp.
- Sc in the next sc.
- Rep Steps 3–6 across the row 39 more times.
- Turn.
Count: 161 sc.
Row 5 — Second Cream Row
With A:
- Ch 1.
- Sc in each st across.
- Change to B on the last pull-through of the final sc, unless this is the last blanket row.
- Turn.
Count: 161 sc.
Continue the Blanket
- Rep Rows 2–5 another 63 times.
- Use B for each stem row.
- Use C for each flower row.
- Use A for both plain sc rows.
- End after Row 5 of the final repeat.
- Keep A attached for the border.
The main blanket has:
- 257 rows in total
- 64 tulip rows
- 40 tulips per flower row
- 2,560 tulips in total
If using several flower shades, change the flower color at the start of each Row 3. Keep the stem and cream rows the same.
Border Instructions
Lay the blanket flat before starting. Push the puffs toward the RS and mark that face.
Border Round 1
With the RS facing you, use A. Start at a top corner. If needed, fasten off. Then rejoin A at that corner.
- Ch 1.
- Work 3 sc in the corner st.
- Sc in each of the next 159 sts across the top.
- Work 3 sc in the last top corner st.
- Work sc evenly down the first side. Start with about 4 sc for each five-row section. Adjust this to suit the height of the dc rows.
- At the bottom corner, work 3 sc in the underside of the first foundation st.
- Sc in the underside of each of the next 159 foundation sts.
- Work 3 sc in the underside of the last foundation st.
- Work sc evenly up the second side. Match the sc count on the first side.
- Join with a sl st to the first sc.
Do not work in the same corner st again as you start a side.
Mark the middle sc in each 3-sc corner group.
Lay the blanket flat. Check the edge:
- If it pulls inward, add a few side sc. Space them evenly.
- If it forms waves, work fewer side sc. Space these changes evenly.
The side count may vary with your gauge.
Border Round 2
- Ch 1.
- Sc in each st around.
- Work 3 sc in each marked corner st.
- Move each marker to the middle sc of the new corner group.
- Join with a sl st to the first sc.
Border Rounds 3–4
Rep Round 2 twice more.
Check the border width. If it is less than 1 inch, work another rnd as needed. Keep the blanket flat and use 3 sc at each marked corner.
Fasten off, leaving an 8-inch tail.
Finishing
- Weave in all yarn ends on the WS.
- Take out the stitch markers.
- Wash and dry as the yarn label says.
- If the yarn allows, shape the damp blanket. Use a clean, flat space.
- Smooth the edges. Do not stretch them.
- Use your fingers to shape each puff with care.
- Let the blanket dry fully before use.