Pattern Description:
Skill Level
Intermediate – Requires experience with reading charts and working color changes.
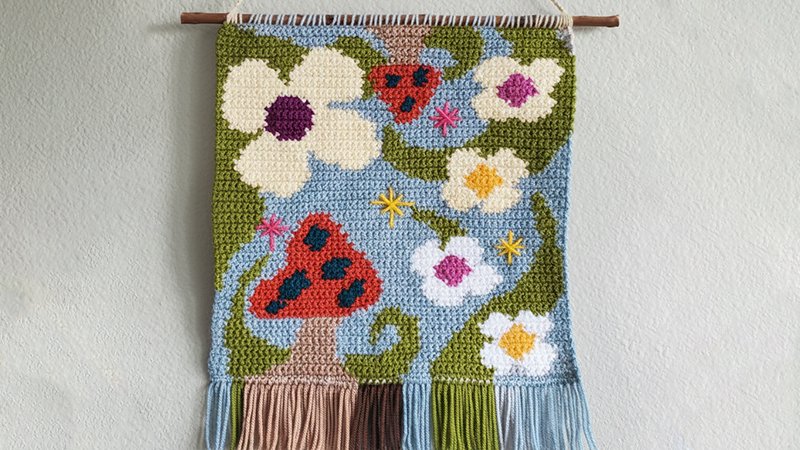
The Shrooms and Blooms Wall Hanging is a bright, whimsical, and colorful intermediate-level crochet pattern designed to bring a touch of “fairy land” charm to your space.
Featuring playful mushrooms, blooming flowers, scattered stars, and lush green leaves, this tapestry-style wall hanging creates a magical woodland aesthetic.
Worked with multiple yarn colors using the bobbin method, the design is ideal for those comfortable with colorwork and reading a graph.
The finished piece can be displayed as a wall hanging, or adapted for other creative uses such as a decorative pillow front or the panel of a tote bag.
Optional fringe and small stars offer additional customization, allowing makers to enhance the enchanting theme.
Materials Needed & Measurements:
Hook
US G (4.00 mm) crochet hook.
Yarn
Worsted weight (Category #4) yarn.
Yarn Colors & Quantities
Use 8 colors, less than 1.5 oz / 62 yds of each.
Specific Color List (Brava Worsted):
- Color A: Gray (Dove Heather)
- Color B: Green (Avocado)
- Color C: Tan (Almond)
- Color D: White (White)
- Color E: Yellow (Caution)
- Color F: Red (Paprika)
- Color G: Pink (Rouge)
- Color H: Purple (Fairy Tale)
Notions
Scissors, measuring tape, yarn needle.
Other Materials
Wooden dowel or natural stick over 15″ long.
Gauge (Blocked)
17 sc × 20 rows = 4″.
Finished Size (Blocked, Approx.)
Height: 14.2″ Width: 13.8″ (Does not include dowel or fringe.)
Abbreviations (US Terms)
- Ch – Chain
- RS – Right side
- Sc – Single crochet
Instructions for Making the Shrooms and Blooms Wall Hanging Pattern:
Beginning the Project
Start with Color A. Ch 60 to form the foundation chain. Turn your work, then begin Row 1 in the 2nd Ch from the hook, giving you 59 sc across. This stitch count remains the same for every row.
Row Structure
The piece is worked from the bottom upward, one row at a time. Each row begins with:
Ch 1, turn (does not count as a stitch).
Work 59 sc across for every row, following your colorwork chart (not included here).
Colorwork Method
This pattern uses the bobbin technique, which is ideal for color blocks and detailed motifs.
- Each color section is worked from its own bobbin.
- Yarn is not carried across the back; instead, separate bobbins prevent excess bulk.
- When changing colors, always switch on the last yarn-over of the stitch before the color change.
- Because this is not worked in the round, you’ll turn the work at the end of each row, alternating RS and WS views.
Keeping yarn tidy and tangle-free will make the process much smoother.
Blocking
Blocking is highly recommended, as it helps even out the tension and significantly smooths colorwork stitches. A lightly steamed or wet block works well for acrylic yarn.
Attaching the Wooden Dowel
In your final row, secure the wall hanging to the dowel using Color A. You may:
- Sew the hanging around the dowel or
- Sc around the dowel across the last row for a decorative finish.
Choose the method that best matches your preferred look.
Creating the Hanger Cord
With Color A: Ch 80 to form a sturdy hanger cord. Tie each end to the first and last stitches of the final row. Adjust the length as desired.
Optional Decorative Embellishments
Fringe
Add fringe to the bottom edge (Row 1 side). Use the same colors appearing in Row 1 for a cohesive finish. Attach strands evenly spaced for a neat, full fringe.
Stars & Details
To enhance the magical woodland theme, add four small colorful stars using surface details. You may embroider, applique, or crochet small stars in Colors E–H for a whimsical “fairy dust” effect.