Pattern Description:
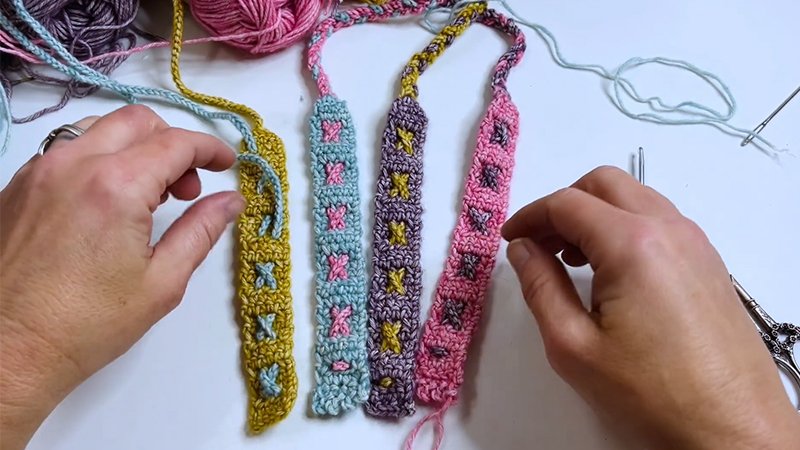
The X Marks the Spot is an extremely easy, beginner-level crochet bookmark pattern that is worked in rows using simple stitches.
The design incorporates weaving techniques to create an “X” pattern, similar to lacing a shoe, giving it a little flair.
The pattern finishes with braided chains at the top and an optional picot stitch border at the bottom.
Materials Needed & Measurements:
Materials:
- Yarn: Scheepjes Stone-Washed or any 3-weight light worsted weight yarn.
- Composition (for Scheepjes Stone-Washed): 78% Cotton, 22% Acrylic, 142 yds/ 130 m per 1.76 oz/50 g skein.
- Yardage Needed: Just a little bit of each color you decide to use. The sample used four colors: Yellow Jasper (849), Deep Amethyst (811), Amazonite (813), and Tourmaline (836).
- Hook & Tools:
- 3 mm crochet hook (a larger hook may be used, adjusting tension).
- Darning Needle.
- Scissors.
Finished Measurement:
The finished bookmark size is 6 inches tall x 1 inch wide.
Additional Notes:
The skill level required for this pattern is Beginner. The total estimated time to complete the bookmark is 1 hour 4 minutes.
Abbreviations and Pattern Notes Used:
Abbreviations:
- sc – single crochet
- sc2tog – single crochet 2 together
- sc3tog – single crochet 3 together
- fsc – foundation single crochet
- st(s) – stitch(es)
- ch – chain
- sk – skip
- ch(s) – chain(s)
- – repeat from to end of row
Stitch Guide Definitions:
- sc2tog (Single Crochet 2 Together): Insert hook in indicated st, yo, draw up a loop, rep from 2 times, yo, draw through all loops on hook – 1 sc decrease.
- sc3tog (Single Crochet 3 Together): Insert hook in indicated st, yo, draw up a loop, rep from 3 times, yo draw through all loops on hook – 2 sc decrease.
- fsc (Foundation Single Crochet): Create a slip knot. Ch 2, insert hook in 1st ch, yo, draw up a loop, yo, pull through 1 loop (this is considered a ch 1), yo, draw through both loops on hook (2nd st). Then, insert hook in bottom two loops of ch 1, yo, draw up a loop, yo, draw through 1 loop (this is a ch 1), yo, draw through both loops (2 fsc created).
Instructions for Making the X Marks The Spot Crochet Bookmark Pattern:
Body Instructions:
The body of the bookmark consists of a simple repetition of rows, starting with a foundation row.
- Row 1: Fsc 5.
- Row 2: Ch 1, turn, sc in each st across – 5 sc.
- Row 3: Ch 1, turn, sc in 1st sc, ch 1, sk 1 sc, sc in next st, rep from one more time – 3 sc, 2 ch-1.
- Row 4: Ch 1, turn, sc in each st, and ch-1 sp across – 5 sc.
- Row 5: Ch 1, turn, sc 1 in each st – 5 sc.
Repeat Rows 3-5, 9 more times.
Top Shaping
Continue after the Repeats:
- Row 33: Repeat row 3.
- Row 34: Repeat row 4.
- Row 35: Ch 1, turn, sc2tog, sc in next st, sc2tog – 3 sc.
- Row 36: Ch 1, turn, sc3tog – 1 sc.
Creating the Chains
Do not cut yarn after Row 36. The chain created at the top will be one of the three braids.
- Chain 1 (Attached): Ch 60.
- Chains 2 & 3 (Complimentary Color): Using a complimentary color, ch 100-120 chs. You need the new chain to be about twice as long as the chain on the top of the bookmark (Ch 60).
Important: Before braiding, the length of all three chains must match; you may need to drop some chs or chain more until they are the same length.
Weaving (Assembly)
The assembly uses a darning needle to create the characteristic “X” pattern, similar to lacing up a shoe.
- Attach the Long Chain: Using a darning needle, attach it to the starting end of the long chain (100-120 chs).
- Weaving: Start weaving in from the bottom-most holes (the ch-1 spaces created in Row 3 repetitions). Work diagonally to create the “X” pattern.
- Finish the X: Once you have one side weaved in, begin working the other side.
- Braid: Stabilize the bookmark with something heavy, like a bottle, and begin braiding the three strands (the original Ch 60 and the two sides of the woven long chain).
- Secure: Sew the three braids together when finished. Wrap the yarn around and weave through to secure it and create a tassel. Leave a 1.5″ – 2″ tail.
Finishing (Picot Border)
To finish, an optional picot stitch border is added to the bottom of the bookmark.
- Use the same yarn color as the main bookmark.
- Flip the bookmark so the bottom Right Side (RS) is up. Insert the hook in the rightmost st and attach the yarn.
- Row 1 (Picot Border): Ch 3, insert hook in 1st ch, yo, pull up a loop, slip st through, insert hook in next st, yo, pull up a loop and slip st, rep from across – 4 picot sts.
- Weave in all remaining tails.