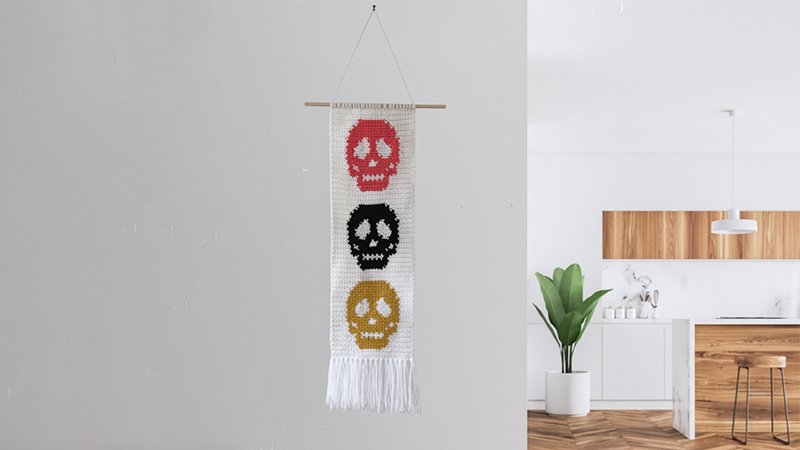
Pattern Description:
The Simple Skull Portrait Tapestry is a spooky-chic project featuring a bold skull design. It is perfect for advanced beginners looking to sharpen their tapestry skills and add an edge to their work.
The pattern uses American standard crochet terminology and is worked in rows using single crochet (Sc) throughout, turning yarn into an eerie statement piece. Color changes can be done using tapestry crochet or intarsia crochet.
Materials Needed & Measurements:
Materials Needed:
- 4mm Crochet Hook
- Yarn (Stylecraft Special Aran in the following colors):
- White
- Mustard
- Black
- Pomegranate
- Yarn Needle
- Tape Measure
- Scissors
- Steamer / Steam Iron (for blocking)
- Wooden Dowel (for hanging)
- Darning needle (for attaching the dowel)
- Yarn for Fringe (12-inch pieces of white yarn, 3 strands per fringe)
- Extra long piece of yarn (for hanging loop)
Measurements:
- Size: 7.5 x 27.5 inches approx including fringe.
Abbreviations Used:
- Ch – Chain
- Sc – Single Crochet
- WS – Wrong Side
- RS – Right Side
Instructions for Making the Simple Skull Portrait Tapestry Pattern:
Tapestry Instructions for Simple Skull Portrait (Rows 1-99)
Start by creating a Ch 34 with white color, then Sc in the 2nd Ch from the hook to begin Row 1. (W = White, M = Mustard, B = Black, P = Pomegranate)
Rows 1-4 (Base):
- ← Row 1 [RS]: (W) x 33
- → Row 2 [WS]: (W) x 33
- ← Row 3 [RS]: (W) x 33
- → Row 4 [WS]: (W) x 33
Rows 5-31 (Mustard Skull Section):
- ← Row 5 [RS]: (W) x 12, (M) x 9, (W) x 12
- → Row 6 [WS]: (W) x 11, (M) x 11, (W) x 11
- ← Row 7 [RS]: (W) x 10, (M) x 13, (W) x 10
- → Row 8 [WS]: (W) x 10, (M) x 13, (W) x 10
- ← Row 9 [RS]: (W) x 10, (M) x 2, (W), (M), (W), (M), (W), (M), (W), (M), (W), (M) x 2, (W) x 10
- → Row 10 [WS]: (W) x 10, (M) x 2, (W) x 9, (M) x 2, (W) x 10
- ← Row 11 [RS]: (W) x 8, (M) x 4, (W), (M), (W), (M), (W), (M), (W), (M), (W), (M) x 4, (W) x 8
- → Row 12 [WS]: (W) x 7, (M) x 19, (W) x 7
- ← Row 13 [RS]: (W) x 7, (M) x 3, (W), (M) x 11, (W), (M) x 3, (W) x 7
- → Row 14 [WS]: (W) x 7, (M), (W) x 2, (M) x 13, (W) x 2, (M), (W) x 7
- ← Row 15 [RS]: (W) x 7, (M), (W), (M) x 6, (W) x 3, (M) x 6, (W), (M), (W) x 7
- → Row 16 [WS]: (W) x 6, (M) x 9, (W) x 3, (M) x 9, (W) x 6
- ← Row 17 [RS]: (W) x 6, (M) x 10, (W), (M) x 10, (W) x 6
- → Row 18 [WS]: (W) x 6, (M) x 4, (W) x 3, (M) x 7, (W) x 3, (M) x 4, (W) x 6
- ← Row 19 [RS]: (W) x 6, (M) x 3, (W) x 5, (M) x 5, (W) x 5, (M) x 3, (W) x 6
- → Row 20 [WS]: (W) x 6, (M) x 3, (W) x 6, (M) x 3, (W) x 6, (M) x 3, (W) x 6
- ← Row 21 [RS]: (W) x 6, (M) x 3, (W) x 6, (M) x 3, (W) x 6, (M) x 3, (W) x 6
- → Row 22 [WS]: (W) x 6, (M) x 4, (W) x 5, (M) x 3, (W) x 5, (M) x 4, (W) x 6
- ← Row 23 [RS]: (W) x 6, (M) x 5, (W) x 4, (M) x 3, (W) x 4, (M) x 5, (W) x 6
- → Row 24 [WS]: (W) x 6, (M) x 6, (W) x 2, (M) x 5, (W) x 2, (M) x 6, (W) x 6
- ← Row 25 [RS]: (W) x 7, (M) x 19, (W) x 7
- → Row 26 [WS]: (W) x 7, (M) x 19, (W) x 7
- ← Row 27 [RS]: (W) x 7, (M) x 19, (W) x 7
- → Row 28 [WS]: (W) x 8, (M) x 17, (W) x 8
- ← Row 29 [RS]: (W) x 9, (M) x 15, (W) x 9
- → Row 30 [WS]: (W) x 10, (M) x 13, (W) x 10
- ← Row 31 [RS]: (W) x 11, (M) x 11, (W) x 11
Rows 32–36 (Gap):
- → Row 32 [WS]: (W) x 33
- ← Row 33 [RS]: (W) x 33
- → Row 34 [WS]: (W) x 33
- ← Row 35 [RS]: (W) x 33
- → Row 36 [WS]: (W) x 33
Rows 37–63 (Black Skull Section):
- ← Row 37 [RS]: (W) x 12, (B) x 9, (W) x 12
- → Row 38 [WS]: (W) x 11, (B) x 11, (W) x 11
- ← Row 39 [RS]: (W) x 10, (B) x 13, (W) x 10
- → Row 40 [WS]: (W) x 10, (B) x 13, (W) x 10
- ← Row 41 [RS]: (W) x 10, (B) x 2, (W), (B), (W), (B), (W), (B), (W), (B), (W), (B) x 2, (W) x 10
- → Row 42 [WS]: (W) x 10, (B) x 2, (W) x 9, (B) x 2, (W) x 10
- ← Row 43 [RS]: (W) x 8, (B) x 4, (W), (B), (W), (B), (W), (B), (W), (B), (W), (B) x 4, (W) x 8
- → Row 44 [WS]: (W) x 7, (B) x 19, (W) x 7
- ← Row 45 [RS]: (W) x 7, (B) x 3, (W), (B) x 11, (W), (B) x 3, (W) x 7
- → Row 46 [WS]: (W) x 7, (B), (W) x 2, (B) x 13, (W) x 2, (B), (W) x 7
- ← Row 47 [RS]: (W) x 7, (B), (W), (B) x 6, (W) x 3, (B) x 6, (W), (B), (W) x 7
- → Row 48 [WS]: (W) x 6, (B) x 9, (W) x 3, (B) x 9, (W) x 6
- ← Row 49 [RS]: (W) x 6, (B) x 10, (W), (B) x 10, (W) x 6
- → Row 50 [WS]: (W) x 6, (B) x 4, (W) x 3, (B) x 7, (W) x 3, (B) x 4, (W) x 6
- ← Row 51 [RS]: (W) x 6, (B) x 3, (W) x 5, (B) x 5, (W) x 5, (B) x 3, (W) x 6
- → Row 52 [WS]: (W) x 6, (B) x 3, (W) x 6, (B) x 3, (W) x 6, (B) x 3, (W) x 6
- ← Row 53 [RS]: (W) x 6, (B) x 3, (W) x 6, (B) x 3, (W) x 6, (B) x 3, (W) x 6
- → Row 54 [WS]: (W) x 6, (B) x 4, (W) x 5, (B) x 3, (W) x 5, (B) x 4, (W) x 6
- ← Row 55 [RS]: (W) x 6, (B) x 5, (W) x 4, (B) x 3, (W) x 4, (B) x 5, (W) x 6
- → Row 56 [WS]: (W) x 6, (B) x 6, (W) x 2, (B) x 5, (W) x 2, (B) x 6, (W) x 6
- ← Row 57 [RS]: (W) x 7, (B) x 19, (W) x 7
- → Row 58 [WS]: (W) x 7, (B) x 19, (W) x 7
- ← Row 59 [RS]: (W) x 7, (B) x 19, (W) x 7
- → Row 60 [WS]: (W) x 8, (B) x 17, (W) x 8
- ← Row 61 [RS]: (W) x 9, (B) x 15, (W) x 9
- → Row 62 [WS]: (W) x 10, (B) x 13, (W) x 10
- ← Row 63 [RS]: (W) x 11, (B) x 11, (W) x 11
Rows 64–68 (Gap):
- → Row 64 [WS]: (W) x 33
- ← Row 65 [RS]: (W) x 33
- → Row 66 [WS]: (W) x 33
- ← Row 67 [RS]: (W) x 33
- → Row 68 [WS]: (W) x 33
Rows 69–95 (Pomegranate Skull Section):
- ← Row 69 [RS]: (W) x 12, (P) x 9, (W) x 12
- → Row 70 [WS]: (W) x 11, (P) x 11, (W) x 11
- ← Row 71 [RS]: (W) x 10, (P) x 13, (W) x 10
- → Row 72 [WS]: (W) x 10, (P) x 13, (W) x 10
- ← Row 73 [RS]: (W) x 10, (P) x 2, (W), (P), (W), (P), (W), (P), (W), (P), (W), (P) x 2, (W) x 10
- → Row 74 [WS]: (W) x 10, (P) x 2, (W) x 9, (P) x 2, (W) x 10
- ← Row 75 [RS]: (W) x 8, (P) x 4, (W), (P), (W), (P), (W), (P), (W), (P), (W), (P) x 4, (W) x 8
- → Row 76 [WS]: (W) x 7, (P) x 19, (W) x 7
- ← Row 77 [RS]: (W) x 7, (P) x 3, (W), (P) x 11, (W), (P) x 3, (W) x 7
- → Row 78 [WS]: (W) x 7, (P), (W) x 2, (P) x 13, (W) x 2, (P), (W) x 7
- ← Row 79 [RS]: (W) x 7, (P), (W), (P) x 6, (W) x 3, (P) x 6, (W), (P), (W) x 7
- → Row 80 [WS]: (W) x 6, (P) x 9, (W) x 3, (P) x 9, (W) x 6
- ← Row 81 [RS]: (W) x 6, (P) x 10, (W), (P) x 10, (W) x 6
- → Row 82 [WS]: (W) x 6, (P) x 4, (W) x 3, (P) x 7, (W) x 3, (P) x 4, (W) x 6
- ← Row 83 [RS]: (W) x 6, (P) x 3, (W) x 5, (P) x 5, (W) x 5, (P) x 3, (W) x 6
- → Row 84 [WS]: (W) x 6, (P) x 3, (W) x 6, (P) x 3, (W) x 6, (P) x 3, (W) x 6
- ← Row 85 [RS]: (W) x 6, (P) x 3, (W) x 6, (P) x 3, (W) x 6, (P) x 3, (W) x 6
- → Row 86 [WS]: (W) x 6, (P) x 4, (W) x 5, (P) x 3, (W) x 5, (P) x 4, (W) x 6
- ← Row 87 [RS]: (W) x 6, (P) x 5, (W) x 4, (P) x 3, (W) x 4, (P) x 5, (W) x 6
- → Row 88 [WS]: (W) x 6, (P) x 6, (W) x 2, (P) x 5, (W) x 2, (P) x 6, (W) x 6
- ← Row 89 [RS]: (W) x 7, (P) x 19, (W) x 7
- → Row 90 [WS]: (W) x 7, (P) x 19, (W) x 7
- ← Row 91 [RS]: (W) x 7, (P) x 19, (W) x 7
- → Row 92 [WS]: (W) x 8, (P) x 17, (W) x 8
- ← Row 93 [RS]: (W) x 9, (P) x 15, (W) x 9
- → Row 94 [WS]: (W) x 10, (P) x 13, (W) x 10
- ← Row 95 [RS]: (W) x 11, (P) x 11, (W) x 11
Rows 96–99 (Top Edge):
- → Row 96 [WS]: (W) x 33
- ← Row 97 [RS]: (W) x 33
- → Row 98 [WS]: (W) x 33
- ← Row 99 [RS]: (W) x 33
Fasten off the yarn, leaving a very long tail to be used for attaching the dowel.
Finishing Steps
Fringe
Cut 12-inch pieces of white yarn. You will need 3 strands of yarn to complete one fringe. Place the fringe evenly across the row, starting from the far left foundation chain. To attach:
- Insert your hook into the chain stitch from the back to the front.
- Fold the 3 strands of yarn in half to create a loop and pull this loop through the stitch.
- Pull all the ends of the yarn through the loop and pull tightly to secure. After attaching the fringe, move on to blocking.
Blocking
It is normal for tapestry crochet to appear uneven or not lay completely flat. Blocking is the best way to correct this. There are three ways to block your work:
- Steam: Pin the tapestry piece down onto blocking mats and use a hand steamer or the steam function on your iron to reshape the piece.
- Water: Submerge the piece in cool water for approximately 5–10 minutes. Lay it flat, reshape it while wet, pin it onto blocking mats, and allow it to dry completely.
- Spray: Spray both sides of the tapestry with water until it is damp. Reshape the piece while damp, pin it onto a blocking board, and let it dry completely.
Dowel Rod
Once the piece is completely dry and blocked:
- Using the long tail you left earlier and a darning needle, wrap the yarn around the wooden dowel, then back through the next stitch. Repeat this process across the top until the dowel is fully attached to the tapestry.
- Cut another long piece of yarn to create the hanging loop. The size of this loop can be whatever you prefer.
- Wrap one end of this new yarn over twice on one side of the dowel where the wall hanging begins and tie a knot.
- Wrap the other end of the yarn over twice on the opposite side of the dowel where the wall hanging ends, and tie a knot, ensuring you leave slack in the middle so the wall hanging can be hung up. Trim any remaining ends.