
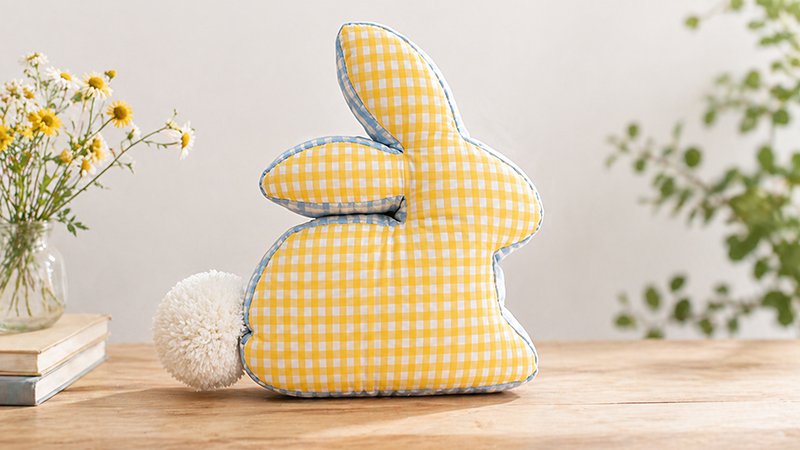
If you’re looking for a project that combines charm, practicality, and eco-conscious living, this DIY Bunny Pillow is a perfect choice.
Soft, decorative, and full of personality, this handmade pillow works beautifully as home décor, a child’s cuddle toy, or a thoughtful gift. Best of all, it encourages you to reuse and repurpose old fabrics, making it both budget-friendly and environmentally responsible.
Why This Project Is Worth Making
This bunny pillow is:
- Beginner-friendly – simple shapes and basic sewing techniques
- Versatile – great for Easter décor, nurseries, or gifts
- Sustainable – ideal for using old towels, shirts, or fabric scraps
- Customizable – you can change size, fabric, and colors easily
Instead of buying new materials, you can breathe new life into unused textiles like:
- Old kitchen towels
- Worn-out cotton shirts
- Scrap fabric from previous sewing projects
Materials and Tools
Before you begin, gather the following:
Fabric
- Scrap fabric, old linens, or repurposed clothing
- Optional: lightweight cotton for lining (if your main fabric is thin)
Filling and Decoration
- Polyester stuffing (polyfill)
- Large pompom (for the tail)
Sewing Tools
- Sewing machine (or hand sewing needle)
- Thread (matching or contrasting)
- Fabric scissors
- Pins or clips
- Hand-sewing needle (for finishing)
Step-by-Step Instructions
Step 1: Prepare the Pattern and Cut Fabric
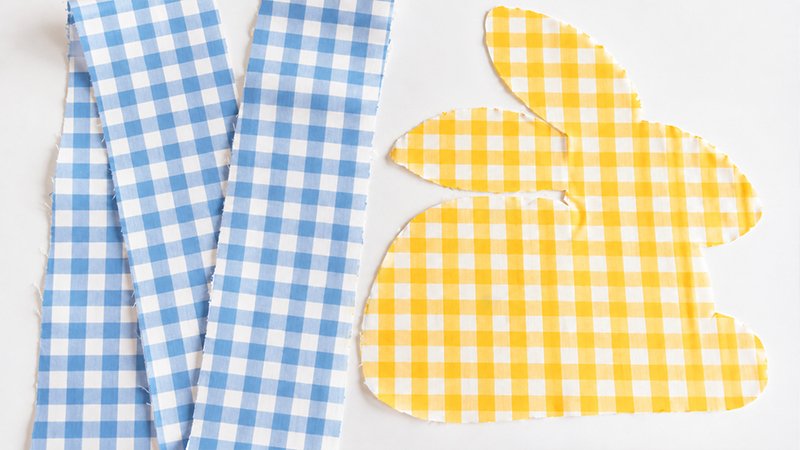
- Print and cut out your bunny template.
- Place the template on your fabric and cut:
- 2 identical bunny shapes (front and back)
- 1 long strip of fabric (gusset)
- Width: about 2–4 inches (depending on how thick you want the pillow)
- Length: long enough to go around the entire bunny edge
Tip: If your fabric is thin, cut the same pieces from lining fabric and layer them together for durability.
Step 2: Attach the Gusset (Side Strip)
- Take one bunny shape and your long fabric strip.
- Pin the strip along the edge of the bunny shape, right sides facing each other.
- Sew along the edge using a straight stitch, following the bunny’s outline.
Tip: Sew slowly around curves and corners to maintain accuracy.
Step 3: Add the Second Bunny Side
- Take the second bunny shape.
- Pin it to the other side of the fabric strip (right sides together).
- Sew all the way around, but leave a small opening (about 2–3 inches) for turning and stuffing.
Step 4: Clip the Curves
This step is crucial for a smooth finish.
- Carefully make small cuts (snips) along the seam allowance, especially around:
- Ears
- Curved edges
- Do not cut through the stitching.
Why this matters: It helps the fabric relax and prevents puckering when turned right-side out.
Step 5: Turn the Pillow Right-Side Out
- Turn the pillow through the opening.
- Use your fingers or a blunt tool (like a pencil) to gently push out:
- Ears
- Edges
- Corners
Step 6: Stuff the Bunny
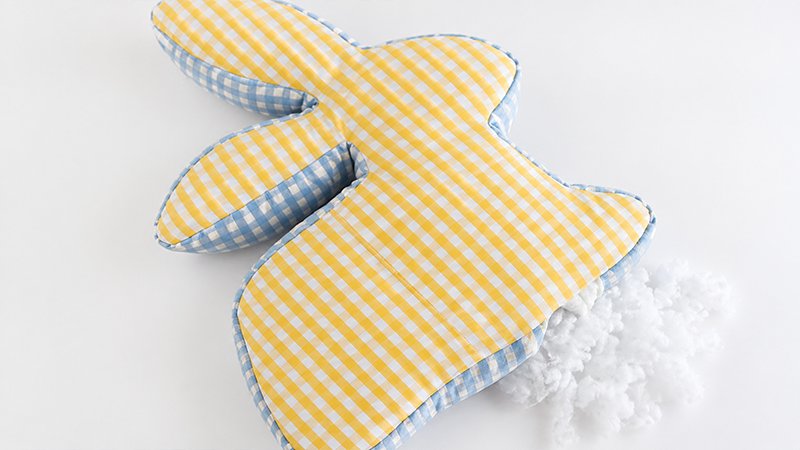
- Fill the pillow with polyester stuffing.
- Add small amounts at a time and distribute evenly.
- Pay extra attention to:
- Ears
- Neck area
Tip: Firm stuffing gives a more defined shape; softer stuffing creates a plush toy feel.
Step 7: Close the Opening
- Fold the raw edges of the opening inward.
- Use a ladder stitch (invisible stitch) to sew it closed by hand.
Result: The seam will be nearly invisible.
Step 8: Add the Bunny Tail
- Attach a large pompom to the back.
- You can:
- Sew it on securely, or
- Tie it through the fabric
Creative Variations
Once you’ve mastered the basic version, try experimenting:
- Different fabrics: stripes, florals, or patchwork
- Size changes: mini ornaments or oversized floor cushions
- Appliqué details: add eyes, nose, or patterns
- Upcycled materials:
- Old T-shirts for softness
- Towels for texture
- Denim for a rustic look
Sustainability Benefits
This project reflects traditional sewing values:
- Waste reduction by reusing materials
- Cost savings by avoiding new fabric purchases
- Creative reuse inspired by historical crafting practices
Final Thoughts
This DIY Bunny Pillow is more than just a sewing project—it’s a simple way to create something meaningful using what you already have. Whether you’re new to sewing or experienced, it offers a relaxing and rewarding experience with a charming result.
Happy sewing!


