Pattern Description:
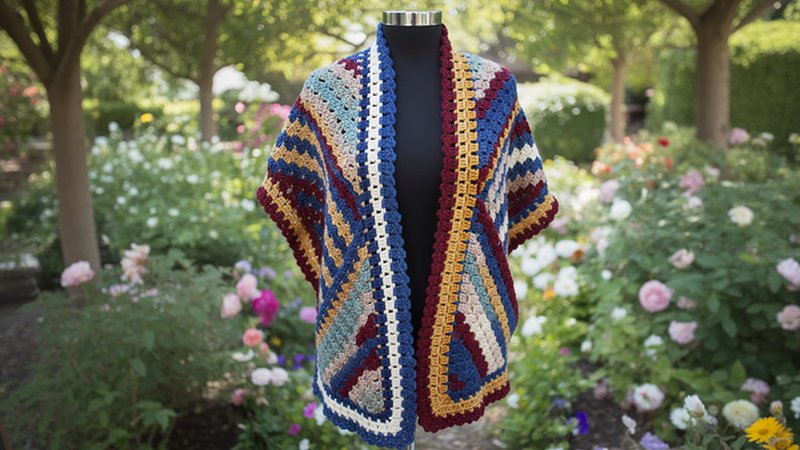
This is a free crochet pattern for a C2C Pocket Shawl. Using DK yarn, this beautiful pocket shawl features an easy, Corner-to-Corner (C2C) design, making it surprisingly easy for beginners.
The construction involves crocheting one large rectangle (the shawl) and two small squares (the pockets), which are then sewn onto the front side of the shawl.
Materials Needed & Measurements:
Materials Needed
- Mary Maxim Sunrise Yarn (5 skeins of Desert Rose) – labeled ‘s’
- Mary Maxim Lullaby Yarn (2 skeins of Snuggles) – labeled ‘l’
- 4.5mm hook
- Scissors
- Tapestry needle
Measurements & Gauge
- Gauge: 3 double crochet (dc) pixels with 3 dc’s each equals 2 square inches.
- Finished Size: The specific example shown measures 62 x 19 inches.
- Shawl Length: The long side of the shawl (the huge rectangle) should measure between 60 and 80 inches, depending on the crocheter’s height. The example measures 62 inches.
- Pockets: The two pockets are crocheted to be 11 x 11 pixels each.
Abbreviations Used:
- st/sts: stitch/stitches
- ch: chain
- sk: skip
- sl st: slip stitch
- dc: double crochet
- C2C: corner to corner
- RS: Right Side
- WS: Wrong Side
- s: Mary Maxim Sunrise Yarn (Desert Rose)
- l: Mary Maxim Lullaby Yarn (Snuggles)
Instructions for Making the C2C Pocket Shawl Pattern:
C2C Shawl Construction (Huge Rectangle)
First, you will crochet the shawl, which is a huge rectangle. This section is a DC C2C Pixelgraph where you repeat (increase) the horizontal row 1 until the long side reaches the desired length (60 to 80 inches). Once that length is reached, you will start decreasing.
Increasing Section (Rows 1–32)
Begin the pattern by increasing according to the following row counts:
| Row | Side | Color/Square Count |
| Row 1 | ← RS | (l) x 1 (1 square) |
| Row 2 | → WS | (l) x 2 (2 squares) |
| Row 3 | ← RS | (l) x 3 (3 squares) |
| Row 4 | → WS | (l) x 4 (4 squares) |
| Row 5 | ← RS | (l) x 5 (5 squares) |
| Row 6 | → WS | (s) x 1, (l) x 5 (6 squares) |
| Row 7 | ← RS | (l) x 5, (s) x 2 (7 squares) |
| Row 8 | → WS | (s) x 3, (l) x 5 (8 squares) |
| Row 9 | ← RS | (l) x 5, (s) x 4 (9 squares) |
| Row 10 | → WS | (s) x 5, (l) x 5 (10 squares) |
| Row 11 | ← RS | (l) x 5, (s) x 6 (11 squares) |
| Row 12 | → WS | (s) x 7, (l) x 5 (12 squares) |
| Row 13 | ← RS | (l) x 5, (s) x 8 (13 squares) |
| Row 14 | → WS | (s) x 9, (l) x 5 (14 squares) |
| Row 15 | ← RS | (l) x 5, (s) x 10 (15 squares) |
| Row 16 | → WS | (s) x 11, (l) x 5 (16 squares) |
| Row 17 | ← RS | (l) x 5, (s) x 12 (17 squares) |
| Row 18 | → WS | (s) x 13, (l) x 5 (18 squares) |
| Row 19 | ← RS | (l) x 5, (s) x 14 (19 squares) |
| Row 20 | → WS | (s) x 15, (l) x 5 (20 squares) |
| Row 21 | ← RS | (l) x 5, (s) x 16 (21 squares) |
| Row 22 | → WS | (s) x 17, (l) x 5 (22 squares) |
| Row 23 | ← RS | (l) x 5, (s) x 18 (23 squares) |
| Row 24 | → WS | (s) x 19, (l) x 5 (24 squares) |
| Row 25 | ← RS | (l) x 5, (s) x 20 (25 squares) |
| Row 26 | → WS | (s) x 21, (l) x 5 (26 squares) |
| Row 27 | ← RS | (l) x 5, (s) x 22 (27 squares) |
| Row 28 | → WS | (l) x 1, (s) x 22, (l) x 5 (28 squares) |
| Row 29 | ← RS | (l) x 5, (s) x 22, (l) x 2 (29 squares) |
| Row 30 | → WS | (l) x 3, (s) x 22, (l) x 5 (30 squares) |
| Row 31 | ← RS | (l) x 5, (s) x 22, (l) x 4 (31 squares) |
| Row 32 | → WS | (l) x 5, (s) x 22, (l) x 5 (32 squares) |
Straight Section (Rows 33–93)
The first corner (shaping the width) is reached at Row 33, where decreasing begins on the RS. For the straight section, continue crocheting 32 squares across using the color scheme below for Rows 33 through 93:
| Rows | Side | Color/Square Count |
| Rows 33–93 | Alternating RS/WS | (l) x 5, (s) x 22, (l) x 5 (32 squares) |
Decreasing Section (Rows 94–124)
The second corner is reached at Row 94, where decreasing begins on the WS. Continue decreasing according to the following row counts until only 1 square remains:
| Row | Side | Color/Square Count |
| Row 94 | → WS | (l) x 5, (s) x 22, (l) x 4 (31 squares) |
| Row 95 | ← RS | (l) x 3, (s) x 22, (l) x 5 (30 squares) |
| Row 96 | → WS | (l) x 5, (s) x 22, (l) x 2 (29 squares) |
| Row 97 | ← RS | (l) x 1, (s) x 22, (l) x 5 (28 squares) |
| Row 98 | → WS | (l) x 5, (s) x 22 (27 squares) |
| Row 99 | ← RS | (s) x 21, (l) x 5 (26 squares) |
| Row 100 | → WS | (l) x 5, (s) x 20 (25 squares) |
| Row 101 | ← RS | (s) x 19, (l) x 5 (24 squares) |
| Row 102 | → WS | (l) x 5, (s) x 18 (23 squares) |
| Row 103 | ← RS | (s) x 17, (l) x 5 (22 squares) |
| Row 104 | → WS | (l) x 5, (s) x 16 (21 squares) |
| Row 105 | ← RS | (s) x 15, (l) x 5 (20 squares) |
| Row 106 | → WS | (l) x 5, (s) x 14 (19 squares) |
| Row 107 | ← RS | (s) x 13, (l) x 5 (18 squares) |
| Row 108 | → WS | (l) x 5, (s) x 12 (17 squares) |
| Row 109 | ← RS | (s) x 11, (l) x 5 (16 squares) |
| Row 110 | → WS | (l) x 5, (s) x 10 (15 squares) |
| Row 111 | ← RS | (s) x 9, (l) x 5 (14 squares) |
| Row 112 | → WS | (l) x 5, (s) x 8 (13 squares) |
| Row 113 | ← RS | (s) x 7, (l) x 5 (12 squares) |
| Row 114 | → WS | (l) x 5, (s) x 6 (11 squares) |
| Row 115 | ← RS | (s) x 5, (l) x 5 (10 squares) |
| Row 116 | → WS | (l) x 5, (s) x 4 (9 squares) |
| Row 117 | ← RS | (s) x 3, (l) x 5 (8 squares) |
| Row 118 | → WS | (l) x 5, (s) x 2 (7 squares) |
| Row 119 | ← RS | (s) x 1, (l) x 5 (6 squares) |
| Row 120 | → WS | (l) x 5 (5 squares) |
| Row 121 | ← RS | (l) x 4 (4 squares) |
| Row 122 | → WS | (l) x 3 (3 squares) |
| Row 123 | ← RS | (l) x 2 (2 squares) |
| Row 124 | → WS | (l) x 1 (1 square) |
IV. Crochet Pockets (Make 2)
Crochet two square pockets that are 11 x 11 pixels each. Fasten off and weave in the ends after completion.
Pocket Pattern (Rows 1–21, make 2)
The pockets are crocheted entirely in yarn (s).
| Row | Side | Square Count |
| Row 1 | ← RS | (s) x 1 (1 square) |
| Row 2 | → WS | (s) x 2 (2 squares) |
| Row 3 | ← RS | (s) x 3 (3 squares) |
| Row 4 | → WS | (s) x 4 (4 squares) |
| Row 5 | ← RS | (s) x 5 (5 squares) |
| Row 6 | → WS | (s) x 6 (6 squares) |
| Row 7 | ← RS | (s) x 7 (7 squares) |
| Row 8 | → WS | (s) x 8 (8 squares) |
| Row 9 | ← RS | (s) x 9 (9 squares) |
| Row 10 | → WS | (s) x 10 (10 squares) |
| Row 11 | ← RS | (s) x 11 (11 squares) |
At the end of Row 11, begin decreasing on both ends (Corner).
| Row | Side | Square Count |
| Row 12 | → WS | (s) x 10 (10 squares) |
| Row 13 | ← RS | (s) x 9 (9 squares) |
| Row 14 | → WS | (s) x 8 (8 squares) |
| Row 15 | ← RS | (s) x 7 (7 squares) |
| Row 16 | → WS | (s) x 6 (6 squares) |
| Row 17 | ← RS | (s) x 5 (5 squares) |
| Row 18 | → WS | (s) x 4 (4 squares) |
| Row 19 | ← RS | (s) x 3 (3 squares) |
| Row 20 | → WS | (s) x 2 (2 squares) |
| Row 21 | ← RS | (s) x 1 (1 square) |
V. Pocket Shawl Assembly
To assemble the pocket shawl, sew the two finished pockets onto the front side of the shawl. The pockets should be positioned approximately three rows up in the center of the shawl.