Pattern Description:
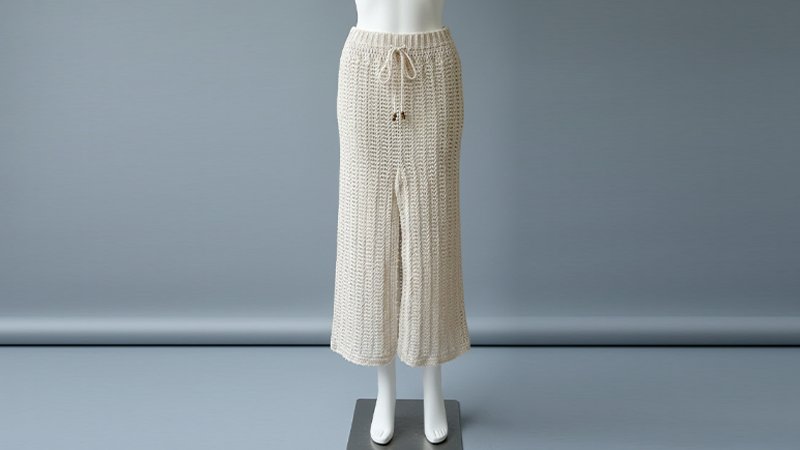
This comfortable, versatile crochet maxi skirt is made using thread yarn and features a gorgeous cable stitch pattern that creates a flattering and elegant silhouette.
Crocheted top-down using the Arrowhead Cable Stitch Pattern, it features a flowy, carefree silhouette reminiscent of bohemian style.
The pattern is easily adjustable and includes 9 inclusive sizes, an adjustable/elasticized waist, and a side slit.
Materials Needed & Measurements:
Tools and Materials
| Item | Specification | |
| Yarn weight | Size 10 | |
| Brand | Aunt LydiasThread (1000 yrds) | |
| Color | Natural | |
| Hook | 2.5 mm hook (e.g., 2.5 mm Clover Crochet Hook) | |
| Substitute Yarn Tip | For best results, try using a cotton fingering yarn to achieve a lightweight finish | |
| Other Tools | tapestry needle, measuring tape, scissors, rubber band, decorative beads |
Measurements and Gauge
The pattern comes in 9 inclusive sizes. Body measurements are provided for these 9 sizes, not the finished skirt dimensions.
| Measurement/Gauge | Specification | |
| Waistband Gauge | 10 Hdc Sts x 11 rows = 1.3” x 4” | |
| Cable Stitch Gauge | 3 CB St x 10.5 rows = 4” x 4” | |
| Yardage (Estimated) | 2232 [2424/ 2694/ 3039/ 3391] [3791/ 4038/ 4200/ 4576] | |
| No. Balls (1000 yrds/skein) | XS[S/M/L/XL] [2XL/3XL/4XL/5XL] – 2.2 [2.4/ 2.7/ 3.0/ 3.4] [3.8/ 4.0/ 4.2/ 4.6] | |
| Length Reference | Model is 5’ 3”/ 160cm tall; a reference length for 76 rows (minus edging) is 34.5 in/ 87.6cm long |
Skill Level: Easy – Intermediate.
Abbreviations Used:
- Ch: Chain
- Hdc: Half Double Crochet
- BPO: Back Post Only
- Slst: Slip Stitch
- Rnd: Round
- Sc: Single Crochet
- Dc: Double Crochet
- Tc: Treble Crochet Stitch (Yarn Over 2 times)
- Sk: Skip
- St(s): Stitch(es)
- Ch Sp: Chain Space
- Rep: Repeat
- RS: Right Side
- Dc3tog: Double Crochet 3 Together
Instructions for Making the Elegant Long Bohemian Crochet Skirt Pattern:
Part 1: Waist Band
- Foundation Row (FR): Ch 10, + 1 to start the next row.
- Row 1: From the 2nd Ch from hook, work a Hdc and across, Ch 1 turn.
- Row 2: Hdc across through the BPO only.
- Row 3: Rep Row 2 for a total of 80 [90/ 95/ 110/ 120] [130/ 140/ 145/ 155] rows or until your hip width is achieved while stretched, ending on a number 0 or 5.
- Last Row: Fold the waistband in half and Slst BPO across the front piece and through both loops on the back piece on each St of both rows together, Ch 1, turn to row side.
Part 2: Skirt Pattern
- Rnd 1: Work 2 Sc across each row evenly and loosely. Slst into the 1st St to join in the Rnd. You should have double the amount of Sts per Row, ending on a 0 number.
- Rnd 2: In the same Slst, work a (Dc, Ch 1, Sk 1). Rep () in the Rnd, Slst into the 1st St to join.
- Rnd 3 – 4: Sc in Ch Sp, (Work a Puff St (4Dc) in Ch Sp, Ch 2). Rep () in the Rnd, Slst into the 1st St to join. Rep for 1 more row.
- Rnd 5: In the same St, work a Dc, 2 Dc on Ch Sp, (Dc on St, 2 Dc on Ch Sp). Rep () in the Rnd. Slst into the 1st St to join.
- Rnd 6: In the same St, work a Dc and 3 more across, Ch 1, Sk 1, (Dc 4, Ch 1, Sk 1). Rep () in the Rnd. Slst into the 1st St to join.
- Rnd 7: In the same St, work a Sc and into each St in the Rnd. Slst into the 1st St to join.
- Rnd 8 (Cable Pattern): In the same St, work a Dc. (Yo 2x, Insert hook through the 4th St on the prev row, work 1 Tc St. Work 1 more Tc in the same St, Dc on the 3rd St, Ch 1, Sk 1, Dc, Work 2 Tc on the same 4th St on the prev row. Sk 2 Sts, Dc, Ch 1, Sk 1). Rep the following sequence for the rest of the Rnd: (Dc, work 2 Tc in the St on the prev row, Sk 2 Sts, Dc on the 3rd St, Ch 1, Sk 1, Dc, Work 2 Tc on the same prev St on the prev row, Sk 2 Sts, Dc, Ch 1, Sk 1). Slst into the 1st St to join.
- Rnd 9: Sc in the same St and in each St and Ch in the Rnd. Slst into the 1st St to join.
- Next Rnds (Cable Repeat): Rep Rnd 7 & 8 Arrowhead Cable Stitch Pattern until the length you want to start your slit (e.g., 24 rows total).
- Slit Transition (Next Row – Rnd 8 type): (Dc, work 2 Tc in the St on the prev row, Sk 2 Sts, Dc on the 3rd St, Ch 1, Sk 1, Dc, Work 2 Tc on the same prev St on the prev row, Sk 2 Sts, Dc, Ch 1, Sk 1). Rep () across until the last Dc St for the row, Ch 1 turn.
- Slit Row 2 (Next Row – Rnd 7 type): Sc each St across, Ch 1 turn.
- Cont. Slit: Rep Steps 10 and 11 until you’ve reached your preferred length minus 1”/ 2.5cm for the edging. Your last row should end on Step 10.
Part 3: Edging
- FR: From your last St, Ch 1 and turn towards the slit row. Sc each row evenly across until the 3rd last St at the beginning of the slit. Sc the 1st and 3rd St together while Sk the 2nd St. Cont to Sc each Row across evenly. Slst into the 1st St to join in the Rnd. Ch 1 turn.
- Rnd 1 (RS): Dc each St across until the last 3rd St at the beginning of the slit. Dc the next 3 Sts together (Dc3tog). Cont to Dc across until the bottom of the slit. Work 3 Dc, Dc across in the Rnd. On the last St, work 3 Dc, Slst to join.
- Rnd 2: Work (Dc 2, Ch 1, Sk 1). Rep () across until the 3rd last St at the beginning of the slit. Dc the next 3 Sts together. Cont () across until the bottom of the slit. Work 3 Dc, Rep () across in the Rnd. On the last St, work 3 Dc, Slst to join. Tip: The prev Dc3tog St should be your 2nd St in the grouped St.
- Rnd 3: Work Dc Sts on each St and Ch across until the 3rd last St at the beginning of the slit. Dc the next 3 Sts together. Cont to Dc across until the bottom of the slit. Work 3 Dc, Dc across in the Rnd. On the last St, work 3 Dc, Slst to join.
- Rnd 4 (Picot Edging): (Sc 5, Ch 3, work a picot on the last St). Rep () across until the 3rd last St at the beginning of the slit. Dc the next 3 Sts together. Cont () across until the bottom of the slit. Work 3 Dc, Rep () across in the Rnd. On the last St, work 3 Dc, Slst to join. Bind off.
- Picot St: Ch 3, Slst in the last St made.
Part 4: Adding Elastic Band
- (RS) Insert your hook at the top of the elastic waistband, Ch 1 to secure.
- Place an elastic rubber band behind the loop and bet working yarn. Sc evenly across each row working around the rubber band.
- Cont until the last 2 in/ 5cm or last 4 rows. Pull the rubber band firmly so it becomes slightly bunched up. Tie 2 knots on the rubber band.
- Cont to Sc around the rubber band, Slst to join in the Rnd. Bind off and snip off the access rubber band.
Part 5: Belt Tie
- Measure the length you want, and add/pull 5x the length to start the FR St.
- Work a slip knot.
- Belt Cord: *(Take the bottom yarn and wrap it around the hook from the front to back, hold on to both loops at the bottom. Yo with the top yarn, PT both loops).
- Rep (*) until you’ve reached your preferred length or the end of the yarn.
- Bind off.
- Using a tapestry needle, find your middle point and weave through (up and down each loop) the 1st Dc Row in the Rnd.
- Decorative beads can be added using a needle threader.