
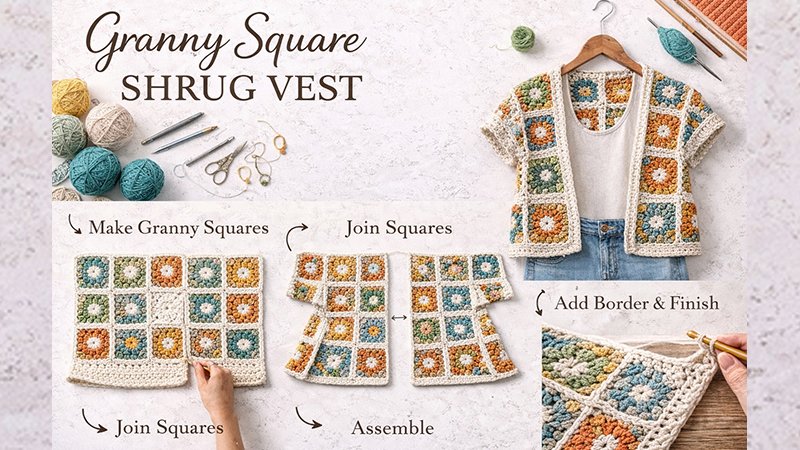
The Granny Square Shrug Vest is a modern reinterpretation of the classic granny square, blending vintage charm with effortless, contemporary layering.
Designed to sit comfortably on the shoulders with an open front and relaxed armholes, this shrug-style vest is the perfect project for crocheters who love modular construction, creative color play, and versatile styling.
Whether worn over a tank top in warmer months or layered atop long sleeves in cooler weather, this piece offers year-round appeal.
This pattern-style guide walks you through the design concept, materials, construction logic, sizing approach, and finishing techniques—giving you everything you need to confidently create a polished, wearable garment.
Pattern Overview
- Garment Type: Shrug-style vest
- Skill Level: Advanced Beginner to Intermediate
- Construction: Modular granny squares seamed into a rectangular body with arm openings
- Fit: Relaxed, open-front with light drape
- Customization: Fully adjustable length, width, and sleeve depth
The Granny Square Shrug Vest is built from classic squares joined strategically to form a simple yet flattering silhouette. Because it relies on repeated motifs rather than shaping-heavy rows, it’s an ideal project for crocheters who enjoy portable, repeatable work.
Design Inspiration & Style
Rooted in traditional crochet heritage, the granny square has long been associated with warmth, creativity, and community craft. This shrug vest elevates that iconic motif into a fashion-forward garment by emphasizing:
- Clean geometry rather than heavy shaping
- Negative space created by open stitches
- Easy layering through a cropped, shoulder-hugging fit
The result is a vest that feels equally at home in boho wardrobes, casual everyday outfits, and festival-inspired styling.
Materials & Tools
Yarn
- Recommended Weight: DK or Worsted (Category 3–4)
- Fiber Options:
- Cotton or cotton blends for summer wear
- Wool or acrylic blends for cooler seasons
- Yardage: Approximately 900–1400 yards depending on size and length
Solid colors create a clean, modern look, while multi-color or scrap yarns lean into a playful, vintage aesthetic.
Hook
- Use a hook size recommended on your yarn label (typically 4.0–5.5 mm)
- Adjust hook size to achieve a flexible, drapey fabric rather than a stiff square
Notions
- Yarn needle
- Stitch markers
- Measuring tape
- Scissors
Gauge & Sizing Philosophy
Gauge is less rigid in this design due to its modular nature. Instead of row-based measurements, sizing is determined by:
- Finished granny square size
- Number of squares used across width and length
This allows for easy size inclusivity. You can customize the vest by simply adding or removing squares without rewriting the pattern.
Suggested Sizing Guide
- XS–S: 12–14 squares total
- M–L: 16–18 squares total
- XL–2X: 20–22 squares total
- 3X–5X: 24+ squares total
Always block one completed square before finalizing measurements.
Granny Square Motif
The foundation of the vest is a classic granny square, typically worked in the round using clusters of double crochet stitches and chain spaces.
Motif Characteristics
- Square shape with defined corners
- Open, breathable fabric
- Easily customizable color changes
Each square should be uniform in size to ensure smooth assembly. Blocking is strongly recommended before seaming to achieve crisp edges and consistent dimensions.
Construction Method
Step 1: Create the Granny Squares
- Crochet the required number of squares based on your desired size
- Keep stitch tension consistent throughout
- Weave in ends as you go for a cleaner finish
Step 2: Block the Squares
Blocking evens out stitches and ensures accurate sizing. Light steam or wet blocking works well depending on yarn fiber.
Step 3: Layout Planning
Arrange squares in a flat rectangle:
- Width determines how the vest wraps around the shoulders
- Length determines crop or longline style
Leave two vertical gaps near the center for arm openings.
Step 4: Joining
Squares can be joined using:
- Slip stitch join (structured look)
- Single crochet join (decorative ridge)
- Mattress stitch (nearly invisible seam)
Consistency in joining method is key for a professional finish.
Armhole & Shrug Shaping
The shrug effect comes from strategic spacing, not traditional shaping. Armholes are created by:
- Skipping joins between specific squares
- Folding the rectangle and seaming only selected edges
This creates natural openings while allowing the garment to drape effortlessly over the shoulders.
Edging & Finishing Touches
Once assembled, the vest is finished with a simple border to unify the design.
Edging Options
- Single crochet border for minimalism
- Half-double crochet for subtle texture
- Shell or picot edging for decorative flair
Work evenly around the entire outer edge, including armholes, to reinforce structure and prevent stretching.
Styling & Wearability
The Granny Square Shrug Vest is endlessly versatile:
- Pair with jeans and a tee for casual days
- Layer over dresses for bohemian elegance
- Style with belts or pins to change the silhouette
Because it’s open-front and lightweight, it flatters a wide range of body types without clinging.
Customization Ideas
- Lengthen by adding extra rows of squares
- Widen sleeves by inserting half-squares at arm openings
- Play with colorwork using gradients or scrap yarn
- Seasonal adaptation by changing yarn weight
This design encourages experimentation while remaining structurally simple.
Care Instructions
- Hand wash or gentle machine wash depending on yarn fiber
- Lay flat to dry to maintain shape
- Store folded rather than hung to prevent stretching


