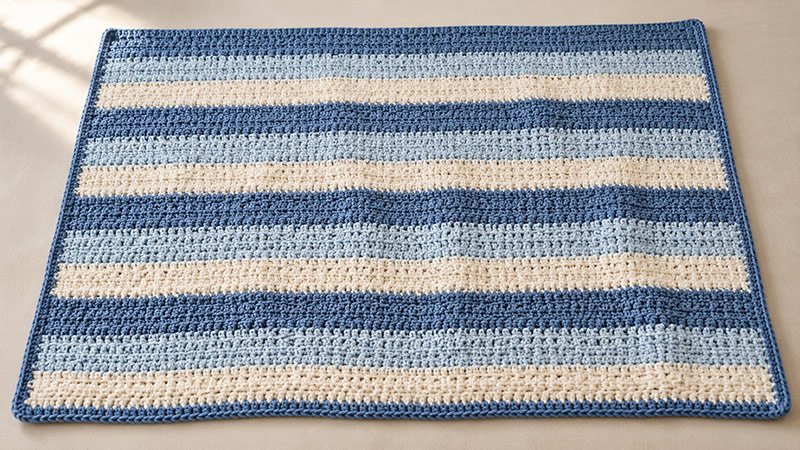
The Country Blues Baby Blanket uses alternating single crochet and double crochet stitches to create a lightly textured fabric.
Stripes in denim blue, pale blue, and cream give the blanket a simple country style. A narrow single crochet border finishes the edges.
The blanket is worked flat in rows, with no joining or sewing required. Each row follows the same stitch sequence, making this a suitable project for beginners who know basic crochet stitches.
This is a newly written design rather than a reproduction of a named designer’s pattern. The instructions have not been physically tested, so make a gauge swatch before starting.
Materials
- Yarn: Approximately 1,050–1,200 yards of DK-weight yarn in three colors:
- Color A: Denim blue, approximately 400–450 yards.
- Color B: Pale blue, approximately 325–375 yards.
- Color C: Cream, approximately 325–375 yards.
- Crochet hook: 4 mm hook, or the size needed to obtain gauge.
- Yarn needle: For weaving in ends.
- Scissors
- Stitch markers: For marking the first and last stitches.
- Measuring tape
Choose a soft, machine-washable yarn. Use the same yarn weight and fiber type for all three colors.
Size
Finished size: Approximately 32 × 34 inches, including the border.
Blanket body: Approximately 30 × 32 inches before adding the border.
Gauge: 16 sts and 18 rows = 4 inches in the alternating sc and dc pattern, measured after washing and drying the swatch.
To check gauge, ch 25 and follow the blanket instructions over 24 sts. Work at least 22 rows, then measure across the center.
To change the width, start with an odd-numbered foundation chain. This produces an even number of working sts. Adjust the length by adding or removing rows.
Stitches
- Chain Stitch: Yarn over and pull through the loop on your hook.
- Single Crochet: Insert your hook into the indicated st. Yarn over and pull up a loop. Yarn over and pull through both loops.
- Double Crochet: Yarn over and insert your hook into the indicated st. Yarn over and pull up a loop. Yarn over and pull through 2 loops. Yarn over and pull through the remaining 2 loops.
- Slip Stitch: Insert your hook into the indicated st. Yarn over and pull through the st and the loop on your hook.
Alternating Stitch Pattern
Work 1 sc followed by 1 dc across each row.
Every row begins with sc and ends with dc. After turning, work each sc into a dc from the previous row and each dc into a sc. This arrangement creates the texture without special stitches.
Abbreviations
US crochet terms are used throughout.
- ch: Chain
- sc: Single crochet
- dc: Double crochet
- sl st: Slip stitch
- st / sts: Stitch / stitches
- rep: Repeat
- rnd: Round
- A: Denim blue
- B: Pale blue
- C: Cream
- [ ]: Repeat the enclosed instructions as directed
Pattern Instructions
Step 1: Read the Pattern Notes
- The turning ch 1 does not count as a st.
- Work into both loops of each st.
- Each body row contains 120 sts: 60 sc and 60 dc.
- Work the first st into the same st at the base of the turning chain.
- Do not work into the turning chain at the end of a row.
- Turn after every body row.
- Change colors during the final yarn-over of the last dc in the row before a new stripe.
Step 2: Make the Foundation Chain
- With A, ch 121 loosely.
- If your foundation chain feels tight, use a hook one size larger for the chain, then return to your main hook for Row 1.
Step 3: Work the First Row
- Row 1: Sc in the 2nd ch from the hook, dc in the next ch, [sc in the next ch, dc in the next ch] rep across. Turn.
- Stitch count: 120 sts.
- Place a marker in the first and last st to help keep the edges straight.
Step 4: Establish the Texture
- Row 2: Ch 1, sc in the first st, dc in the next st, [sc in the next st, dc in the next st] rep across. Turn.
- Stitch count: 120 sts.
- Check that each sc sits above a dc and each dc sits above a sc.
Step 5: Complete the First Stripe
- Rows 3–12: Rep Row 2 with A.
- At the end of Row 12, change to B during the final yarn-over of the last dc.
- You now have one 12-row denim stripe.
Step 6: Work the Stripe Sequence
Continue repeating Row 2, following this color order:
| Rows | Color |
|---|---|
| 1–12 | A — Denim blue |
| 13–24 | B — Pale blue |
| 25–36 | C — Cream |
| 37–48 | A — Denim blue |
| 49–60 | B — Pale blue |
| 61–72 | C — Cream |
| 73–84 | A — Denim blue |
| 85–96 | B — Pale blue |
| 97–108 | C — Cream |
| 109–120 | A — Denim blue |
| 121–132 | B — Pale blue |
| 133–144 | C — Cream |
Maintain 120 sts in every row.
Cut the previous color after each change, leaving a tail approximately 6 inches long. Avoid carrying unused yarn along the edges over a full stripe.
Step 7: Check the Blanket Body
After Row 144, the body should measure approximately 30 × 32 inches at the stated gauge.
Lay it flat and check the following:
- Both long edges are straight.
- Each stripe contains 12 rows.
- The final row contains 120 sts.
- The foundation edge is relaxed rather than drawn inward.
Fasten off C.
Step 8: Add the First Border Round
With the same side facing you throughout the border, join A at a corner.
Rnd 1: Ch 1, work 3 sc in the corner. Sc evenly around the blanket, working 3 sc in each remaining corner. Join with a sl st to the first sc.
Along the top and foundation edges, work approximately 1 sc per st or foundation ch. Along each long side, aim for approximately 128 sc between corners, spacing them evenly across the row ends.
Mark the middle sc of each 3-sc corner group.
Lay the blanket flat before continuing:
- If the border ripples, reduce the number of side sts.
- If it pulls inward, add more side sts.
- Adjust the spacing until the edges lie flat.
The side count is a starting point; your row height and tension determine the best spacing.
Step 9: Complete the Border
- Rnd 2: Ch 1, sc in each st around, working 3 sc in each marked corner st. Move each marker to the middle sc of the new corner group. Join with a sl st to the first sc.
- Rnd 3: Rep Rnd 2.
- Rnd 4: Rep Rnd 2.
- Do not turn between rnds. Keep your tension relaxed, especially around the corners.
- Fasten off, leaving a 6-inch tail.
Step 10: Weave In the Ends
Thread each tail onto a yarn needle. Weave it through several stitches of the matching color, then reverse direction to help secure it.
Trim the ends close to the fabric without cutting the blanket stitches.
Step 11: Wash and Shape
Wash according to the yarn label. Gently press out excess water without twisting.
Lay the blanket flat, straighten the stripes, and shape the corners. Allow it to dry fully before measuring.
For babies, use the blanket during supervised time; keep loose blankets out of an infant’s sleep space.