Pattern Description:
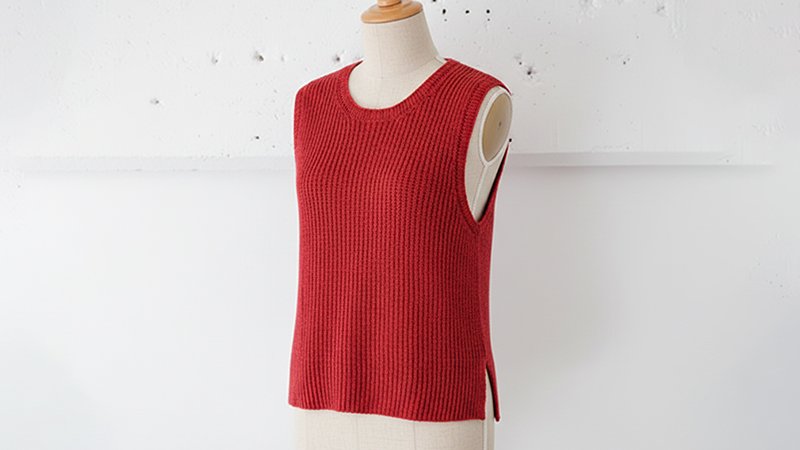
The Best Dressed Vest is a simple, beginner-friendly crochet project built from two identical panels for an easy, fuss-free construction. Worked in bulky yarn, it comes together quickly with clean lines and cozy texture.
The panels are seamed at the shoulders and sides, then finished with neat ribbing around the hem, armholes, and neckline. Stylish, soft, and customizable, it’s the perfect everyday layering piece.
Materials Needed & Measurements:
| Item | Details |
| Yarn | Biggo in Rabbit Heather. Note: Biggo is sadly discontinued; Swish Bulky is recommended as a great alternative. |
| Yarn Quantity | 3 (3, 4, 4, 5, 6, 7) skeins (sizes XS through 3XL, respectively). |
| Hook | 8.00mm (M) Furls Ergonomic Wooden Crochet Hook. |
| Notions | Scissors, Stitch Markers, Measuring Tape, Tapestry Needle. |
| Gauge | 8 stitches wide x 5 rows tall in double crochets = 4″. |
Measurements
The sizing guide is listed for sizes XS(S, M, L, XL, 2XL, 3XL). Keep in mind that the yarn may stretch with multiple wears, so sizing down is suggested.
Measurements are in inches:
| Size | XS | S | M | L | XL | 2XL | 3XL |
| To fit Bust | 30″ | 32″ | 36″ | 40″ | 44″ | 48″ | 52″ |
| Panel Width | 16″ | 17″ | 18″ | 20″ | 22″ | 24″ | 26″ |
| Length (includes ribbing) | 17″ | 18″ | 20″ | 22″ | 23″ | 23″ | 24″ |
Abbreviations Used:
- Sts: Stitches
- SC: Single Crochet
- DC: Double Crochet
- BLO: Back Loop Only
- Ch: Chain
- Sl St: Slip Stitch
- WS: Wrong Side
- RS: Right Side
Instructions for Making the Best Dressed Vest Pattern:
Panel Construction (Make 2 Alike)
Panel Ribbing
The ribbing for the panel should be completed first.
- Ch 7. Note: To make the ribbing thicker, you may increase the initial Ch number.
- Row 1: SC in the 2nd Ch from the hook. SC in the next 5 Sts. Turn. (6 Sts).
- Row 2: Ch 1. SC BLO in every stitch. Turn. (6 Sts).
- Repeat Row 2 until Row 30(32, 36, 40, 44, 48, 52). Note: You can continue the ribbing until it holds up against where it will sit on your waist.
Main Body Section
Continue the pattern directly on top of the completed ribbing.
- Row 1 (RS): DC in every St on top of the ribbing. This number of DC will equal the number of rows completed in the ribbing (e.g., 32 ribbing rows = 32 DC across). Turn. < 30(32, 36, 40, 44, 48, 52) Sts >.
- Row 2: Ch 2. DC in every St until the end of the row. Turn.
- Repeat Row 2 until Row 8 (9, 10, 11, 12, 12, 13). Sl St. Fasten off.
Shaping Armholes
Join the yarn at the 4 (4, 4, 4, 5, 5, 5)th St.
- Row 9 (10, 11, 12, 13, 13, 14): DC across, leaving the last 4 (4, 4, 4, 5, 5, 5) Sts unworked. Turn.
- Repeat this row until Row 16 (17, 20, 22, 24, 24, 25). Note: You can add or remove rows to adjust the vest length. Do not fasten off.
Shaping Shoulders
Begin the shoulder shaping immediately.
- Row 17 (18, 21, 23, 25, 25, 26): Ch 2. DC in the next 6 (6, 7, 8, 9, 10, 11) Sts. Turn.
- Repeat the previous row once more. Sl St. Fasten off.
- Shape Other Shoulder: Attach yarn to the other side of the panel. Ch 2. DC in the next 6 (6, 7, 8, 9, 10, 11) Sts.
- Repeat this row once more. Sl St. Fasten off.
Assembly and Ribbing Attachment
Seaming
Lay both finished panels on top of each other.
- Seam the shoulders using a whip stitch.
- Seam the sides up to Row 8 (9, 10, 11, 12, 12, 13), including the bottom ribbing, using a whip stitch.
- Once seaming is done, the vest is on the WS.
Arm Ribbing (Make 2 Alike)
This ribbing is attached to each armhole.
- Ch 4 (4, 4, 4, 5, 5, 5).
- Row 1: SC in the 2nd Ch from the hook. SC in all Sts until the end of the row. Turn.
- Row 2: Ch 1. SC BLO in every stitch. Turn.
- Repeat Row 2 until Row 32 (34, 36, 40, 44, 48, 52).
- Attach the ribbing to each arm using a whip stitch on the WS of the vest.
Collar Ribbing
This ribbing is attached around the neck opening.
- Ch 3. Note: Increasing the initial Ch number will create a higher collar or a turtleneck.
- Row 1: SC in the 2nd Ch from the hook. SC in the next 1 St. Turn. (2 Sts).
- Row 2: Ch 1. SC BLO in every stitch. Turn. (2 Sts).
- Repeat Row 2 until Row 36 (40, 44, 48, 52, 56, 60).
- Attach the ribbing to the collar using a whip stitch on the WS of the panel.
- Weave in all ends, then turn the vest inside out to finish.